Support and prepare new managers with the Automated New Manager survey.
In this article:
An HRIS integration is highly recommended to automate the data transfer between your organization and Quantum Workplace.
HRIS integrations automatically recognize and communicate new manager events in your organization to automatically launch New Manager surveys.
Overview
Acquiring a direct report and becoming a manager is an exciting and potentially stressful event in any professional career. With the automated New Manager survey, this becomes an opportunity for managers to reflect on their position and receive the resources and support they need to lead people effectively.
For organizations new to Quantum Workplace, new managers are retroactively invited to participate in the New Manager survey. Newly promoted managers, up to 30 days in the past, will be automatically invited.
Quantum Workplace can only monitor your organization for new managers once the feature is enabled. New managers prior to the feature being enabled will not be automatically captured. Please contact your CIM or Support for additional assistance.
This article covers automated New Manager surveys, learn more about launching automated surveys.
Requirements
- Available to admin and survey-admin users
New Manager Template
Quantum Workplace provides a curated New Manager template for new manager events in your organization. This template is designed to supplement an organization's existing training & resources and provide new managers with the support they need.
Questions included in the New Manager template include:
- I am aware of resources available to me as a manager.
- I am receiving coaching and support on my new role as a manager.
- I am comfortable building trust with members of my team.
- Rank the top three barriers you are currently facing as a new manager or anticipate needing help with in the future.
- What resource or support would best help you as a new manager in the next one to two months?
The template can be further customized for your organization's unique situations. Questions can be edited, removed, or added in the Questions step of the survey creation process.
How to Launch an Automated New Manager Survey
Survey creator navigation links:
To launch an Automated New Manager survey,
- Click and expand the Administration drop-down menu in the left-hand navigation menu
- Click Surveys & Pulses
- Select the New Manager template and Use this template
- When deciding on a template, the New Manager template is highly recommended. However, other Best Practice templates, your organization's templates, or the option to create your own questions are still available.
Survey Details
On the Survey Details page:
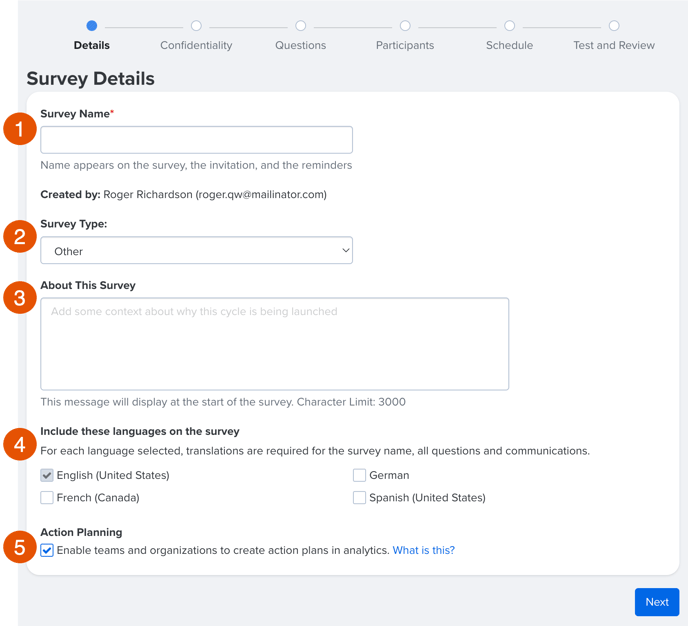
- Enter a title for the survey as it should appear for survey takers
- The use of special characters in the survey title can affect survey exports, learn more about which characters are compatible with successful exports
- Click and expand the drop-down menu to select the survey type
- Optionally, provide more context for the survey
- If the survey should include other languages, check the corresponding box and provide the necessary translations later in the setup, learn more about survey languages and translations
- Check this box to enable Action Planning for this survey, learn more about Action Planning
Click Next to continue to the Confidentiality step.
Confidentiality
Quantum Workplace offers different confidentiality options for each survey to best match the confidentiality needs of the survey and the organization.
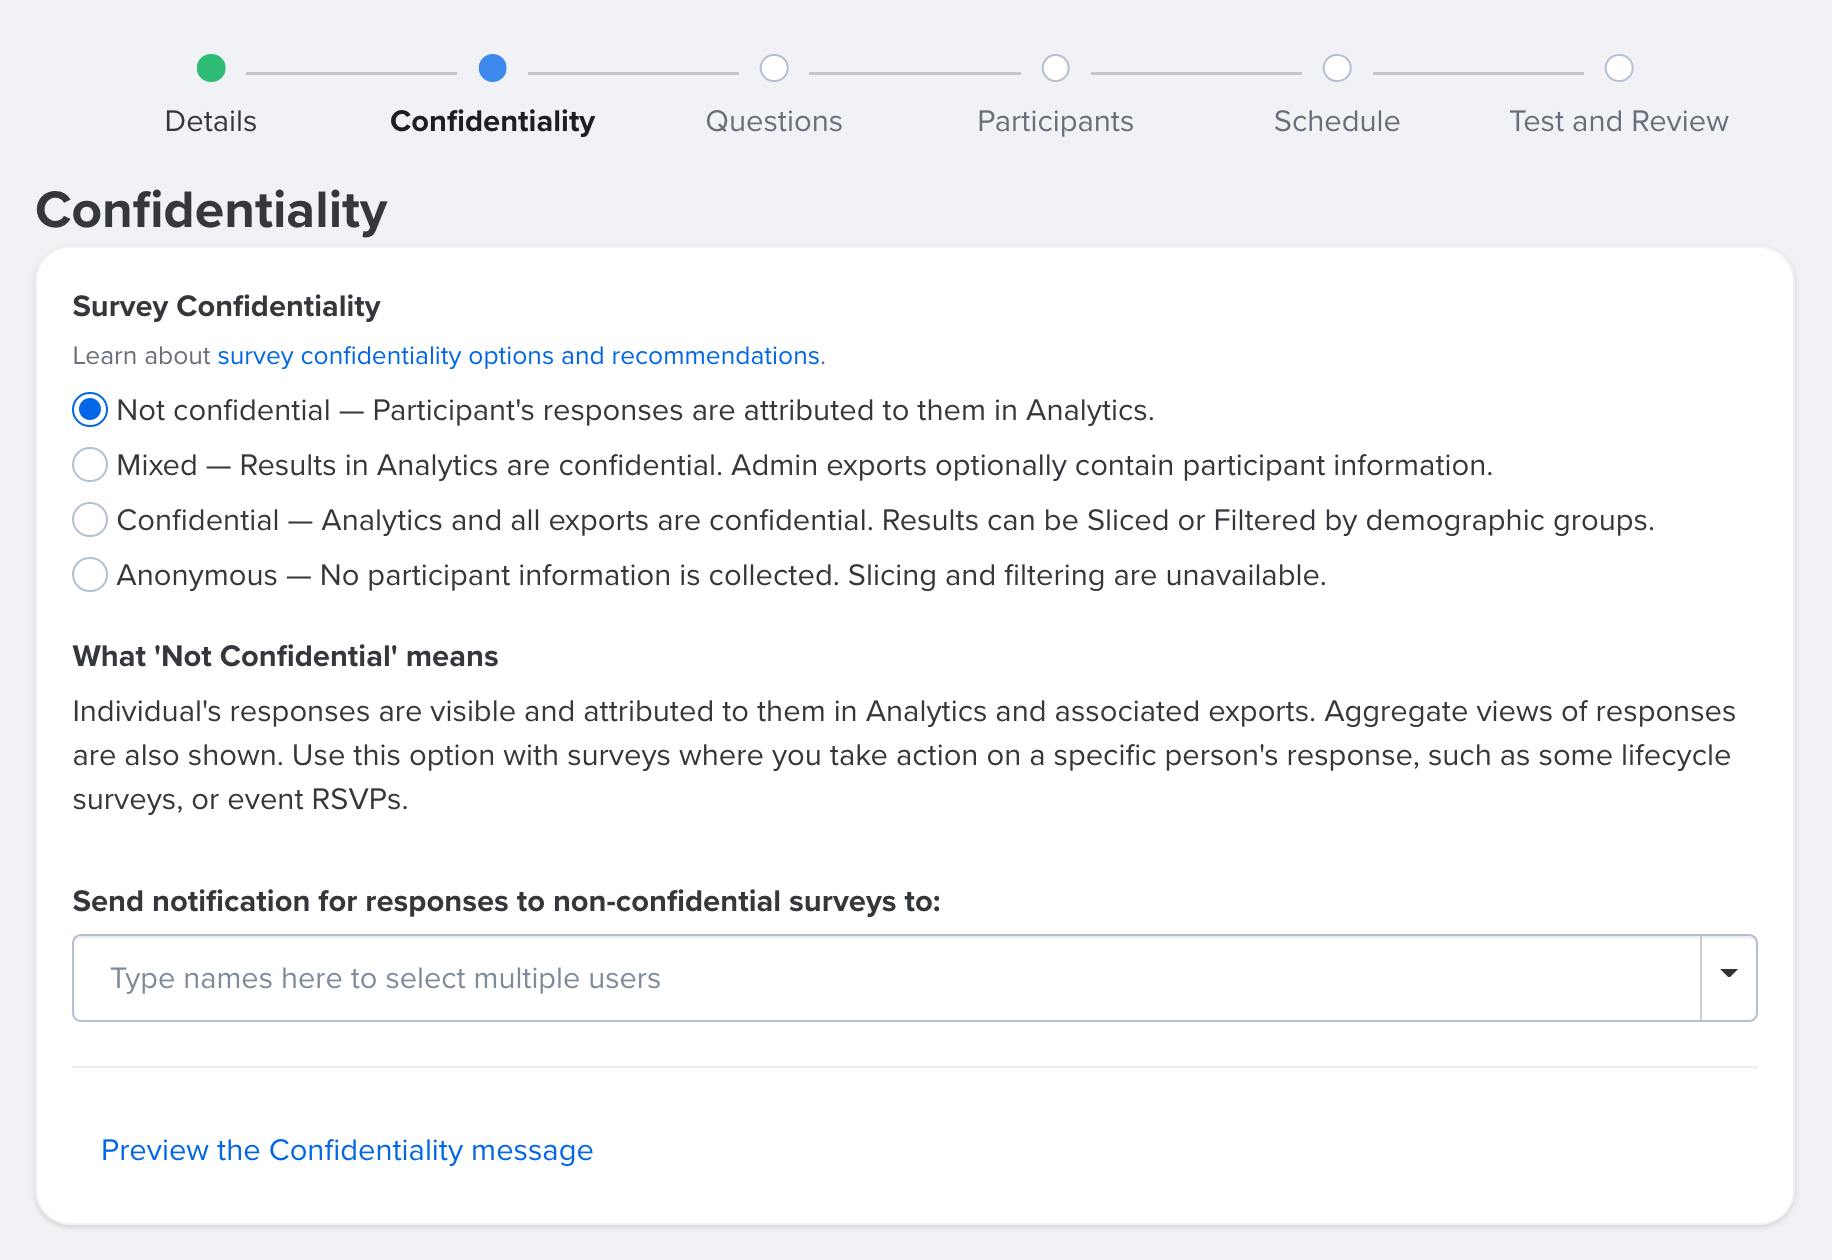
Select among the different confidentiality options:
- Not Confidential does not hide any identifiable information, the participant's responses are visible and attributed to them
- Optionally, enter any users who should be notified when a participant completes the survey
- Mixed maintains a participant's confidentiality in Analytics, an admin export can be configured to contain participant information
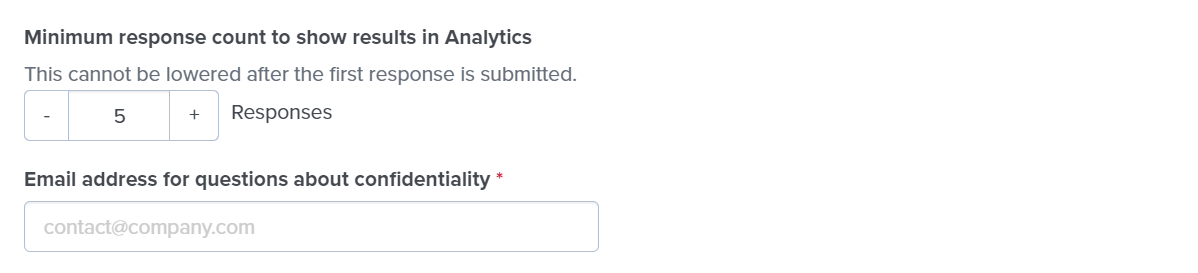
When selecting Mixed, specify the minimum number of responses required to display the results in Analytics. Learn more about the minimum response count- In the Email address for questions... field, enter an email address for survey participants to contact should they have any questions
- Confidential keeps all results hidden and non-attributed, Analytics can slice and filter the results by demographics
-

When selecting Confidential, specify the minimum number of responses required to display the results in Analytics. Learn more about the minimum response count
- Anonymous does not collect any participant information and prevents any slicing or filtering when viewing the analytics
Learn more about survey confidentiality.
Click Next to continue to the Questions step.
Questions
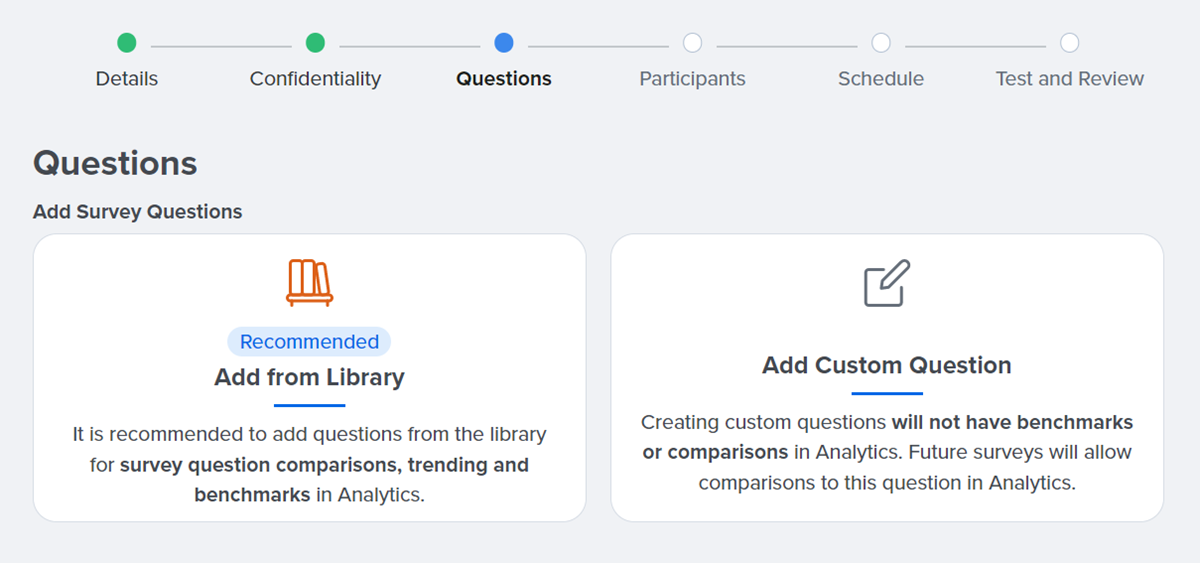
From the Questions page, you can add, rearrange, and edit your questions.
If you selected a template at the beginning of the survey creation process, those questions will be listed on this page.
If you selected Create Your Own Survey, this is where you will add questions for your survey, either via the Library or custom questions. Learn more about creating survey questions.

- Under the menu to the left of the question list, you have several options to modify your survey's questions:
- Add from Library: Add a question from Quantum Workplace's Best Practice library or from past surveys
- Add Custom Question: Create a custom question
- Note: Custom questions do not provide benchmark or trending data
- Add Section: Create a section to visually organize survey questions
- Survey Question Export: Export your current list of questions in detail
- Logic: Configure questions to ask follow-up questions based on responses or limit who can see a question, learn more about Survey Logic
- Styling: Customize the survey color and logo, learn more about Survey Styling
- Preview Survey: Click View to preview a finalized version of the survey, and click Share to copy the URL of the preview to your web browser's clipboard
- View and edit the questions currently included in the survey
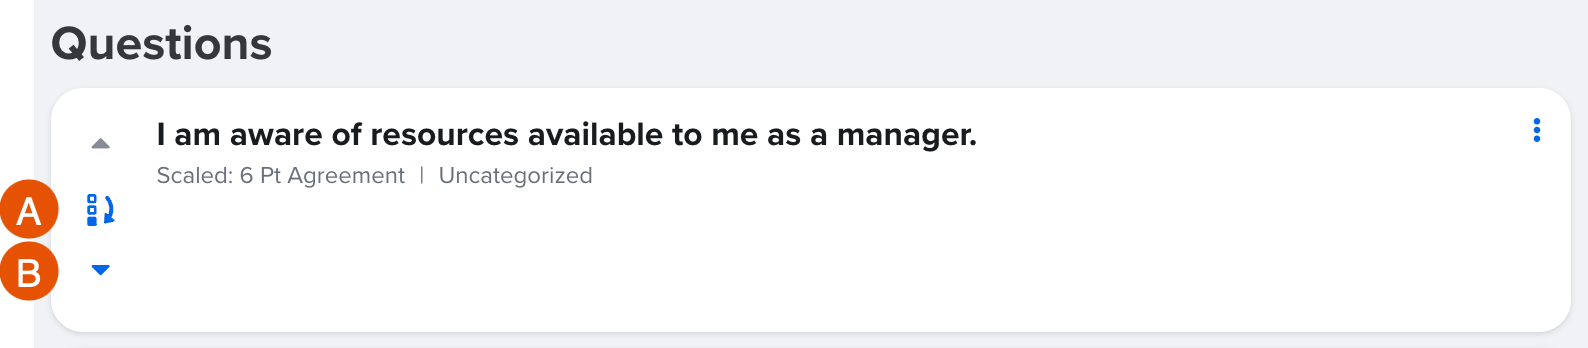
- Click the Move Question icon (Figure A) to open a modal and specify the question's position before or after a specified question/ section
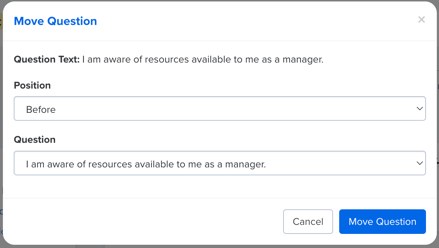
- Click the up and down arrows (Figure B) to rearrange the question one place earlier or later, respectively
- Click the Move Question icon (Figure A) to open a modal and specify the question's position before or after a specified question/ section
Click Next to continue.
Participants
On the Participants page, specify the automatic triggers and how survey takers can access the survey.
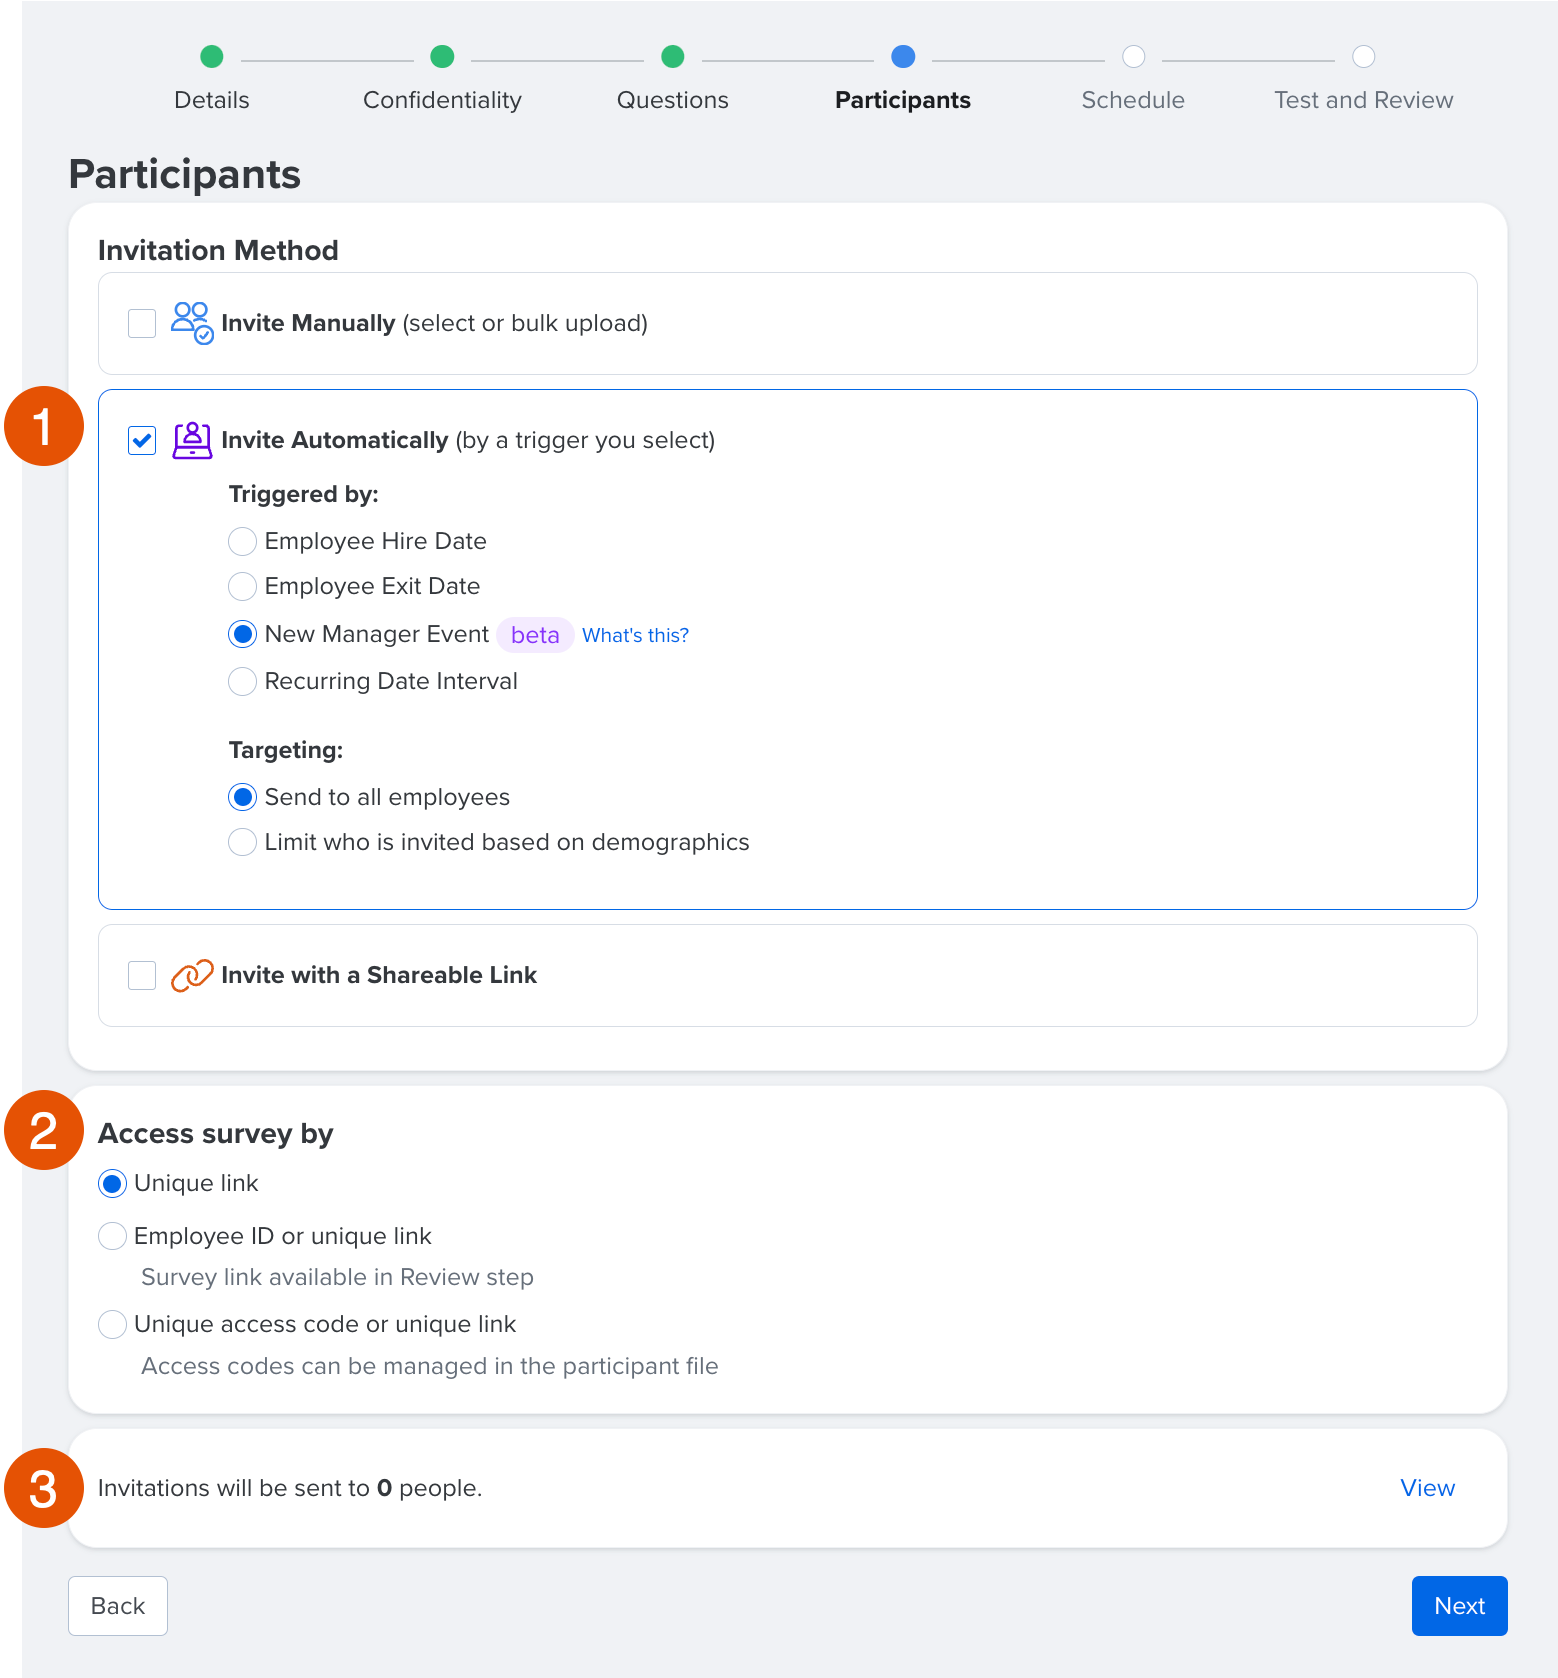
- Under Invitation Method, select Invite Automatically
- Under Triggered by, select New Manager Event
- Under Targeting, select whether the invite is sent to anyone who qualifies for the trigger or whether demographics should be added as an additional qualification layer via included/excluded demographics
- Specify how survey takers can access the survey
- Unique Link: Participants receive a unique link in their email inbox that opens their survey
- Employee ID or Unique Link:
- Employee ID: Participants receive a generic invitation link in their email inbox that requires participants to enter their employee ID to open their survey
- Unique Link: Participants receive a unique invitation link in their email inbox that opens their survey
- Unique Access Code or Unique Link
- Unique Access Code: Participants receive a generic invitation link in their email inbox that requires participants to enter a manageable custom access code to open their survey, learn more
- Unique Link: Participants receive a unique link in their email inbox that opens their survey
Click Next to continue to the Schedule page.
Schedule
On the Schedule page, specify dates and times for invitations, deadlines for participants, and optionally, reminders.
Click What will my emails look like? in the top-right to preview your communication from a participant's point of view.
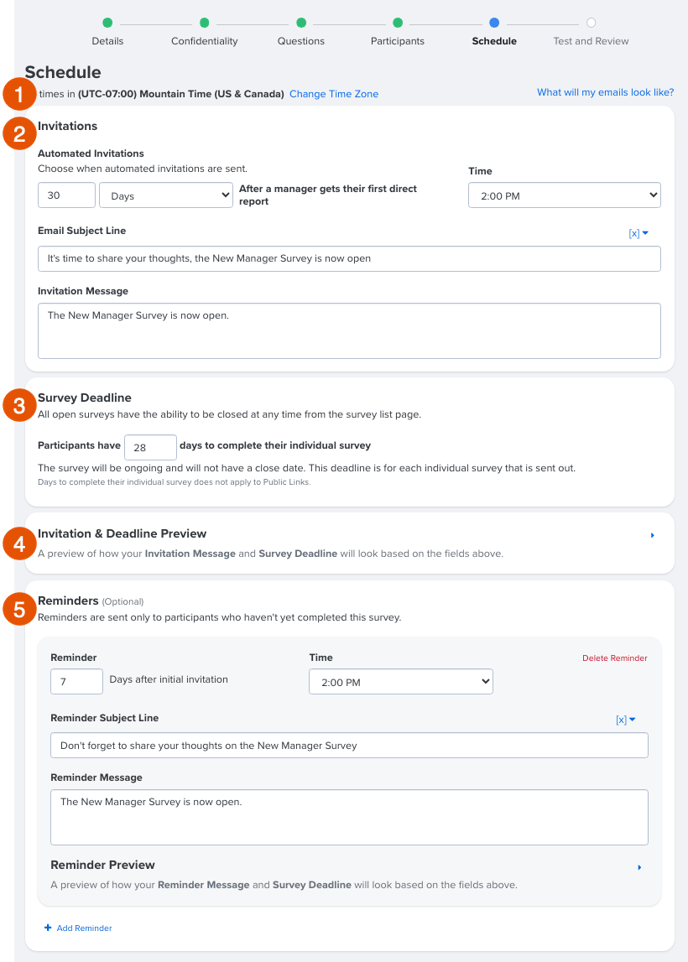
- Time Zone: Click Change Time Zone to update the time zone reflected in the survey setup
- Invitations: Specify when invitations are automatically sent out
- Optionally, customize the text in the Email Subject Line and/or Invitation Message to add context or instructions for participants
- Survey Deadline: Specify how many days the survey remains open for individual participants
- Invitation Preview: Expand the card to view a live preview of the survey's email invite
- Reminders: Optionally, configure when reminders are sent to participants and their messaging
- Optionally, customize the text in the Reminder Subject Line and/or Reminder Message field to add context or instructions for participants
- Click + Add Reminder to add an additional reminder
Click Next to continue to the Test & Review page.
On the initial Survey Details page, if you selected additional languages, you'll instead be navigated to the Languages page.
Languages
If you specified that a survey is offered in another language, besides English, you will see the Languages page following the Schedule page. If your survey is only in English, you will see the Review page instead.
From the Languages page, enter translations for the survey title, description, reminders and each question. Learn how to add translations individually or in bulk.
Click Next to continue to the Test & Review page.
Test & Review
On the Test & Review page, review the key details and dates for your survey before finalizing and scheduling the survey.
Learn more about testing and previewing surveys prior to launch.
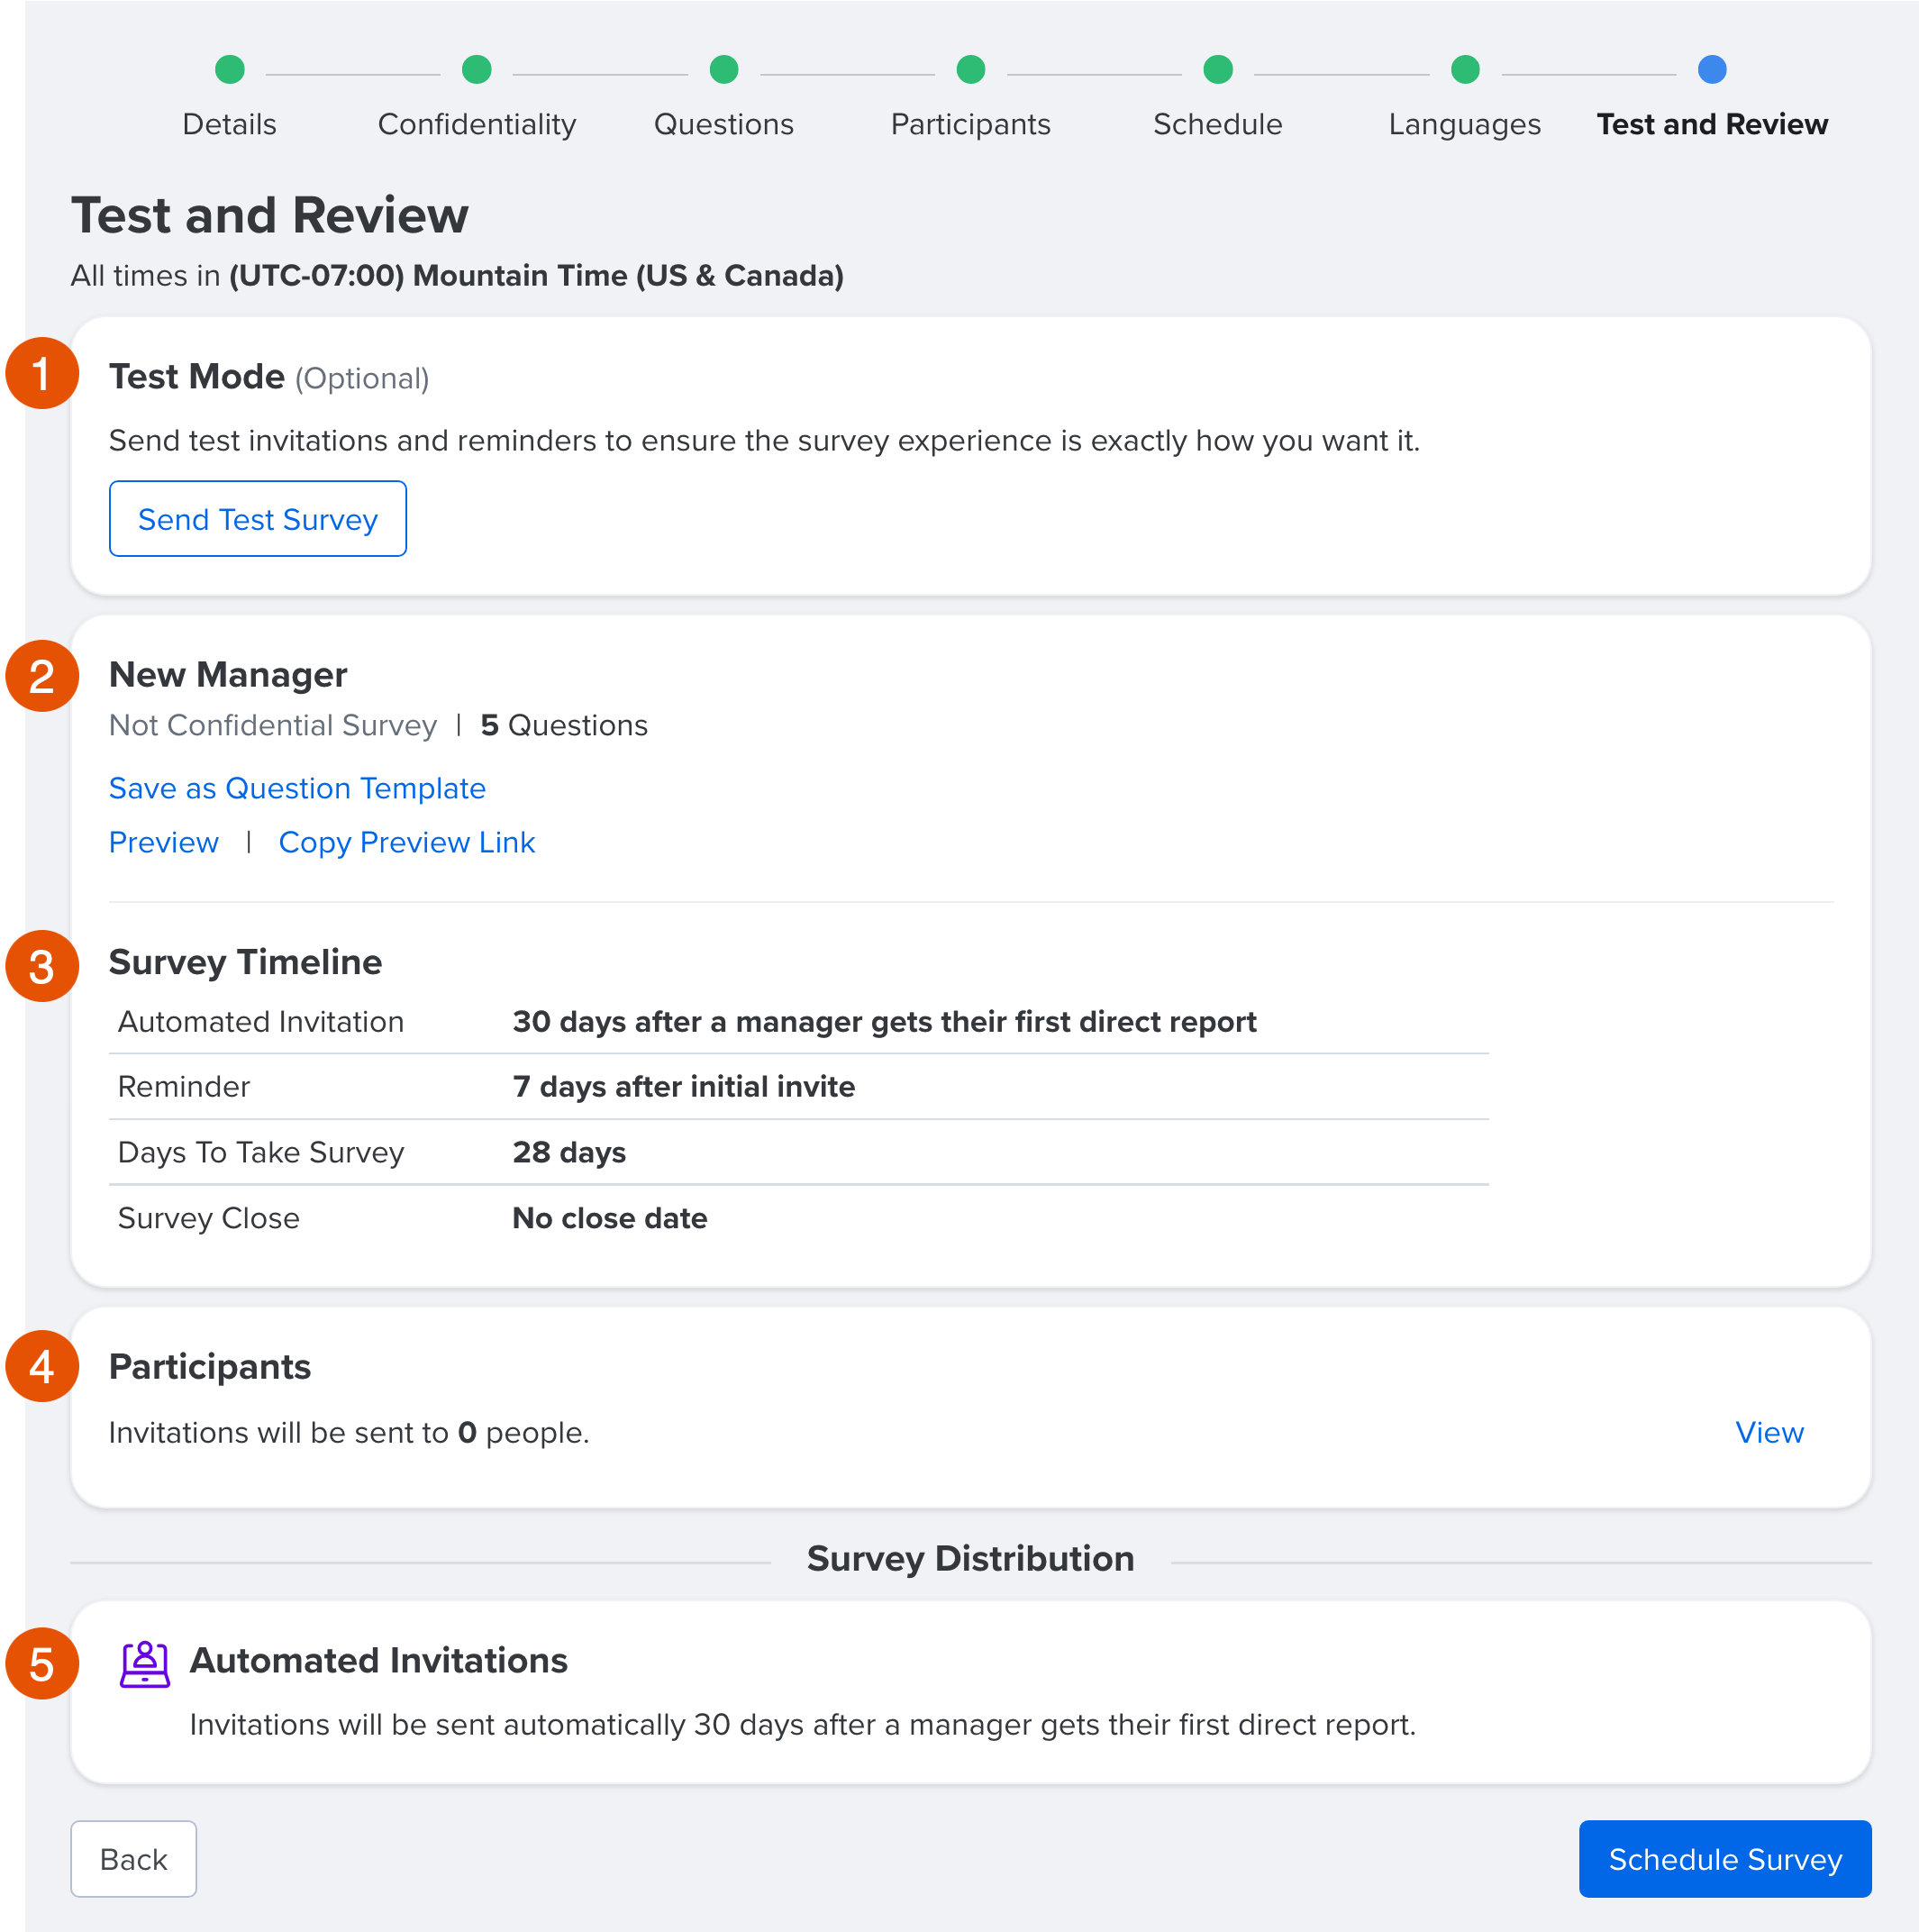
- Under Test Mode, optionally, click Send Test Survey to preview the survey invitations and any reminders
.gif?quality=high&width=688&height=474&name=2023-01-13_17-10-45%20(1).gif)
- Under New Manager:
- Click Save as Question Template to save the included questions for future surveys
- Click Preview to preview the survey from a participant's point of view
- Click Copy Preview Link to copy the link to your device's clipboard, useful for giving a colleague a preview of the survey
- Under Survey Timeline the scheduling details are listed. To make an edit to the scheduling, click the Schedule navigation node along the top of the screen
- In the Participants card, the number of current queued participants will be listed, click View to see a list of survey participants that can be filtered by various demographics
- In the Survey Distribution section, you'll see the Automated Invitations rule for this survey
Look over your survey details and confirm they're configured correctly for your New Manager survey.
Once you're satisfied, click Schedule Survey or Launch Survey to finalize the survey setup.
How to Launch an Automated New Manager Survey (Legacy)
To launch an automated New Manager survey, click and expand Administration in the left-hand navigation menu, then click, Surveys & Pulses.
From the Surveys & Pulses page, click New Survey in the top-right. In the modal that appears, click Automated Survey to start creating your survey.
When deciding on a template, the New Manager template is highly recommended. However, other Best Practice templates, your organization's templates, or the option to create your own questions are still available.
Survey Details
On the first page of the survey setup process, enter the survey's name, included languages, new survey trigger, and whether to enable Action Planning.
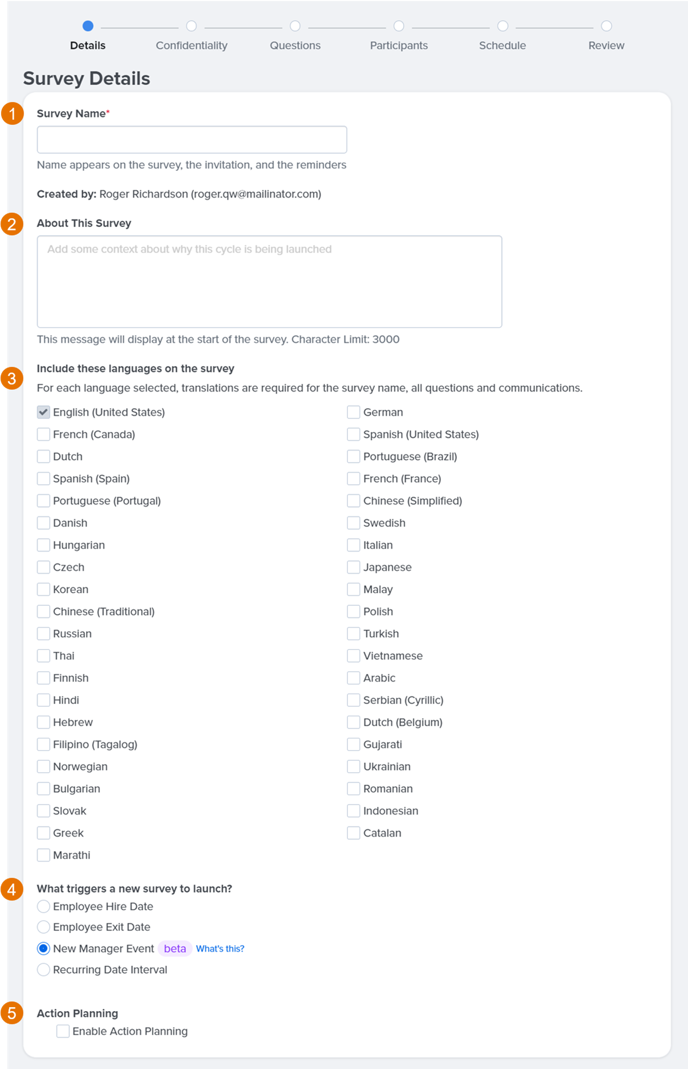
- Survey Name: The title of the survey as it will appear on the survey, invitations, and reminders
- About This Survey: Optionally, enter any context useful for survey participants
- Languages: If the survey should include other languages, check the corresponding box and provide the necessary translations later in the setup. Learn more about survey languages and translations
- Launch Triggers: Specify what event causes a survey launch, in this case, select New Manager Event. A New Manager Event is triggered when a manager receives their first direct report
- Action Planning: Check this box to enable Action Planning for this survey, learn more about Action Planning
Survey Confidentiality
Quantum Workplace offers different confidentiality options for each survey to best match the confidentiality needs of the survey and the organization.
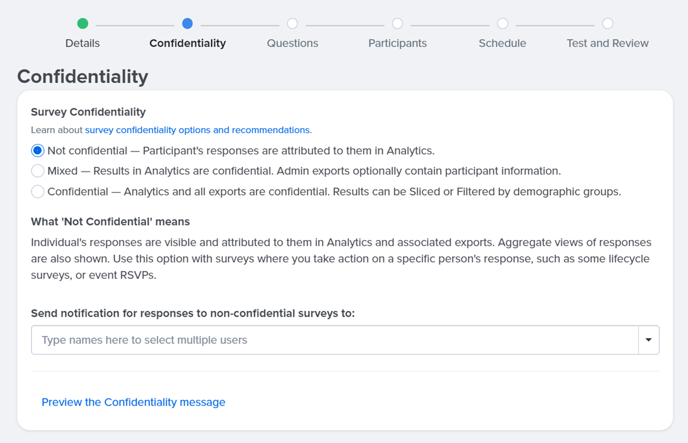
- Not Confidential does not hide any identifiable information, the participant's responses are visible and attributed to them
- Optionally, enter any users who should be notified when a participant completes the survey
- Mixed maintains a participant's confidentiality in Analytics, an admin export can be configured to contain participant information
When selecting Mixed, specify the minimum number of responses required to display the results in Analytics. Learn more about the minimum response count
In the Email address for questions... field, enter an email address for survey participants to contact should they have any questions
- Confidential keeps all results hidden and non-attributed, Analytics can slice and filter the results by demographics
When selecting Confidential, specify the minimum number of responses required to display the results in Analytics. Learn more about the minimum response count
Learn more about survey confidentiality.
Questions
If you selected a Best Practice template at the beginning of the survey setup, you will see those questions listed on this page.
If you instead selected Create Your Own Survey, you can now add questions from Quantum Workplace's library of questions or create your own.
To edit or delete a question, click the question's corresponding ⋮ icon. To rearrange the order of a question, click and drag the question's ⋮⋮ icon to the desired order.
Participants
In the Participants step, determine who should be invited to complete the survey and how they can access the survey.
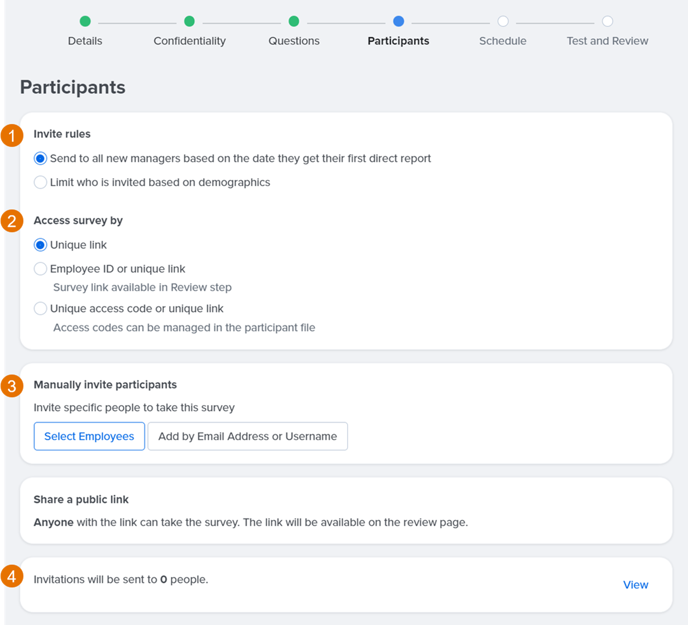
- Invite Rules: Determine how the automated survey will send out invites
- Based on the date of the first direct report: When a manager receives their first direct, an automatic invite will be sent out after a determined time period, this time period is customized on the next page
- Based on demographics: Enter demographics to Include and Exclude to have automatic invitations sent to the right audience
- Access Survey By: Specify how participants can access and complete the survey
- Manually Invite Participants if the specific employees aren't included in the configured invite rules
- List of Survey Invitations displays every employee who falls under the invite rules and can expect a survey invitation
Schedule
On the Schedule page
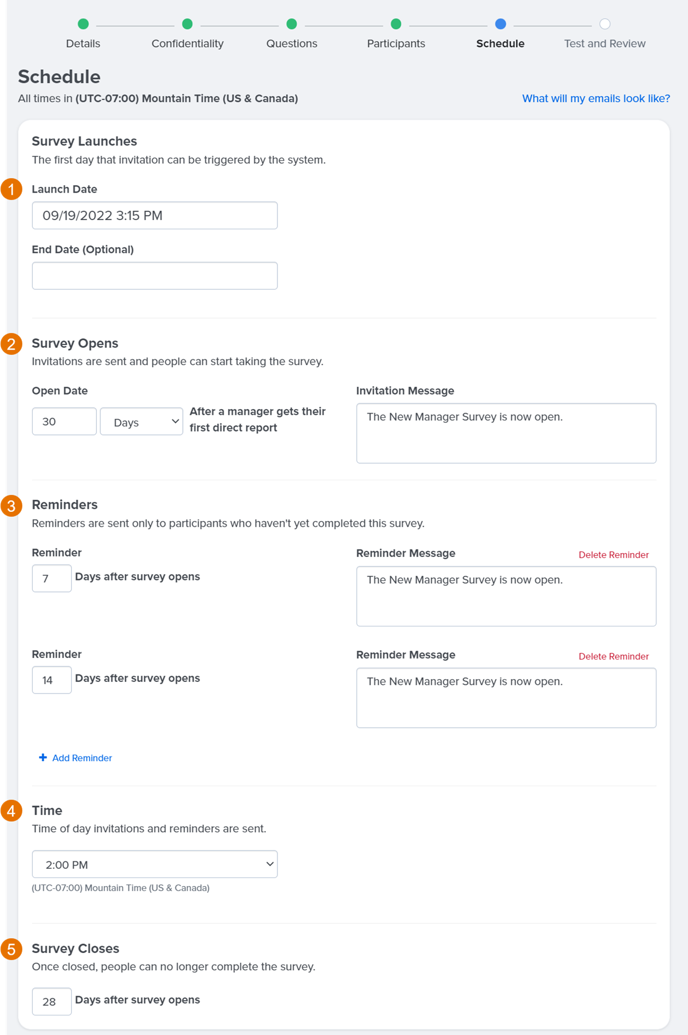
- Launch & End Date: The customizable date and time the survey is set to launch, and optionally end
- Survey Opens: Choose when the survey opens for managers once they have their first direct report- the time interval can be set according to days, weeks, or months
- Reminders: Determine when reminders are sent to participants- reminders can be deleted or additional reminders can be added
- Time: To account for employees who may be in different timezones, enter what time invitations and reminders should be sent
- Survey Closes: Decide when a survey is closed- participants will not be able to complete the survey after the close date
Test & Review
The final Test and Review screen lists the details and settings of the survey as you've configured them.
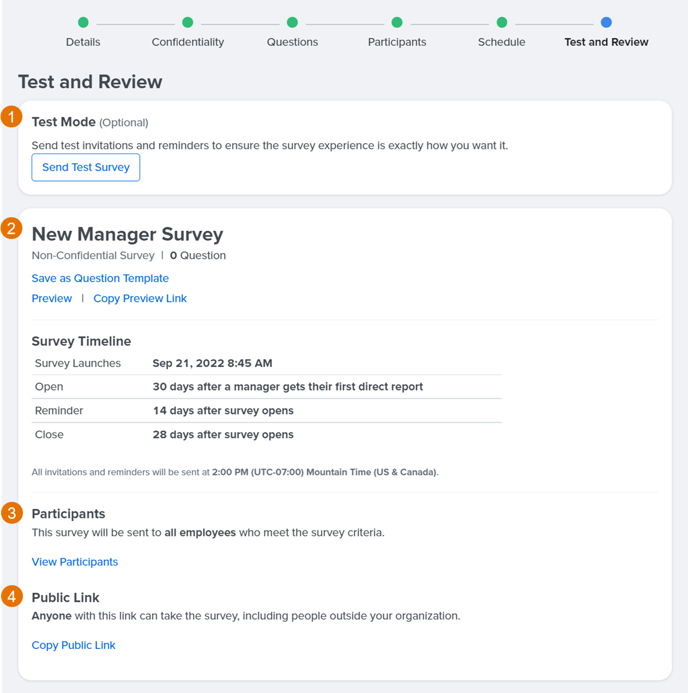
- Test Mode allows you to test the invitation and reminder messages before the survey is launched, the test emails can be sent to specified users within your organization
- Preview the questions and save the questions as a template for future use. The Survey Timeline details the life of the survey, from launch to close, and everything between
- Participants briefly cover the invite rules set on the Participants page and allow you to view a list of all participants
- Public Link provides a button to quickly copy the survey's URL to send to survey participants