In this article:
- Discover the Magic of SSO
- Why Your Company Will Appreciate SSO
- How SSO Streamlines Access to Quantum Workplace
- How to Enable SSO for Your Organization
- In Conclusion
- FAQs
Discover the Magic of Single Sign-On (SSO) ✨
Welcome to the world of Single Sign-On (SSO)! Imagine a login experience that’s as smooth as a perfectly brewed cup of coffee—no more juggling passwords or losing track of login information.
With SSO, your employees can quickly log in to Quantum Workplace using their existing organizational credentials, making their workday more seamless.
🔐 Why enable SSO?
Teams that use Single Sign-On (SSO) see measurable boosts in platform engagement:
-
✅ Employees are 38% more likely to complete their goals
-
✅ Employees are 9% more likely to respond to feedback requests
-
✅ 1:1 facilitators are 13% more likely to share agendas and notes
Why Your Company Will Appreciate SSO 👏
Single Sign-On (SSO) offers employees a frictionless login to Quantum Workplace—no extra passwords to remember, just one secure master key for all their essential resources.
By centralizing authentication through your identity provider (IdP), SSO delivers customizable security controls, and automatically removes access for terminated employees.
Plus, it supports data privacy and compliance, ensuring proper authentication and access management every step of the way.
How SSO Streamlines Access to Quantum Workplace ⚡
Let’s walk through how SSO simplifies access, using the scenario of a manager receiving a notification about newly available Survey Analytics:
A Step-by-Step Example:
Notification Arrival:
One-Click Access:
- Picture this: it’s Monday morning, and your manager receives an email notification indicating that new Survey Analytics are available for review.
SSO Magic in Action:
- The manager clicks on the link in the email that takes them straight to the Survey Analytics section in Quantum Workplace.
- If logged into their Identity Provider:
- Since they are already logged into their organizational Identity Provider (like Azure AD or Okta), they simply enter their username (if required) and voilà—no password required! They are instantly directed to the Survey Analytics without any additional hoops to jump through.
Direct Access to Analytics:
- If not logged in:
- If the manager isn’t logged in, they are prompted to enter their credentials. However, they are still greeted with a familiar login screen and can quickly gain access once they input their details.
Enhanced Decision-Making:
- Once logged in, the manager lands directly on the Survey Analytics page, ready to dive into the data without any distractions or extra clicks. It’s seamless—just like enjoying a beautifully brewed cup of coffee!
- With easy access to their analytics, the manager can make informed decisions faster. This not only keeps them engaged but also boosts overall productivity across the team.
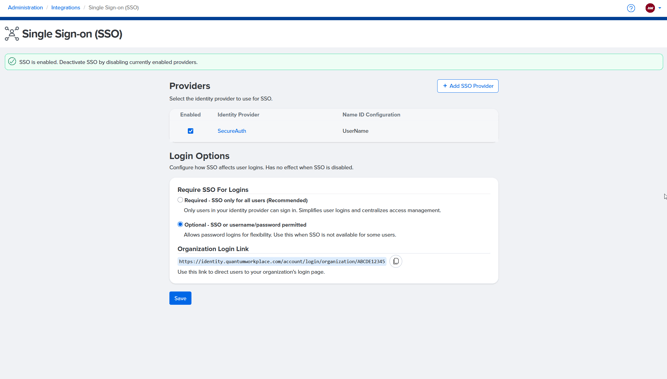
How to Enable SSO for Your Organization 🔓
So, are you ready to enhance your organization with SSO? Here’s how to set it up and start enjoying the benefits:
- Access Administration Settings:
- Click and expand Global Settings in the left-hand navigation menu.
- Click Integrations from the menu that follows.
- Initiate the SSO Workflow:
- Click on the Single Sign-On (SSO) card from the Integrations screen, and let’s get started!
- Select Your Identity Provider:
- Choose your Identity Provider from our list of favorites:
- If your provider isn’t listed, select Other, and we’ll help you coordinate the setup.
- Upload Your Metadata:
- Click Browse Files to upload your identity provider’s metadata file.
What is Metadata, you ask? 💭
Think of the 'metadata file' like a set of instructions your login system needs to connect with Quantum Workplace. it’s what helps the two systems talk to each other securely.
-
- Specify the unique identifier for your organization’s SSO configuration. EmployeeID is a solid choice for consistency.
- Specify whether SSO is required for all users or optional. If required, users must log in through SSO; if optional, users can log in using either SSO or standard credentials.
-
We recommend requiring SSO if all users in your organization can sign in through your identity provider, as it simplifies logins, centralizes access management, and enhances security.
6. Review and Activate:
-
- Double-check your configuration, then click Activate SSO to complete the setup.
🎉 Once you see the “Mission Accomplished” modal, you’re ready to enjoy everything SSO has to offer!
7. Copy Your Organization Login Link
After activation, Admins can copy a direct login link for their organization from the SSO Providers page.
This link directs users to the appropriate login flow based on your configuration.
-
- If SSO is required, users will be automatically routed to your external identity provider.
- If SSO is optional, users will see a screen where they can choose to log in with SSO or standard credentials.
💡 Tip: This link is perfect for sharing with employees or bookmarking internally—it automatically adapts to your SSO setup.
In Conclusion ⬇️
Integrating Single Sign-On (SSO) is a smart step toward enhancing the login experience for your employees. By simplifying access and boosting productivity, you’ll create a more efficient and engaged workplace.
Don’t hesitate to connect with your IT department today and unlock the many advantages of SSO—it’s time to make logging in a breeze! 💫
Single Sign-On (SSO) FAQs❓
Q: Can SSO be optional for some users?
A: Technically, yes, Administrators can set SSO as either required for all users or optional. When optional, users may log in with either their SSO credentials or their standard Quantum Workplace username and password.
- We recommend requiring SSO when it is supported for all users to ensure stronger security and a consistent login experience. The only reason to keep SSO optional is if certain users cannot use SSO due to system compatibility or other technical limitations.
Q: With shared computers, how does SSO benefit us?
A: SSO can actually simplify logins on shared devices. Instead of needing to remember separate usernames and passwords for Quantum Workplace, users log in using their existing company credentials (like their Microsoft or Google account). This reduces password fatigue and improves security—especially helpful when employees rotate across shared devices.
Q: If we don’t use SSO in our day-to-day now, would turning it on for Quantum Workplace benefit us?
A: Yes—many organizations find that even if SSO isn’t broadly adopted across all tools, enabling it for Quantum Workplace increases adoption and even reduces internal support requests. It’s easier for your users to access the platform, and admins gain more control over user authentication. Plus, it supports better compliance and security practices.
Q: Who do we contact internally if we have questions about SSO?
A: That typically depends on your organization’s setup. If your company has an IT or systems administrator, they’re usually the best resource for SSO questions or setup support. If you’re unsure who that is, your HR or operations team may be able to point you in the right direction.
If you're feeling stuck, you can always reach out to our Support team for assistance!
One HR platform for connected talent insights. See how Quantum Workplace brings your data together across 1-on-1s, talent reviews, performance reviews, and more—so you can spot trends, act fast, and make more informed people decisions. Explore the interactive product tour or request a personalized demo with your Customer Success Manager.