Last Updated: June 16, 2026
In this article:
- Overview
- What Are Groups Used For
- Auto-Created Groups
- Creating Custom Groups
- Editing Custom Groups
- FAQs
Note: As Assembly features are being incorporated into Quantum Workplace, some users may see a slightly different experience than what is described in this article. The content below reflects the Quantum Workplace Rewards & Recognition platform experience.
Overview
Groups let you organize employees for targeted recognition, announcements, and point distributions. Assembly creates automatic groups based on your org structure, and you can create custom groups for ultimate flexibility.
What Are Groups Used For
- Give recognition or awards to entire teams or departments
- Share announcements with specific groups
- Distribute points to groups (earning or giving allowance)
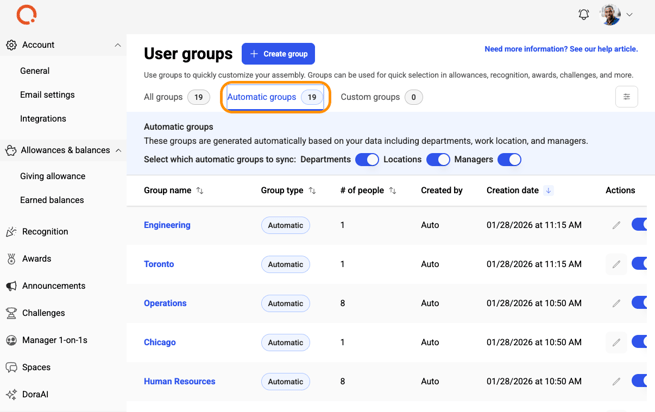
Auto-Created Groups
Assembly automatically creates groups based on your employee data:
- Department groups: Based on departments in your database
- Work location groups: Based on work locations in your database
- Manager group: All employees with manager role
Managing Auto-Created Groups
By default, all auto-created groups are activated. You can:
- Click Recognition in the left navigation
- Select your profile picture in Assembly, then click Admin
- Click User management in the left navigation
- Select 'User groups'
- Click the 'Automatic groups' tab
- Toggle group types on/off (affects all related groups)
- Toggle individual groups on/off
- Reactivate anytime by clicking the toggle
Note: When new departments or locations are added to your database, groups are automatically created and activated.
Creating Custom Groups

- Click Recognition in the left navigation
- Select your profile picture in Assembly, then click Admin
- Click User management in the left navigation
- Select 'User groups'
- Click 'Create group'
- Enter a group name
- Add employees via individual selection, bulk CSV, or criteria
- Click 'Save'
Adding Employees to Groups
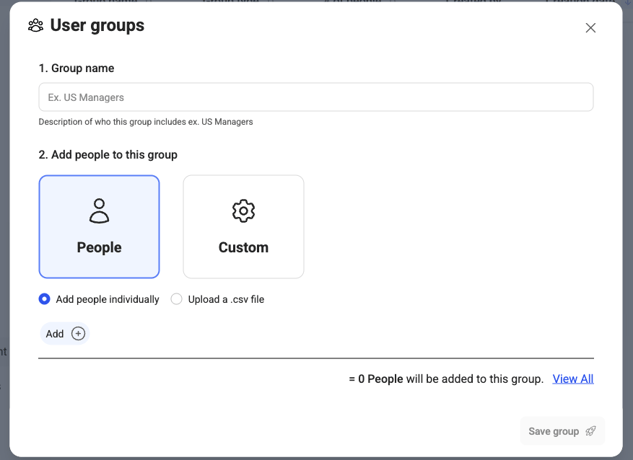
Add individually:
- Select 'People' option
- Select 'Add people individually'
- Click '+Add'
- Search and select employees
- Remove by clicking the 'X' next to their name
Bulk add:
- Select 'People' option
- Select 'Bulk add users'
- Paste emails comma-separated or upload a CSV
- Emails must match valid active, pending, or queued users
Adding by Criteria (Dynamic Groups)
Create groups that automatically update as employees change:
- Select 'Custom' option
- Select criteria: Role, Department, Work location (optional for each)
- Choose 'Match ALL' (must match all selected) or 'Match ANY' (match any selected)
- Save the group

Examples:
- ALL criteria: Engineering Managers in Los Angeles (must match all 3)
- ANY criteria: All managers, all engineers, all LA employees (matches any)
Editing Custom Groups
- Next to the group, click the 'Edit' pencil icon
- Add/remove people or update criteria
- Click 'Save'
- Changes reflect immediately everywhere groups are used
Group Impact on Existing Recognitions
If an employee is removed from a group:
- Past recognition they received remains
- Next time you select that group, they won't be included
If a new employee joins a group:
- Past announcements shared with the group are accessible to them
- They appear in the group for future actions
Frequently Asked Questions
Can I edit an automatic group?
No. You can only activate/deactivate auto-created groups. Create custom groups for specific control.
Can I combine individual people and criteria in one group?
Yes. You can mix both approaches when creating a custom group.
What happens if I delete a custom group?
Past recognition or announcements shared with that group remain; the group is removed from future selections.