Last Updated: June 16, 2026
In this article:
- Overview
- Supported HRIS Platforms
- Setting Up an HRIS Connection
- Configuring Single Sign-On
- Managing Your HRIS Connection
- Troubleshooting Common Issues
- FAQs
Note: As Assembly features are being incorporated into Quantum Workplace, some users may see a slightly different experience than what is described in this article. The content below reflects the Quantum Workplace Rewards & Recognition platform experience.
Overview
Connecting your Assembly to an HRIS allows you to automatically manage members, populate employee profile information, and keep your organization up to date as employees join and leave.
Assembly supports multiple HRIS platforms and can maintain simultaneous connections to one or multiple providers. Only Assembly admins who also have admin access in your HRIS can set up these connections.
Supported HRIS Platforms
Assembly connects to a wide range of HRIS providers through our HRIS catalog. Rippling is a fully supported platform with detailed setup guidance, and other HRIS platforms follow a similar connection and configuration process.
To see all supported integrations, go to your admin panel, select Users > HRIS Connections, and click "See all integrations."
Setting up an HRIS Connection
Step 1: Authorize the Connection
- Click Recognition and Rewards in Quantum Workplace
- Select your profile picture in Assembly
- Click Recognition and Rewards Settings
- Click User management in the left sidebar.
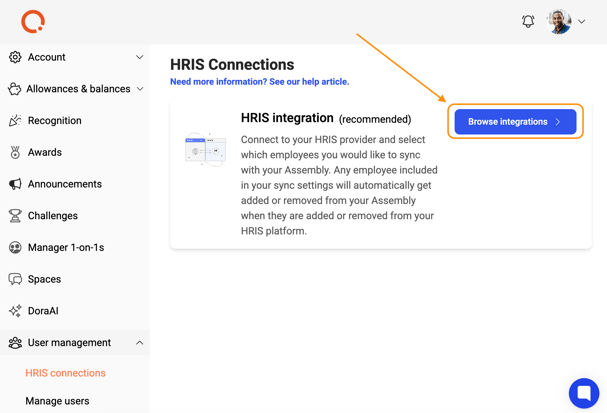
- Click HRIS connections
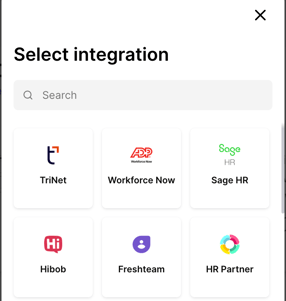
- Click "Browse integrations" to view supported HRIS providers.
- Select your HRIS provider.
- Enter the credentials required to connect. If you're unsure where to find them, click the help link within the connection modal.
- Click Submit.
- Upon successful connection, click "Finish" to proceed.
Note: Depending on the size of your HRIS account, the initial connection may take up to 30 minutes. You'll receive an email when it's complete.
Step 2: Configure Employee Sync Settings
After authorization, configure which employees should sync with your Assembly. You can sync everyone in your HRIS or create custom criteria targeting specific groups.
Sync Everyone
- Select 'Everyone' to add all employees from your HRIS to your Assembly.
- You can exclude individual employees by selecting them in the 'Exclude these employees' section.
Custom Sync Settings
Combine any of these criteria to target specific employee groups:
- Company/Office: Sync employees from selected office locations. If you don't select any, all offices are included.
- Groups/Departments: Sync employees in selected groups. If you don't select any, all groups are included.
- Employment Status: Sync by status (full-time, part-time, contractor, etc.). If you don't select any, all statuses are included.
- Exclude Employees: Exclude specific employees even if they match other criteria.
Matching Logic: ALL vs. ANY
Choose whether employees must match all criteria or any criteria:
- ALL: Employee must meet every selected criterion. Example: Syncs full-time engineering employees in Los Angeles only.
- ANY: Employee can meet any of the selected criteria. Example: Syncs anyone in Los Angeles, anyone in engineering across all locations, or any full-time employee.
Step 3: Choose Invitation Timing
After configuring sync settings, decide when to send invitations:
- Save & Queue Invites: Employees appear in the 'Queued' tab. Admins manually approve and send invitations when ready.
- Save & Invite Now: Invitations are sent immediately, and employees are activated in your Assembly.
Step 4: Set Approval Requirements for New Employees
Configure how new employees who join your HRIS should be handled:
- Admin Approval Required: New HRIS employees appear in 'Requested' status and require admin approval before receiving invitations.
- Automatically Approve New Employees: New HRIS employees are automatically approved and activated in Assembly.
Configuring Single Sign-On (SSO)
After the connection is established, you'll be prompted to set up SSO:
- Click Set up single sign on now.
- Go to your Assembly admin panel: Security & Login > SAML Authentication.
- Copy your Assembly ID from the provider callback URL.
- Paste it into the Rippling SSO setup and click Move to the next step.
- Choose whether to enable shared admin SSO (typically not recommended).
- Click Continue.
- Skip the group attribute step (it's already configured for Assembly).
- Complete the SSO configuration in Rippling, then return to Assembly to select your employees and configure sync settings (as described above).
Managing Your HRIS Connection
Data Syncing
Assembly imports the following employee details from your HRIS to populate profiles:
- Avatar, first name, last name, email
- Employee ID, manager, and direct reports
- Birthday, start date, job title, department, office location, home location
Data syncs automatically every 6 hours and whenever updates are detected in your HRIS. You can also manually trigger a sync by clicking "Sync data" at any time.
Editing Your Connection
- Click Recognition and Rewards in Quantum Workplace
- Select your profile picture in Assembly
- Click Recognition and Rewards Settings
- Click Users in the left sidebar.
- Click HRIS connections.
- Click Settings.
- Click Edit under "Configure Employee Sync Settings."
- Adjust your sync selections and click Save.
- Depending on your invitation settings, new employees will be queued or automatically activated.
Note: If you change sync settings and no longer include employees who were previously synced, those employees will be automatically deactivated in Assembly.
Disconnecting Your HRIS
- Click Recognition and Rewards in Quantum Workplace
- Select your profile picture in Assembly
- Click Recognition and Rewards Settings
- Click Users in the left sidebar.
- Click HRIS connections.
- Click Disconnect on the connection card, or click Settings and disconnect from there.
Disconnecting will not remove existing members from Assembly, but it will stop automatic syncing of your member list.
Multiple HRIS Connections
You can set up multiple connections to the same or different HRIS platforms. Key behaviors:
- If the same employee (same email) appears in multiple HRIS connections, Assembly syncs them based on the first connection created.
- If the same person has different emails in different HRIS connections, they'll appear as separate users in Assembly.
- If you exclude an employee in any HRIS connection, they're automatically excluded from all other connections.
- Exclusions across all connections are managed from a universal exclude list.
Troubleshooting Common Issues
Employee Profile Information Is Not Syncing or Shows Wrong Values
Problem: Employee profile data (birth date, hire date, manager, department, job title, location, avatar, or name) is not updating or appears blank.
Solution:
- If you manually edited or removed this information in Assembly, it will not be overwritten by HRIS syncs. Manually-changed fields remain as-is.
- Verify that you've granted Assembly the proper permissions in your HRIS to read these fields.
- Confirm the data actually exists in your HRIS for the employee(s) in question.
- If you removed information manually, it will remain blank in future syncs unless you re-populate it in your HRIS.
Employee(s) Are Not Getting Automatically Activated
Problem: New HRIS employees aren't appearing in your Active member list.
Solution:
- Check whether your invitation settings require "Admin approval." If so, check the 'Queued' or 'Requested' tabs—new employees won't auto-activate.
- Check the 'Deactivated' tab to see if the user was manually deactivated. Manually deactivated users must be manually reactivated.
- Verify your sync settings include the employee's group, company, or status. If you changed settings recently and the employee no longer matches the criteria, they won't activate.
- Update your sync settings to include their group/company, or ensure they're added to the correct groups in your HRIS.
Employee(s) Are Not Getting Automatically Deactivated
Problem: Terminated or removed HRIS employees remain active in Assembly.
Solution:
- If you recently changed sync settings, employees outside the new criteria won't auto-deactivate. Update settings to include them, or adjust their status in your HRIS.
- Your HRIS may distinguish between temporary leave and permanent termination differently. By default, Assembly doesn't deactivate employees on temporary leave. Contact your account manager to adjust this behavior.
- Check the 'Active' tab to see if the user was manually invited (rather than HRIS-added). Manually-invited users must be manually deactivated.
What Happens If I Switch to a Different HRIS?
Scenario: I disconnected from HRIS 1 and connected to HRIS 2.
Outcome:
- Members added via HRIS 1 remain active in Assembly.
- When you connect HRIS 2, if your new sync settings don't include employees who were added from HRIS 1, those employees will be automatically deactivated.
- If you re-add those employees to your HRIS 2 sync settings or add them to the correct group/company in HRIS 2, they'll be automatically reactivated.
Frequently Asked Questions
Can I connect to multiple HRIS platforms at the same time?
Yes, you can have one or multiple HRIS connections active simultaneously. The same employee cannot be synced from multiple connections—they sync based on the first connection where they appear.
How often does data sync between my HRIS and Assembly?
Data syncs automatically every 6 hours and immediately when changes are detected in your HRIS. You can manually trigger a sync at any time.
What if my HRIS data contains fields that Assembly doesn't import?
Assembly imports core profile fields (name, email, job title, department, location, manager, birthday, start date, and avatar). Other HRIS fields are not imported and must be managed separately.