In this article:
- Overview
- Requirements
- New Hire Templates
- Getting Started
- Select Template
- Survey Details
- Confidentiality
- Questions
- Participants
- Schedule
- Languages (Optional)
- Test & Review
Overview
New Hire surveys are ongoing surveys that can be configured to automatically invite new hires to participate in surveys regarding their onboarding and overall experience.
New Hire surveys are designed to capture an employee's first steps with an organization. Additional surveys such as an annual engagement survey, periodic pulses, and an exit survey can help provide a macro view of an employee's engagement during their tenure with an organization.
Additional resources for New Hire surveys and best practices.
Requirements
- Available to admin and survey-admin users
New Hire Templates
Quantum Workplace's Best Practice Templates provide two different means of surveying and understanding the new hire experience- as a series of surveys, or as a single survey experience.
Note: All questions included in a Quantum Workplace Best Practice template can be edited and/or removed during the Questions step of the survey creation process.
New Hire: Series
This method of new hire surveying is designed to gather information from new hires at different milestone moments during their onboarding.
Each New Hire template includes different questions specific to each milestone in a new hire's onboarding experience. Specifically, there are New Hire templates for when a new hire reaches their one-week, 30-day, 3-month, and 6-month mark with your organization.
New Hire: Single Survey Approach
The single survey approach is designed to gather information from new hires with a single survey. Quantum Workplace recommends launching this survey once a new hire reaches 60 or 90 days with your organization.
Getting Started
To launch a New Hire survey:
- Click and expand Surveys in the left-hand navigation menu
- Click Administration from the expanded menu
- Click New Survey in the top right
Select the Survey Template (Question Set)
The first step of the survey-creation process is to select the template for the survey.
For New Hire surveys, any of the New Hire templates are recommended. Learn more about the New Hire templates.
- Select a template from Quantum Workplace's Best Practices, your organization's templates, or click Create Your Own Survey in the top-right to create your own questions
- Look over the included questions- questions can be removed or added later in the survey setup process
- To confirm your template, click Use this template
Survey Details
On the Survey Details page, enter the survey name, the context for the survey, determine what other languages to offer the survey in, and whether to disable Action Planning.

- Under Survey Name, provide the survey name as it should appear on the survey, invitations, and reminders
- The use of special characters in the survey title can affect survey exports, learn more about which characters are compatible with successful exports
- Click and expand the drop-down menu to select the survey type
- Optionally, provide a brief description or add context for your survey participants
- Specify whether any additional languages should be included in the survey
- Additional languages require translations that will be submitted in a later step
- Enabled by default, click the box to disable Action Planning for the survey, learn more about Action Planning
Click Next to continue.
Confidentiality
On the Confidentiality page, specify the confidentiality settings appropriate for the survey.

- Select the confidentiality setting for the survey
- The Not Confidential option is recommended for New Hire, Exit Surveys, and other lower-volume surveys
- Each confidentiality setting has a different follow-up action:
- Not Confidential: Enter the user(s) who should be notified each time the survey is completed
- Mixed: Specify the number of responses required to show survey results in Analytics, and enter an email address for survey participants to contact should they have any confidentiality-related questions
- Confidential: Specify the number of responses required to show survey results in Analytics
- Anonymous: Specify the number of responses required to show survey results in Analytics
Learn more about survey confidentiality and best practices.
Click Next to continue.
Questions
From the Questions page, you can add, rearrange, and edit your questions.
If you selected a template at the beginning of the survey creation process, those questions will be listed on this page.
If you selected Create Your Own Survey, this is where you will add questions for your survey, either via the Library or custom questions. Learn more about creating survey questions.

- Under the menu to the left of the question list, you have several options to modify your survey's questions:
- Add from Library: Add a question from Quantum Workplace's Best Practice library or from past surveys
- Add Custom Question: Create a custom question
- Note: Custom questions do not provide benchmark or trending data
- Add Section: Create a section to visually organize survey questions
- Survey Question Export: Export your current list of questions in detail
- Logic: Configure questions to ask follow-up questions based on responses or limit who can see a question, learn more about Survey Logic
- Styling: Customize the survey color and logo, learn more about Survey Styling
-
- Preview Survey: Click View to preview a finalized version of the survey, and click Share to copy the URL of the preview to your web browser's clipboard
- View and edit the questions currently included in the survey

- Click the Move Question icon (Figure A) to open a modal and specify the question's position before or after a specified question/ section
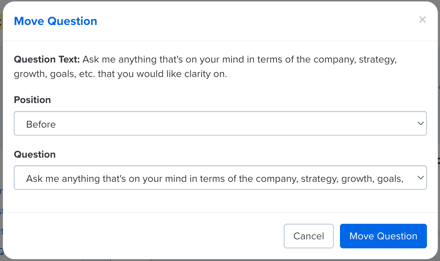
- Click the up and down arrows (Figure B) to rearrange the question one place earlier or later, respectively
- Click the Move Question icon (Figure A) to open a modal and specify the question's position before or after a specified question/ section
Participants
On the Participants page, customize how survey participants are qualified and invited.
To launch a New Hire survey:

- Select Invite Automatically
- Under Triggered By, select Employee Hire Date
- Under Targeting, specify if all qualifying employees are invited or if a qualifying employee should pass through a demographic filter, learn more
If the survey should include recently hired employees who wouldn't qualify under the current invite rules, use the Invite Manually to select the employees who should be invited to participate.
Under Targeting, determine who is sent survey invites after the selected trigger occurs:
- Send to all employees will invite all employees who qualify for the trigger
- Limit who is invited based on demographics allows you to control what demographics are included and excluded as an additional rule for survey invitations.
For example, if a New Hire survey is meant for offices in Boston and San Diego, but shouldn't include HR employees in either office, the fields can look like this:
Include: Location: Boston, Location: San Diego
Exclude: Department: HR
Continue to the Access Survey By card to specify how survey participants can securely access the survey.
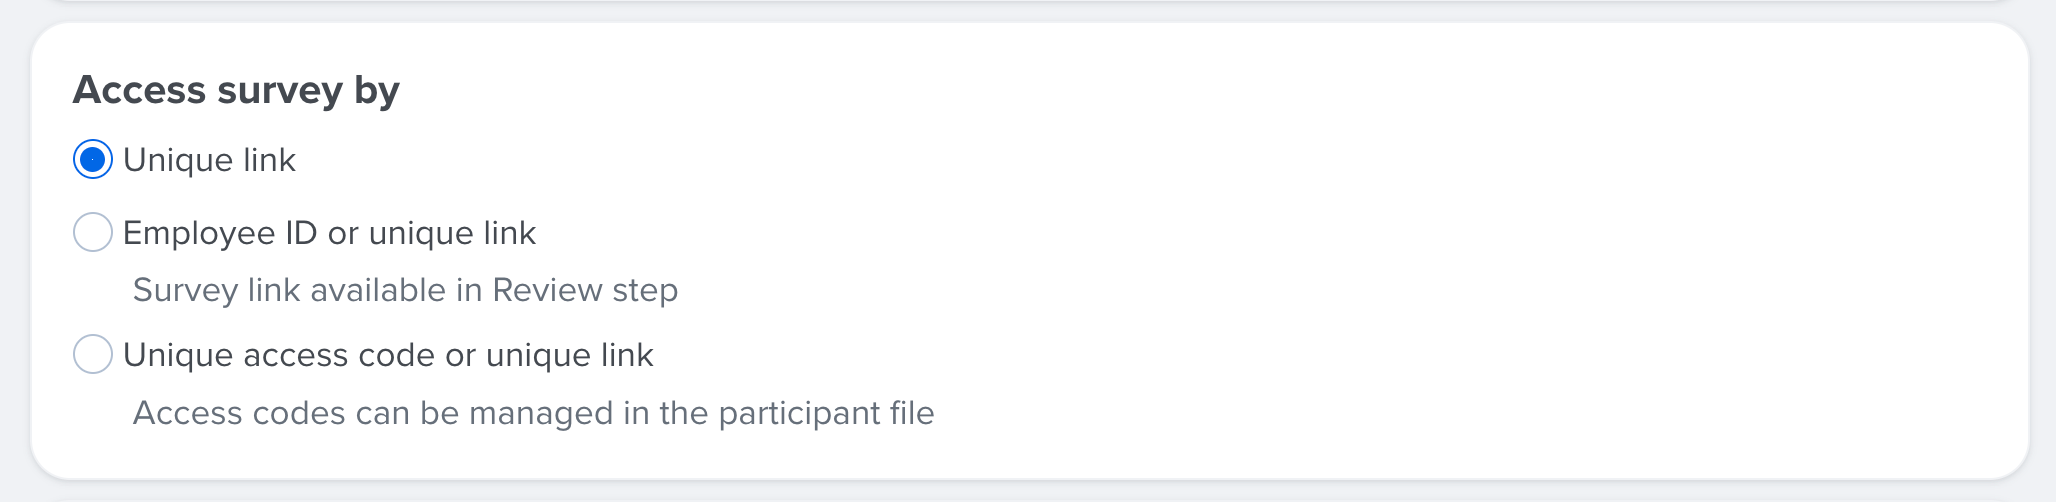
Select one of the following options:
- Unique Link: Participants receive a unique link in their email inbox that opens their survey
- Employee ID or Unique Link:
- Employee ID: Participants receive a generic invitation link in their email inbox that requires participants to enter their employee ID to open their survey
- Unique Link: Participants receive a unique invitation link in their email inbox that opens their survey
- Unique Access Code or Unique Link
- Unique Access Code: Participants receive a generic invitation link in their email inbox that requires participants to enter a manageable custom access code to open their survey, learn more
- Unique Link: Participants receive a unique link in their email inbox that opens their survey
If the survey should include recently hired or exited employees who wouldn't qualify under the current invite rules, use the Invite Manually to select the employees who should be invited to participate.
Click Next to continue.
Schedule
On the Schedule page, determine when invitations are delivered, how long surveys are open for, and when reminders, if any, are sent to participants.
For New Hire surveys, whether you selected a template as part of a series or the single survey approach, Step 1 shown below is where you can configure when new hires are invited to complete the survey.
For example, if the New Hire- 30 Days template was selected, in Step 1 shown below, you can configure the survey invitation to be delivered 30 days after the hire date.
Depending on the invitation method(s) selected in the previous step, the options displayed on the Schedule step will vary.
The following view reflects when the Invite Automatically option is selected.

- Click Change Time Zone to update the time zone reflected in the survey setup
- Invitations: Customize when invitations are sent out according to the trigger
- Optionally, customize the text in the Email Subject Line and/or Invitation Message to add context or instructions for participants
- Survey Deadline: Determine how many days survey participants have to complete their survey
- Invitation Preview: Expand the card to view a live preview of the survey's email invite
- Reminders: Optionally, configure when reminders are sent to participants and their messaging
-
- Optionally, customize the text in the Reminder Subject Line and/or Reminder Message field to add context or instructions for participants
- Click Add Reminder to add additional reminders
Click Next to continue.
Schedule Grace Period
For New Hire surveys configured to invite participants [x] days after their hire date, there is a grace period that will look [x] days prior to the survey launch and invite eligible recent new hires to the New Hire survey.
As an example, consider a New Hire survey scheduled to launch on March 26 with invites configured to be sent 20 days after an employee's hire date:
- An employee with a hire date of March 6 will be invited to the New Hire survey
- An employee with a hire date of March 5 will not be invited to the New Hire survey
- An employee with a hire date of March 8 will be queued and invited to the New Hire survey on March 28
Languages
If you specified that a survey is offered in another language, besides English, you will see the Languages page following the Schedule page. If your survey is only in English, you will see the Test and Review page instead.
From the Languages page, enter translations for the survey title, description, reminders, and each question. Learn how to add translations individually or in bulk.
Test & Review
On the Test and Review page, review key details and dates for your survey before finalizing and launching the survey.
Learn more about testing and previewing surveys prior to launch.
The information displayed on this page should reflect and confirm your survey design decisions.
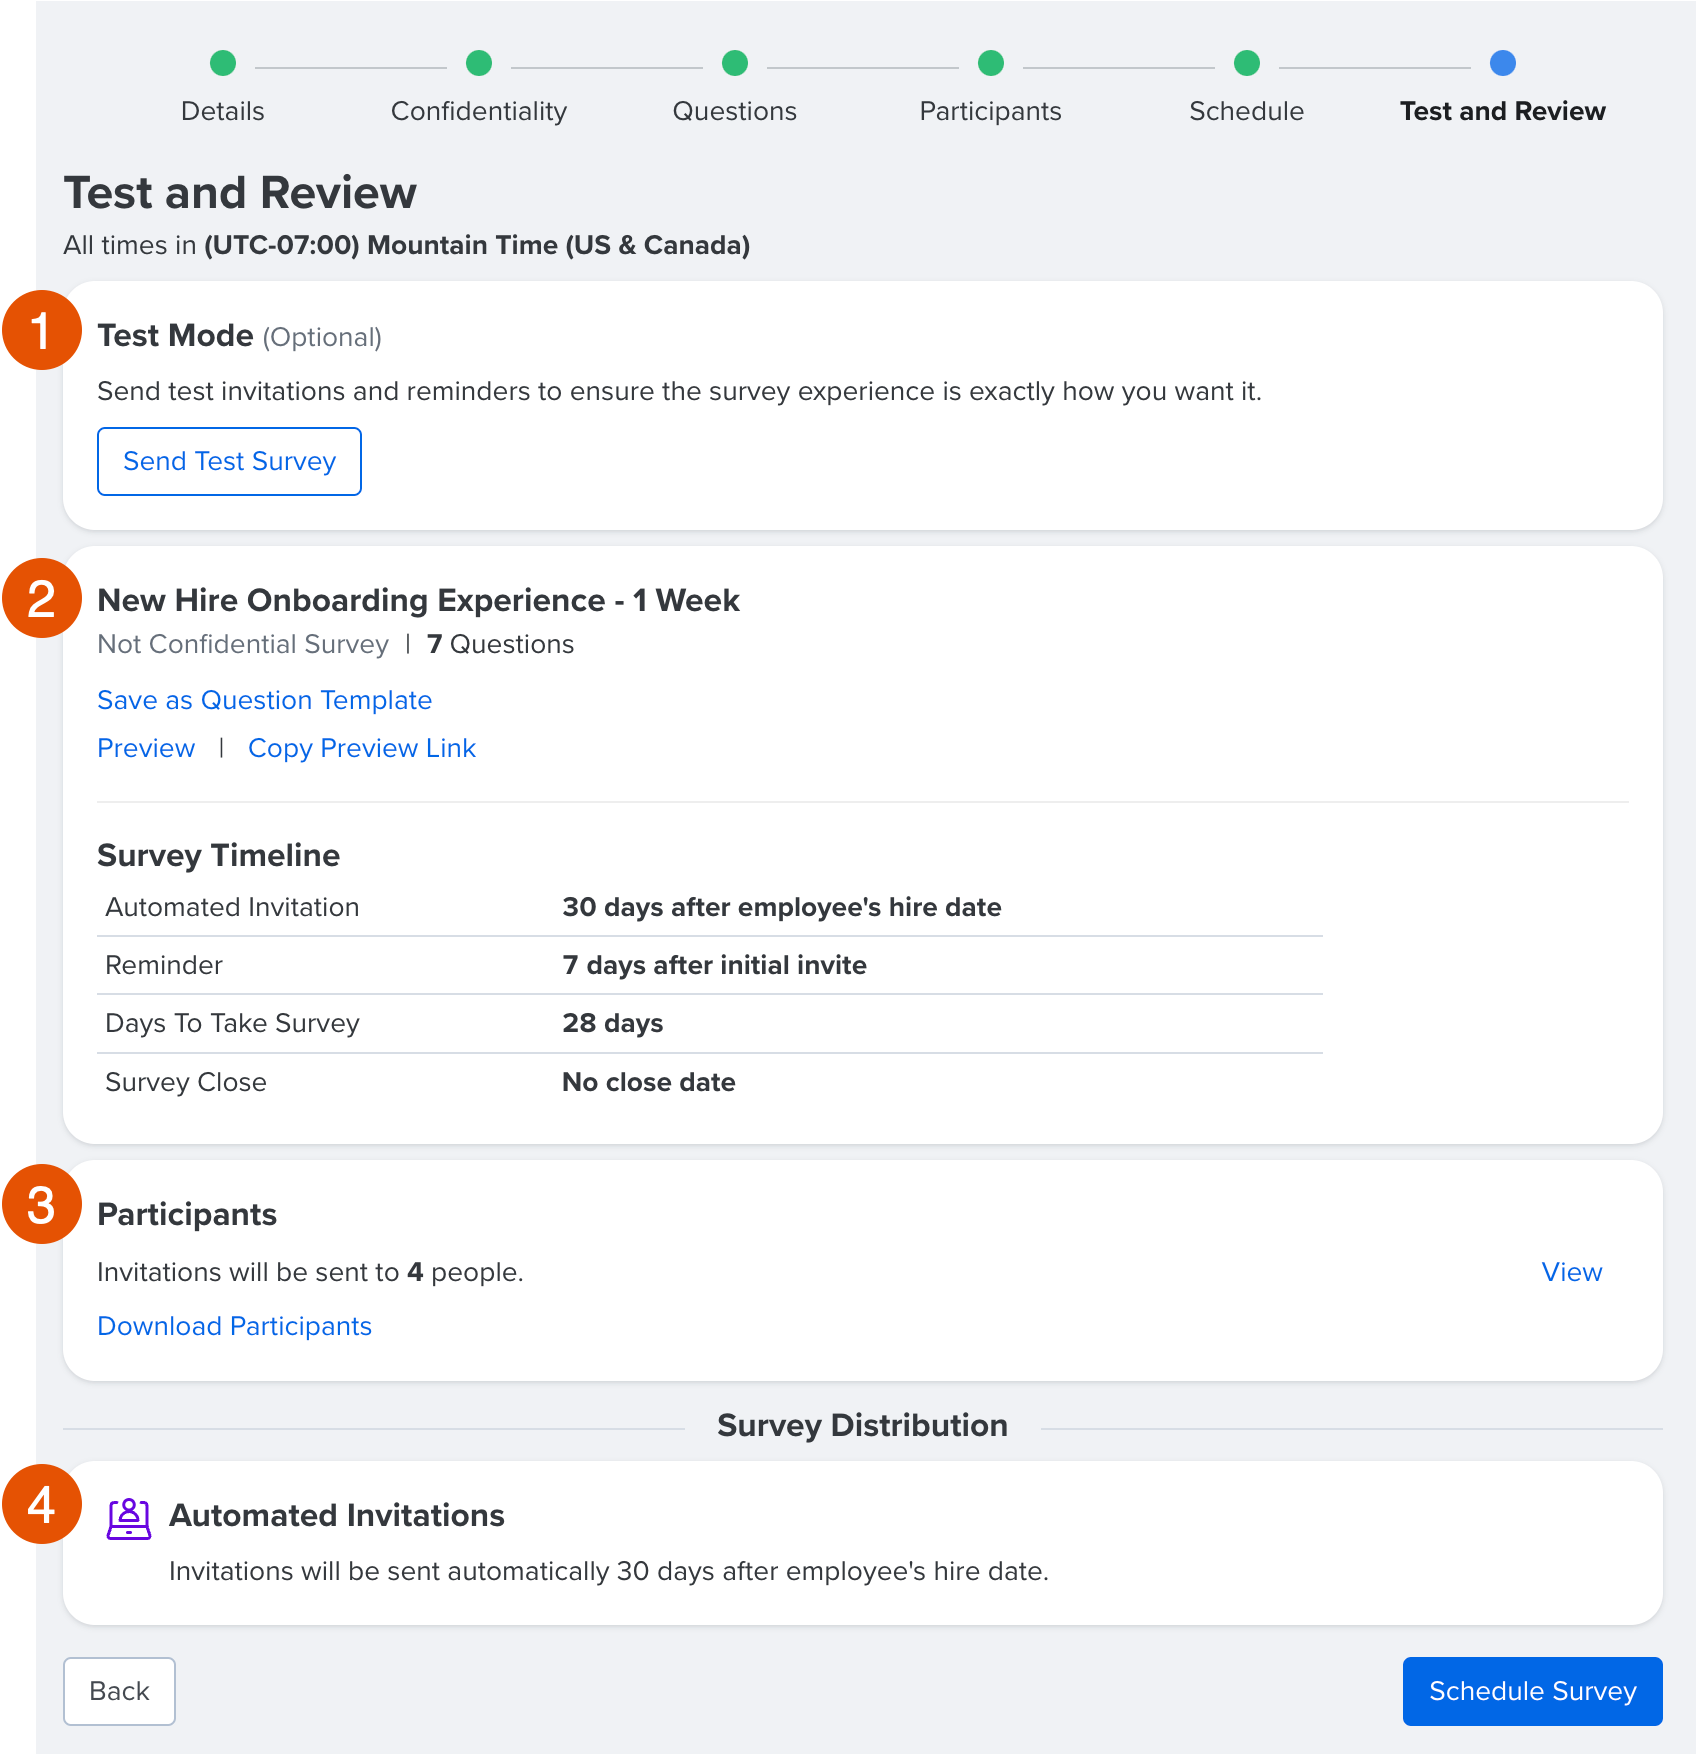
- Test Mode: Optionally, click Send Test Survey to send a survey sample to select users as well as which message to be included

- Survey Details: This card details the survey name, confidentiality, and the specified survey timeline
- Participants: See the number of participants currently set to be invited to participate, click View or Download Participants for more information
- Survey Distribution: This section reflects your selections on the Participants page and allows you to perform any follow-up actions, i.e. adding users manually or copying the shareable link, as you could on the Participants page
The following view reflects when the manual, automatic, and shareable link options are selected:
Click Schedule Launch to complete the survey. If you schedule the survey to launch at a future date, it will automatically launch at the specified time.
One HR platform for connected talent insights. See how Quantum Workplace brings your data together across 1-on-1s, talent reviews, performance reviews, and more—so you can spot trends, act fast, and make more informed people decisions. Explore the interactive product tour or request a personalized demo with your Customer Success Manager.