In this article:
- Overview
- Requirements
- Assign a User to an Administrator Role
- Assign a User to a Focused Admin Role
- Assign a User to a Feature Admin Role
Overview
As an admin, you can assign a user as an administrator to grant them full-admin access to Quantum Workplace.
Admins have access to all of the features your organization uses. Some examples of admin-specific abilities include launching and managing cycles, analytics, and editing user demographics.
To grant a user with limited admin access, consider adding the user as a Focused Admin to limit their access by specified demographics or a user(s)' downline.
Additional Resources:
- Guide for New Admins
- Guide to User Management
- Focused Admins
- Understanding the Different Admin Roles
- Admin Post-Survey Toolkit
- Product Training: User Management
Requirements
- Available to full admin users
Assign a User to an Administrator Role
As an admin, to assign a user to an admin role:

- Click and expand Global Settings in the left-hand navigation menu
- Click Users
- Identify the user and click the corresponding Edit in the Actions column
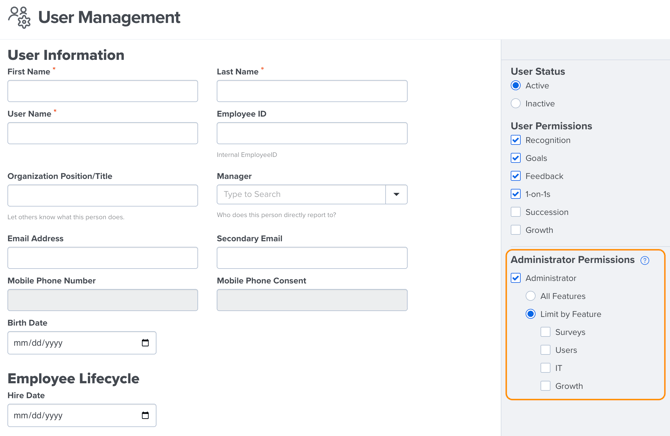
- In the Administrator Permissions area, click and enable the Administrator checkbox
- Click and enable the All Features option
- Optionally, enable the Easy Impersonation ability, learn more
- Scroll to the bottom of the page and click Save
Assign a User to a Focused Admin Role
As an admin, to assign a user to a Focused Admin role:

- Click and expand Global Settings in the left-hand navigation menu
- Click Users
- Identify the user and click the corresponding Edit in the Actions column
- In the Administrator Permissions area, click and enable the Administrator checkbox
- Click and enable the Limited Scope option
- Select whether to Limit by Demographics or Limit by User's Downline and configure the Focused Admin's administrative scope
- Optionally, enable the Easy Impersonation ability, learn more
- Scroll to the bottom of the page and click Save
Limit by Demographics
Select Limit by Demographics to define the administrative scope of the Focused Admin by one or multiple demographics.
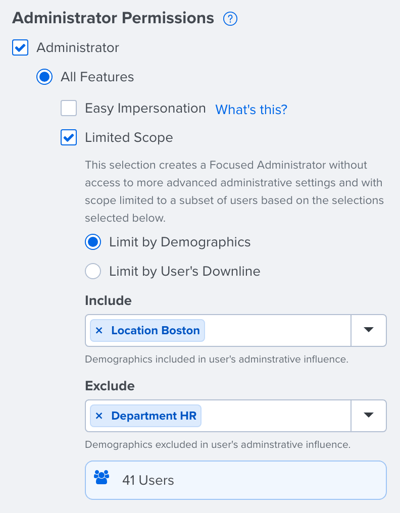
Include: Demographics in this field define whom the Focused Admin should have access and visibility into
Exclude: Optionally, demographics in this field define whom the Focused Admin should not have access and visibility into.
As you add demographics, keep the following rules in mind:
-
Think of the settings as operating in order- First, demographics under Include will pull in the relevant users. Then, users who fall under the Exclude demographic(s) will be removed from the initial pool of users.
- If multiple attributes from the same group are added, i.e. Department: Sales and Department: Technology, then the query includes all employees in Sales and Technology
- If multiple attributes across demographics are added, i.e. Department: Sales and Location: Boston, then the query includes employees in both Sales and Boston
- If a mix of demographics is added, i.e. Department: Sales, Department: Technology, and Location: Boston, then the query includes employees in Sales or Technology, and Boston
As you configure the administrative scope of the Focused Admin, you will see the number of users who fall under the current scope, both active and inactive. Click on the [x] Users to view a list of the users and export the user list.
Limit by User's Downline
Select Limit by User's Downline to define the administrative scope by the downline of the specified user(s).
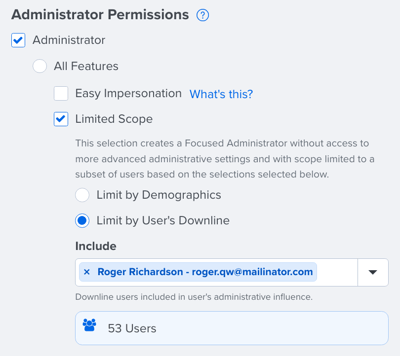
A Focused Admin's administrative scope can be defined by the downline of any user, even the downline of the Focused Admin.
Include: Users entered in this field define the users' downline that the Focused Admin will have access to
Users entered in this field define whom the Focused Admin will have access to the specified user(s)' downline. For example, to give a Focused Admin administrative access to the entire organization, except for the CEO, assign the user to the CEO's downline.
As you configure the administrative scope of the Focused Admin, you will see the number of users who fall under the current scope, both active and inactive. Click on the [x] Users to view a list of the users and export the user list.
Assign a User to a Feature Admin Role
Feature Admins are limited by the specific features they can access within Quantum Workplace. When assigning a user to a Feature Admin role, you can select from:
-
- Survey Administrator (access to administering surveys)
- User Administrator (access to creating new demographics, managing platform users, and HRIS Integrations with optional HRIS notifications)
- IT Administrator (access to Teams, Slack, SSO, and Outlook integrations)
As an admin, to assign a user to a Feature Admin role:

- Click and expand Global Settings in the left-hand navigation menu
- Click Users
- Identify the user and click the corresponding Edit in the Actions column
- In the Administrator Permissions area, click and enable the Administrator checkbox
- Click and enable the Limit by Feature option to automatically open the Feature Admin choices
- Select the intended Feature Admin
- Scroll to the bottom of the page and click Save
One HR platform for connected talent insights. See how Quantum Workplace brings your data together across 1-on-1s, talent reviews, performance reviews, and more—so you can spot trends, act fast, and make more informed people decisions. Explore the interactive product tour or request a personalized demo with your Customer Success Manager.