In this article:
- Overview
- Requirements
- Access Survey Access Settings
- Assignments
- Access Roles
- Create a New Role
- Test Access
Overview
Access Settings gives you the option to configure custom roles and assignments to provide survey access in ways that fit your organization's needs.
Assignments can be thought of as the who, it specifies who has access to specific areas of your survey's analytics, i.e. the entire survey, their downline only, a specific branch of your org tree, etc.
Roles can be thought of as the what, it determines what assigned users can see and do via filters, slices, reports, and other capabilities provided to them.
Non-admin users can only access a survey's analytics if they're given an Assignment and Role for the specified survey.
Additional Resources:
- Test Survey Access
- Manage Org Tree Assignments in Bulk
- Product Training: Access Settings
- Recording: Access Roles & Assignments in Survey Analytics
- Recording: Survey Analytics as a Manager
Requirements
- Available to full admin and survey-admin users
Access Survey Access Settings
To access a survey's Access Settings:

- Click and expand Surveys in the left-hand navigation menu
- Click Analytics from the expanded menu
- Open a specific survey by clicking on the name
- Click and expand the Admin Controls drop-down menu in the top right corner
- Click Access Settings
Assignments
As an admin, Assignments give you the flexibility to give analytics access to specific areas of your organization.
For example, an Assignment can give a user visibility into the entire survey, for their personal downline only, or for a branch on an org tree.

The following assignments are available by default:
- Overall Results: Provides access to all respondents and org trees for the survey
- Note: All Respondents was previously known as the Analyst assignment
- Manager Org Tree*: Automatically gives managers access to their own downline
- Note: Ongoing or automated surveys triggered by Hire & Exit Date events do not automatically generate a manager org tree
- Custom Org Tree: Assign any user, with any Role, to any branch of the tree
- Create an Org Tree to your specifications, learn how
- Survey Author*: Automatically created and assigned to the Focused Admin who created a survey
*As an automatically generated role, the role name cannot be edited
Assign Users to a Custom Org Tree and Manager Org Tree
The process of assigning a user to a Custom Org Tree and Manager Org Tree are the same.
To assign a user to an Org Tree:

- Click on the Custom Org Tree or Manager Org Tree
- Click the edit icon corresponding to a branch of the Org Tree to open the Manage Access modal

- Enter and add the user and their Role:

- A. Search & Add User: Enter and click the employee's profile
- B. Role: Use the drop-down to select the employee's role as configured in the Access Roles tab, learn more
- C. Action Plan: Use the drop-down to specify the employee's role for the Org Tree branch's Action Plan, learn more
- Click Save
Create a Custom Org Tree
You can also create an Org Tree from scratch. The Org Tree Creator is organized into three columns:
- Demographics: Your organization's demographic attributes
- Org Tree Structure: A customizable and interactable field where the Org Tree structure is determined via the hierarchy of attributes
- Preview: As you click and drag attributes into the Org Tree Structure column, a real-time preview reflects what your org tree will look like
To create a Custom Org Tree:
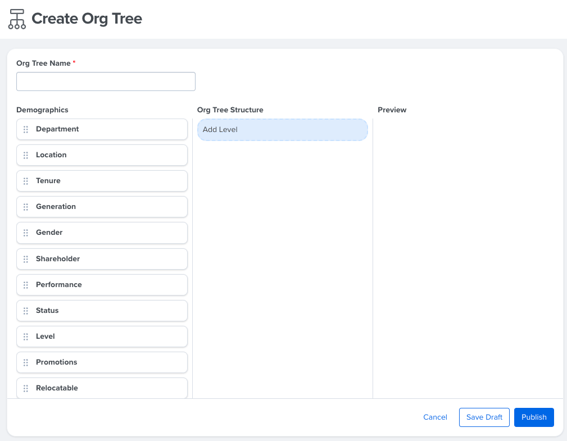
- Under Assignments, Click Create a Custom Org Tree to get started
- Click Create Org Tree to navigate to the Org Tree Creator

- In the Org Tree Name field, enter an easily identifiable name e.g. Location-Department
- Click-and-drag attributes from the Attributes column to the Org Tree Structure column in the specific hierarchical order
- Org trees allow a maximum of five attributes and can be rearranged as necessary
- In the Preview column, view and interact with the real-time org tree preview
- Click Publish to finalize your org tree or Save Draft to resume at a later date
Access Roles
As an admin, you have complete flexibility in customizing what users have access to.
For example, a Manager role can give users some access to filtering and slicing survey data but does not give the role access to comments, replies, or the heat map.
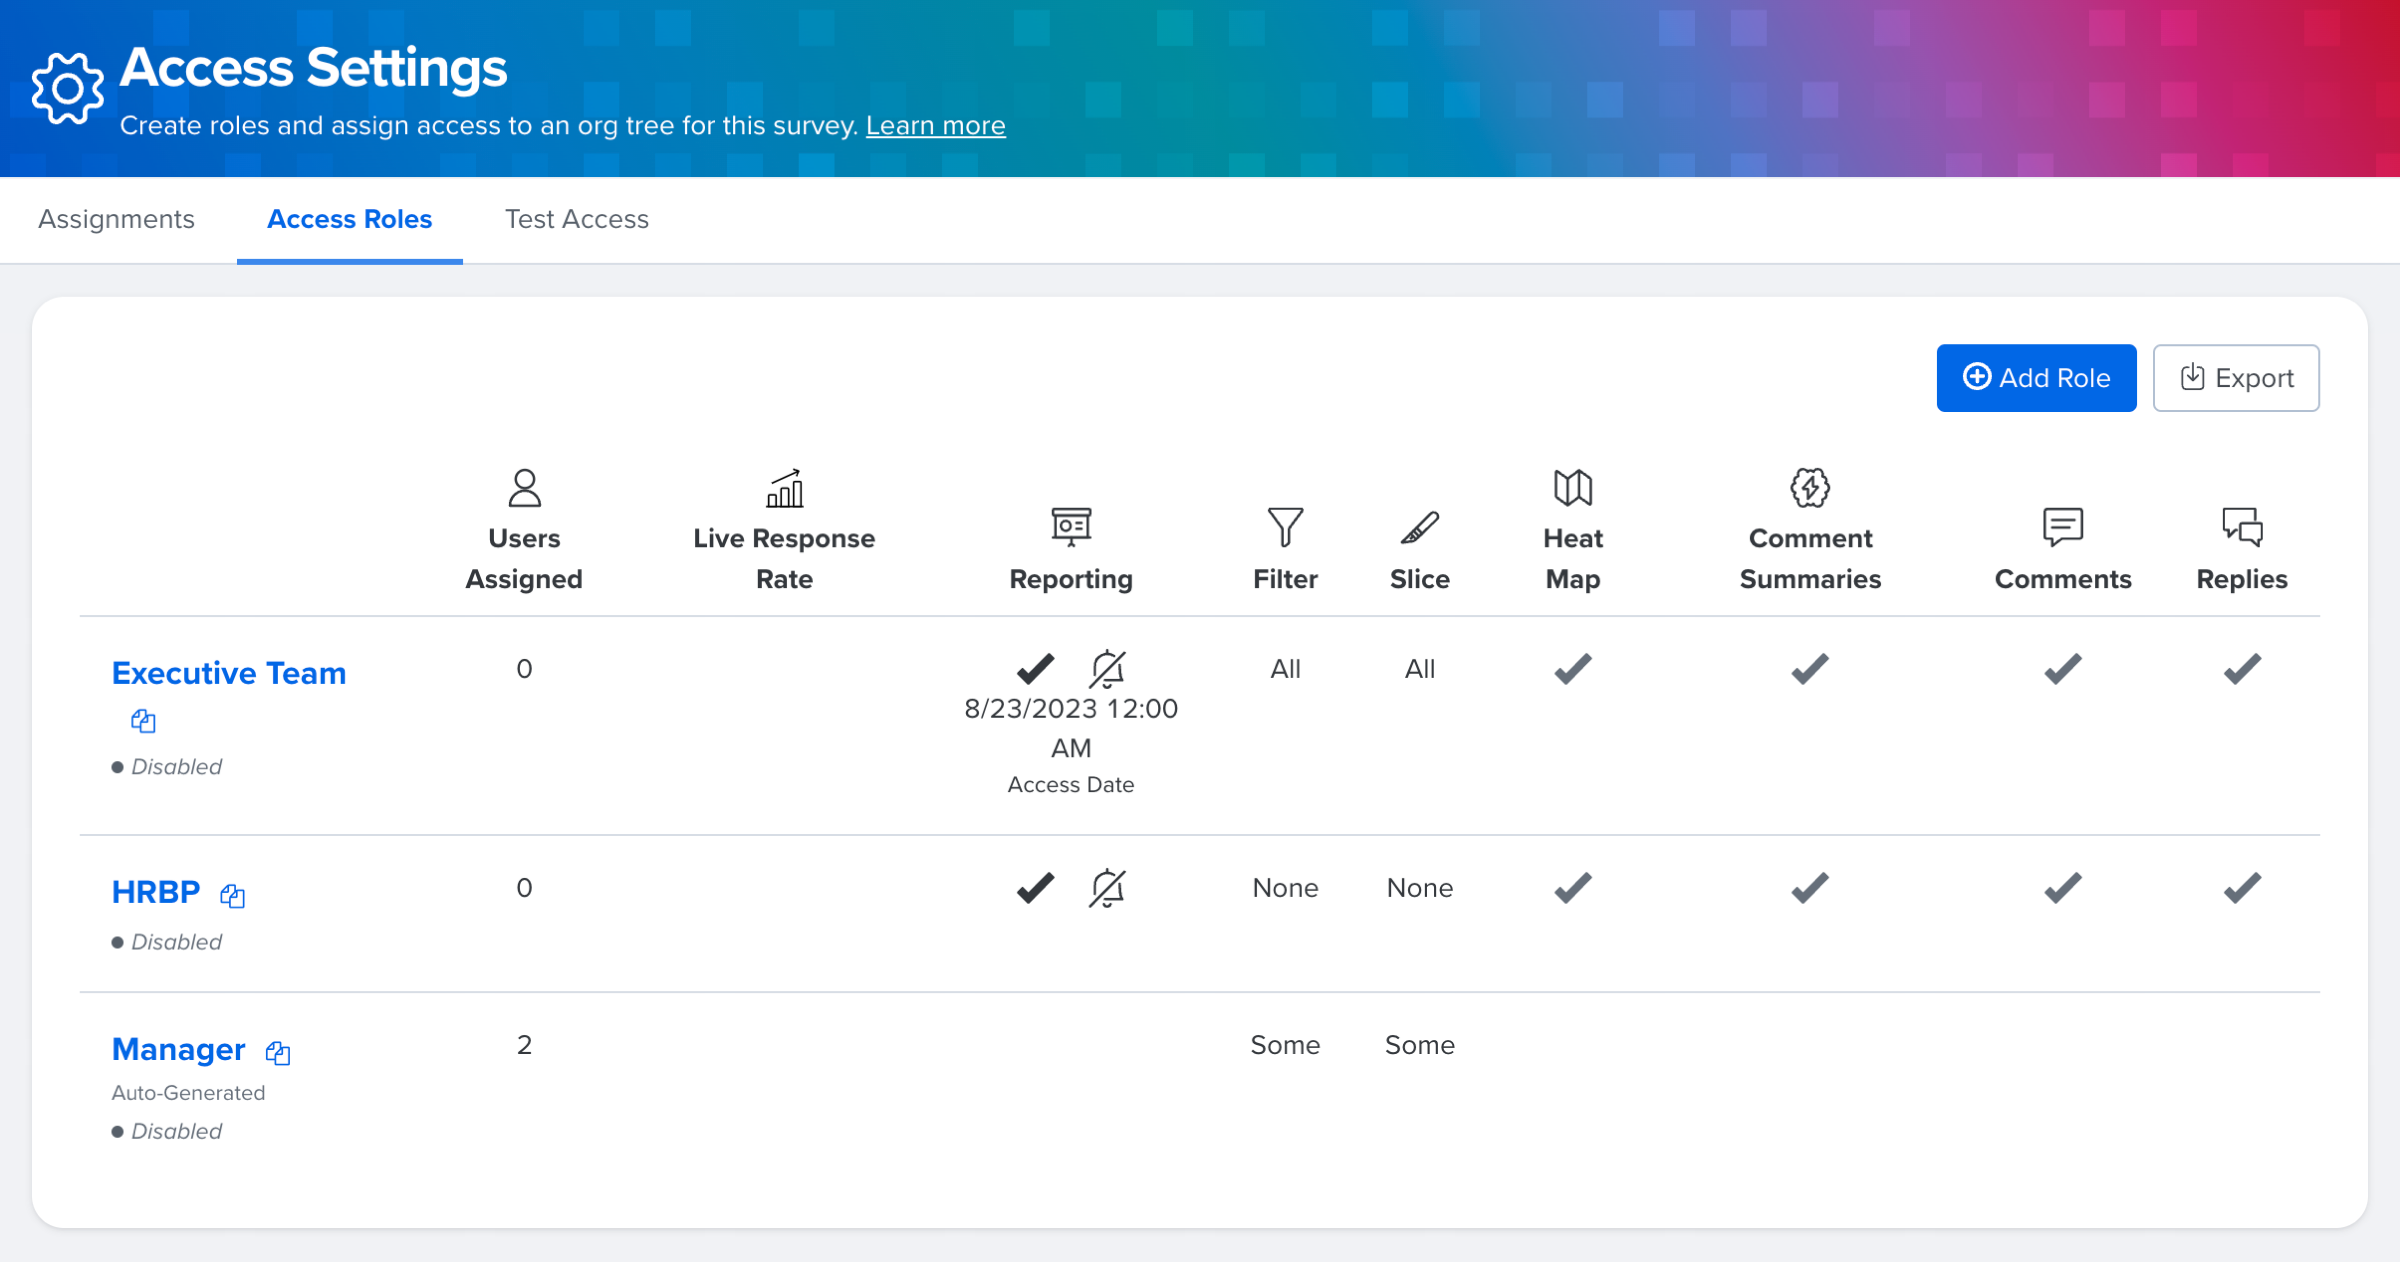
To streamline this process, every people leader in your organization is automatically given the Manager role. Some of these other automatically created roles include:
- Manager Role*
- When a survey is launched, the Manager role is automatically created and all managers in your organization are automatically added to this role, learn more about the Manager role's default and recommended settings
- The Manager role's filter and slice settings are determined by your General Settings, these settings can be personalized per survey
- *As an automatically generated role, the role name cannnot be edited
- Survey Author Role*
- When a survey is launched by a Focused Admin or survey-admin, the Survey Author role is automatically created
- The View Themes and Manage Themes settings are automatically enabled on the Comments report for this role, other settings can be personalized per survey
- *As an automatically generated role, the role name cannot be edited
- Additional Roles
- An administrator can manage the existing settings for Focused Admins and survey-admins and create additional roles to grant access to other leaders and managers in your organization- learn more about Focused Admins and other admin roles
Create a New Role
New Roles can be created as needed to provide survey access to HRBPs, senior leadership, etc., or to plan a phased rollout of access to the survey's results.
To create a new Role:
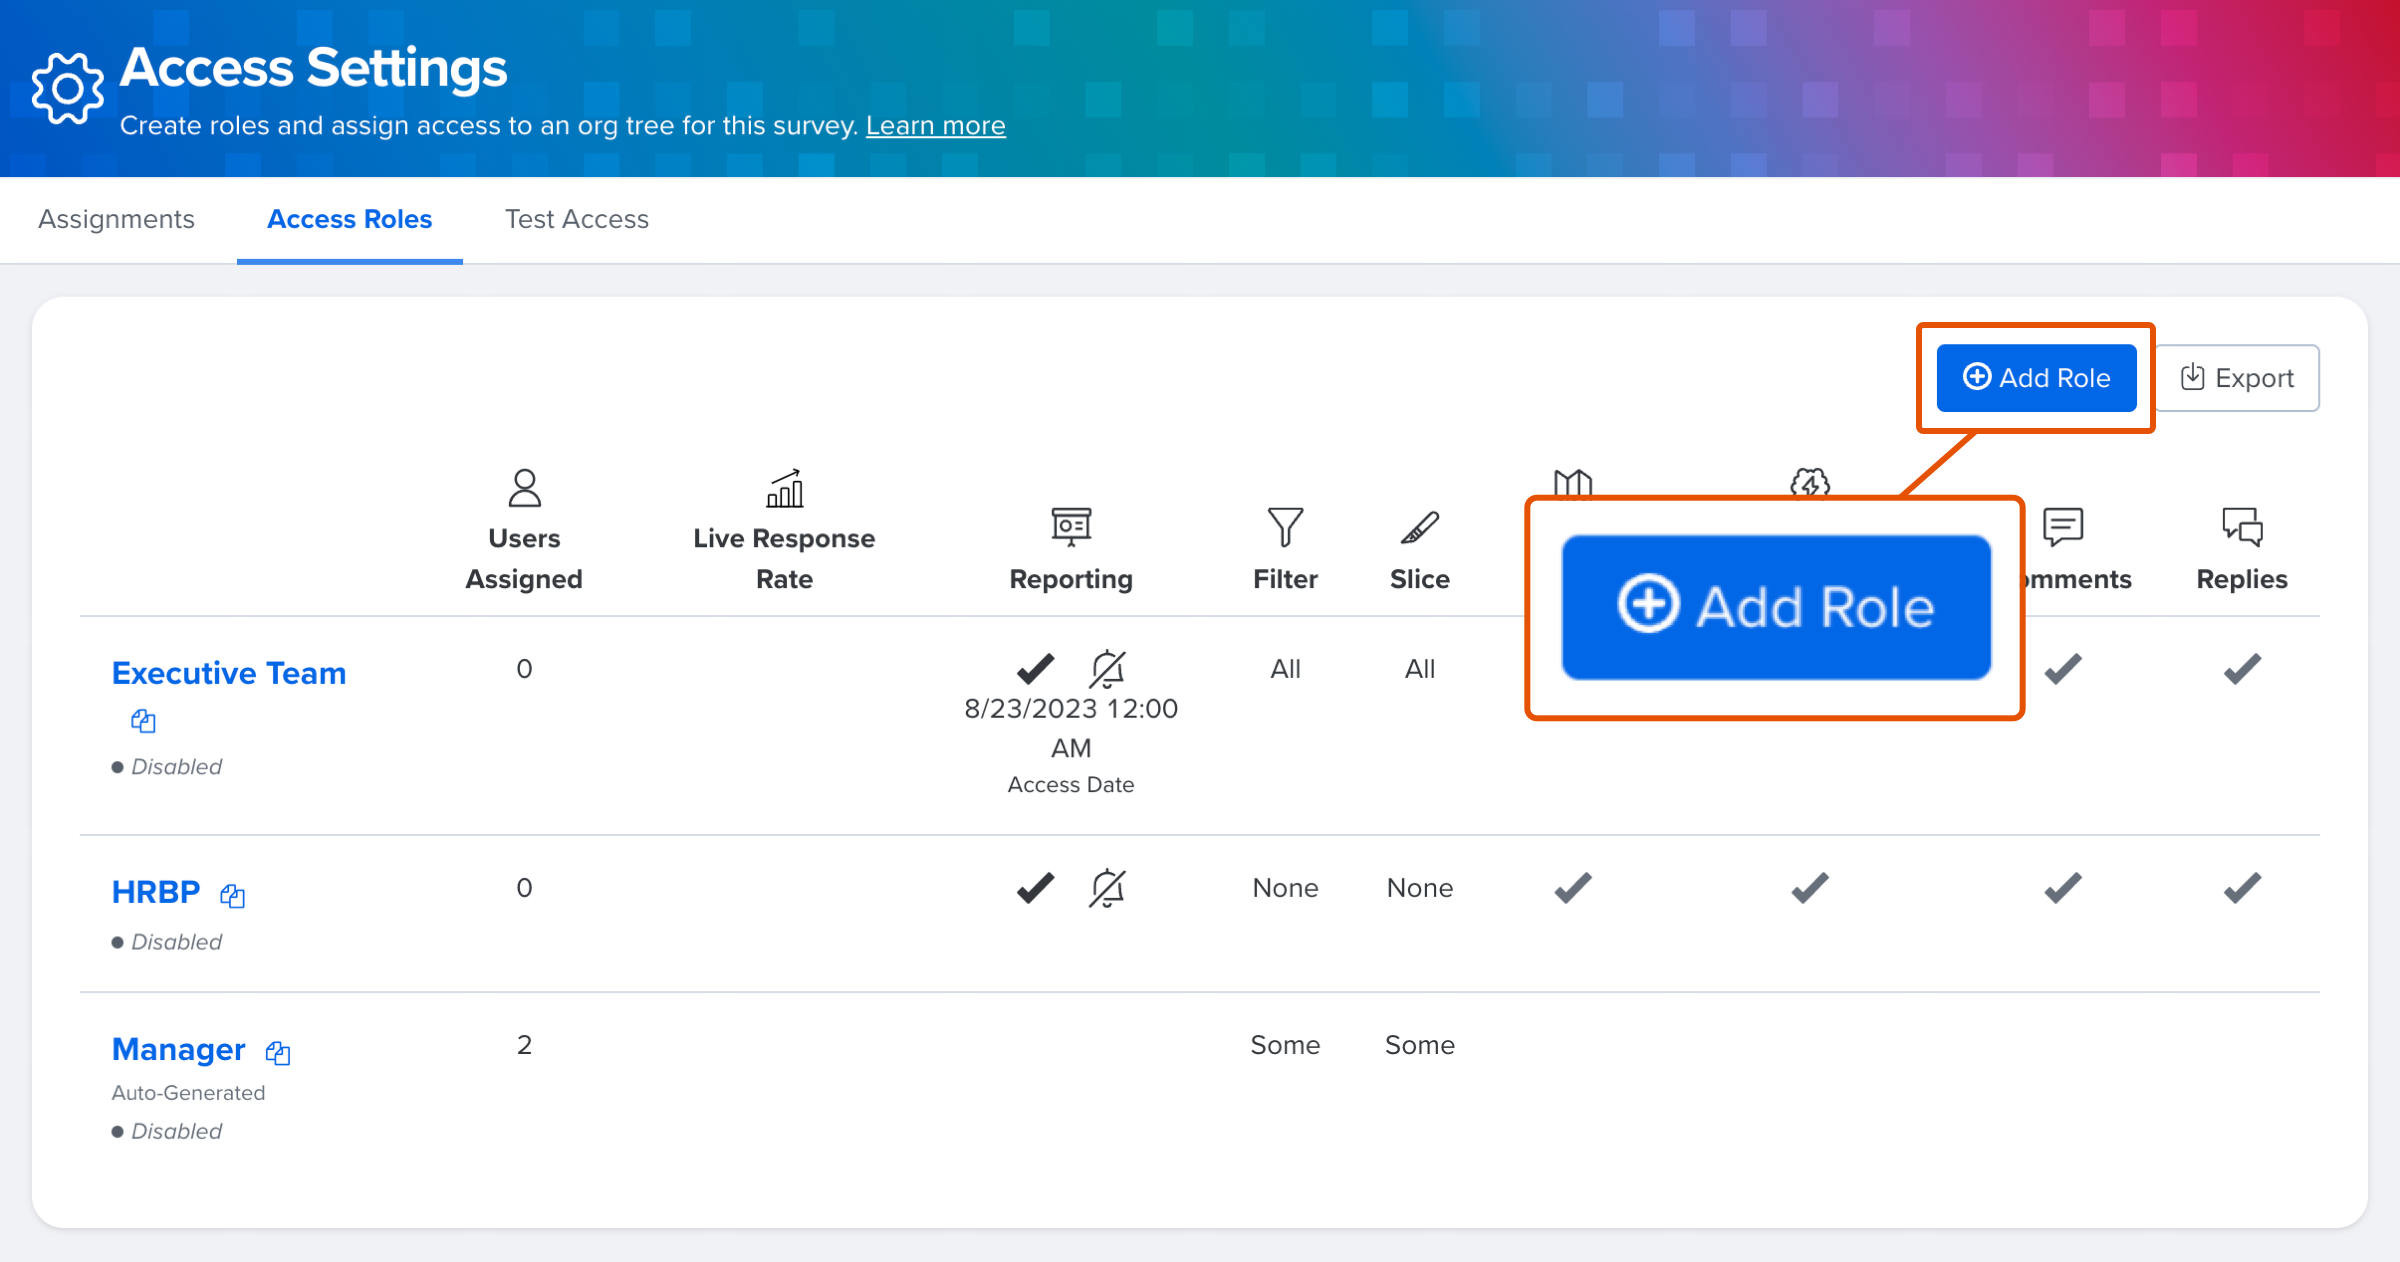
- Click Surveys, then Analytics
- In the top right, click navigate to the Access Roles tab
- Click a specific survey
- Click Add Role to view a blank Role
- Enter a name for the Role
- Configure Role Access with Live Response Rate Access and/or Reporting Access
- Configure User View options
- Manage the users in the role
- Click Save
Alternatively, to use an existing role as a starting template- click the role's copy icon, learn more.
Use the Enable Access toggle to activate a role on the specified access date.
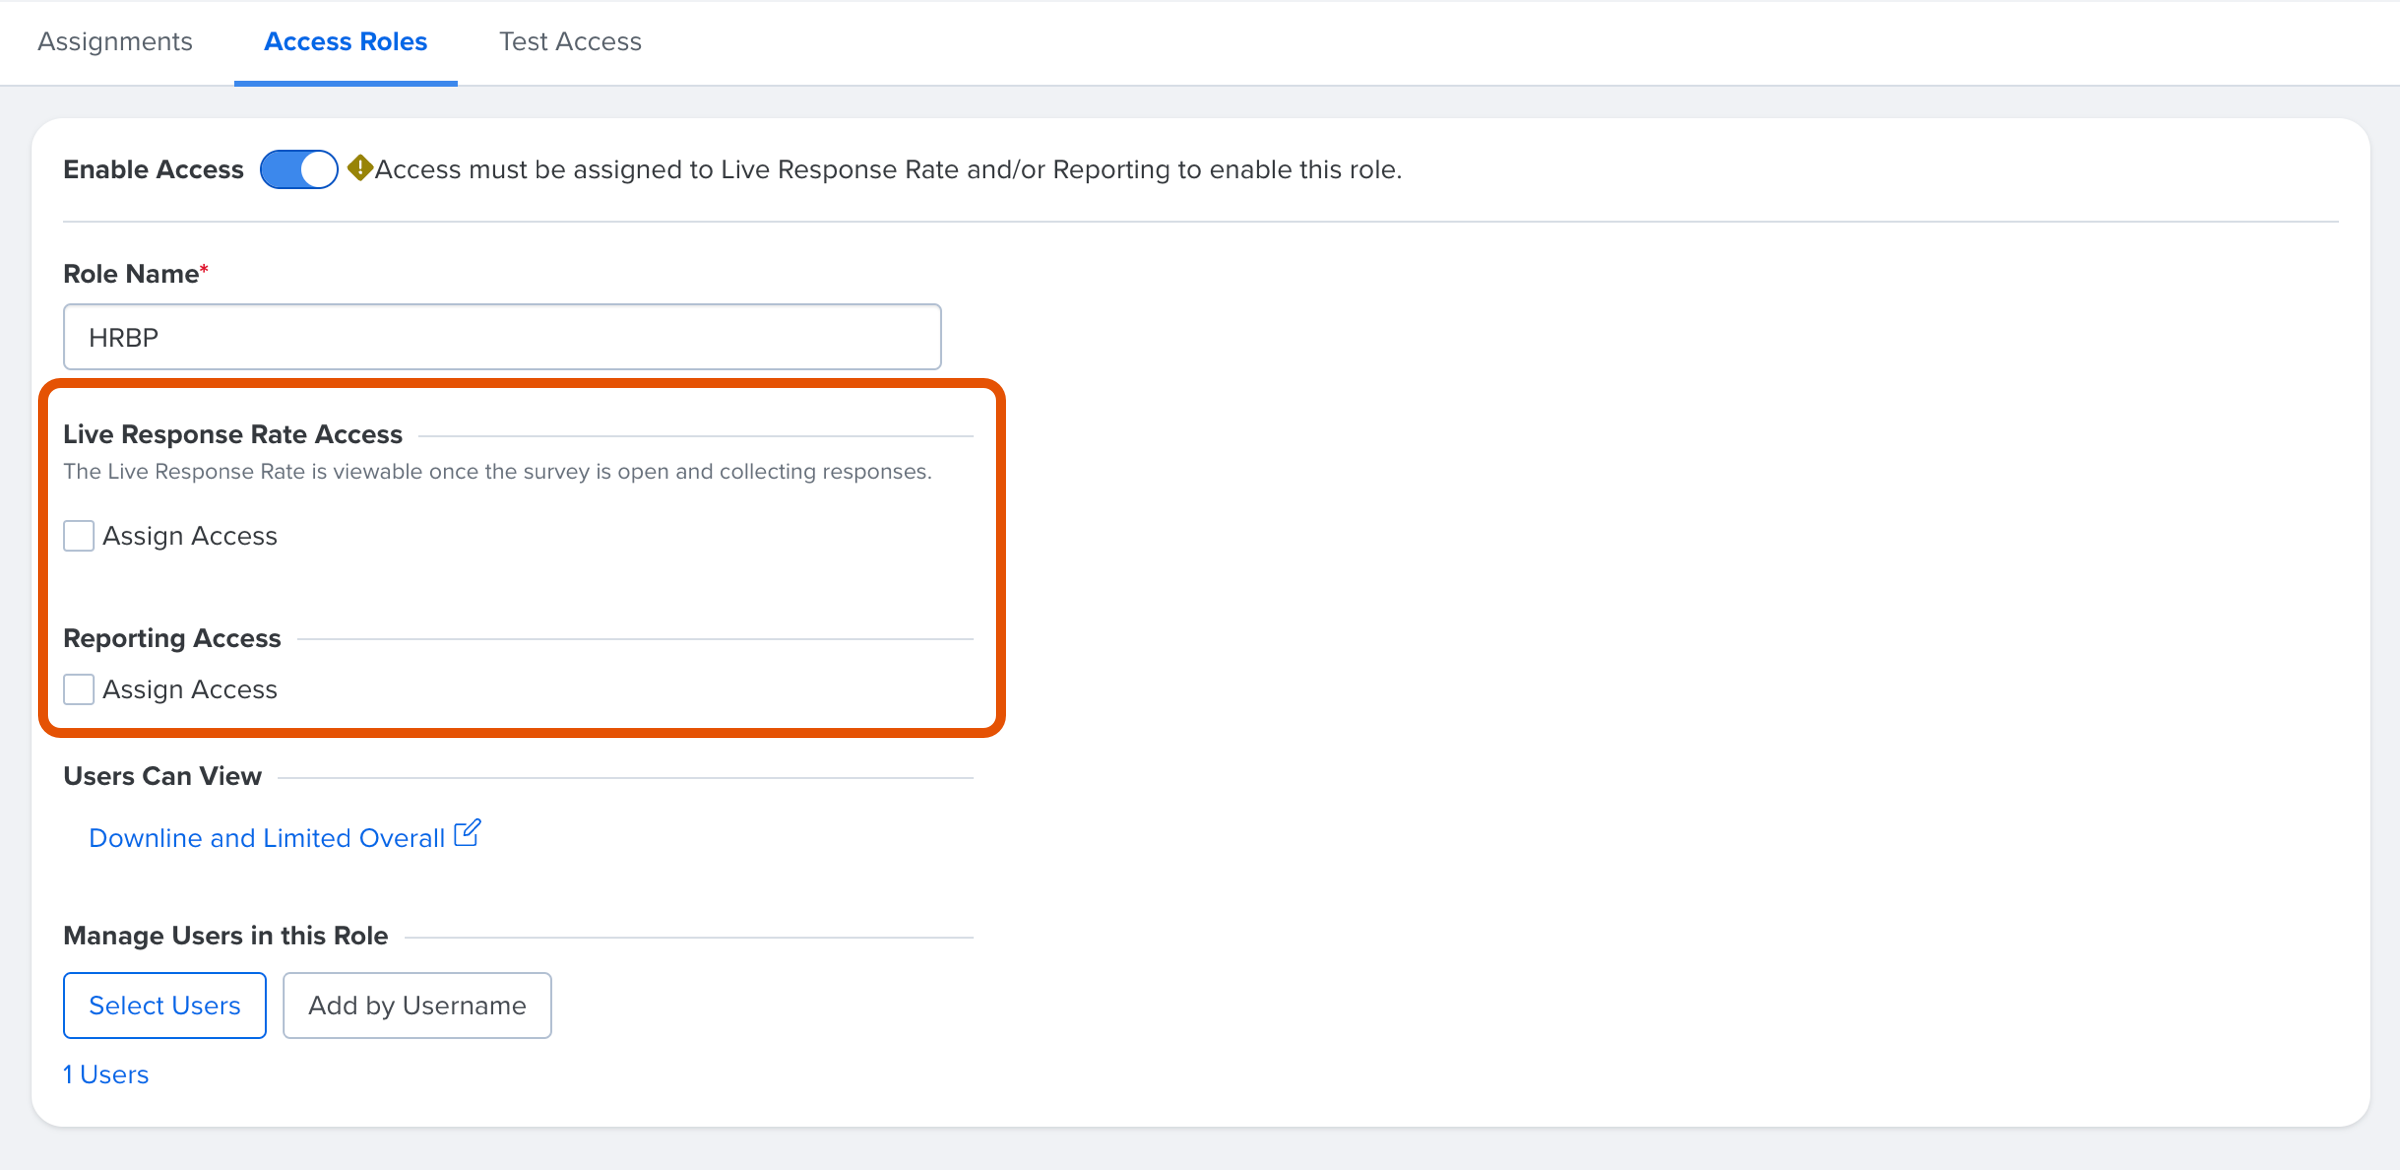
Live Response Rate Access
Enable access to Live Response Rate to configure a role's ability to view and monitor survey completion rates and prepare for the survey closing and subsequent analytics.
Learn more about the Live Response Rate.
To enable Live Response Rate access:
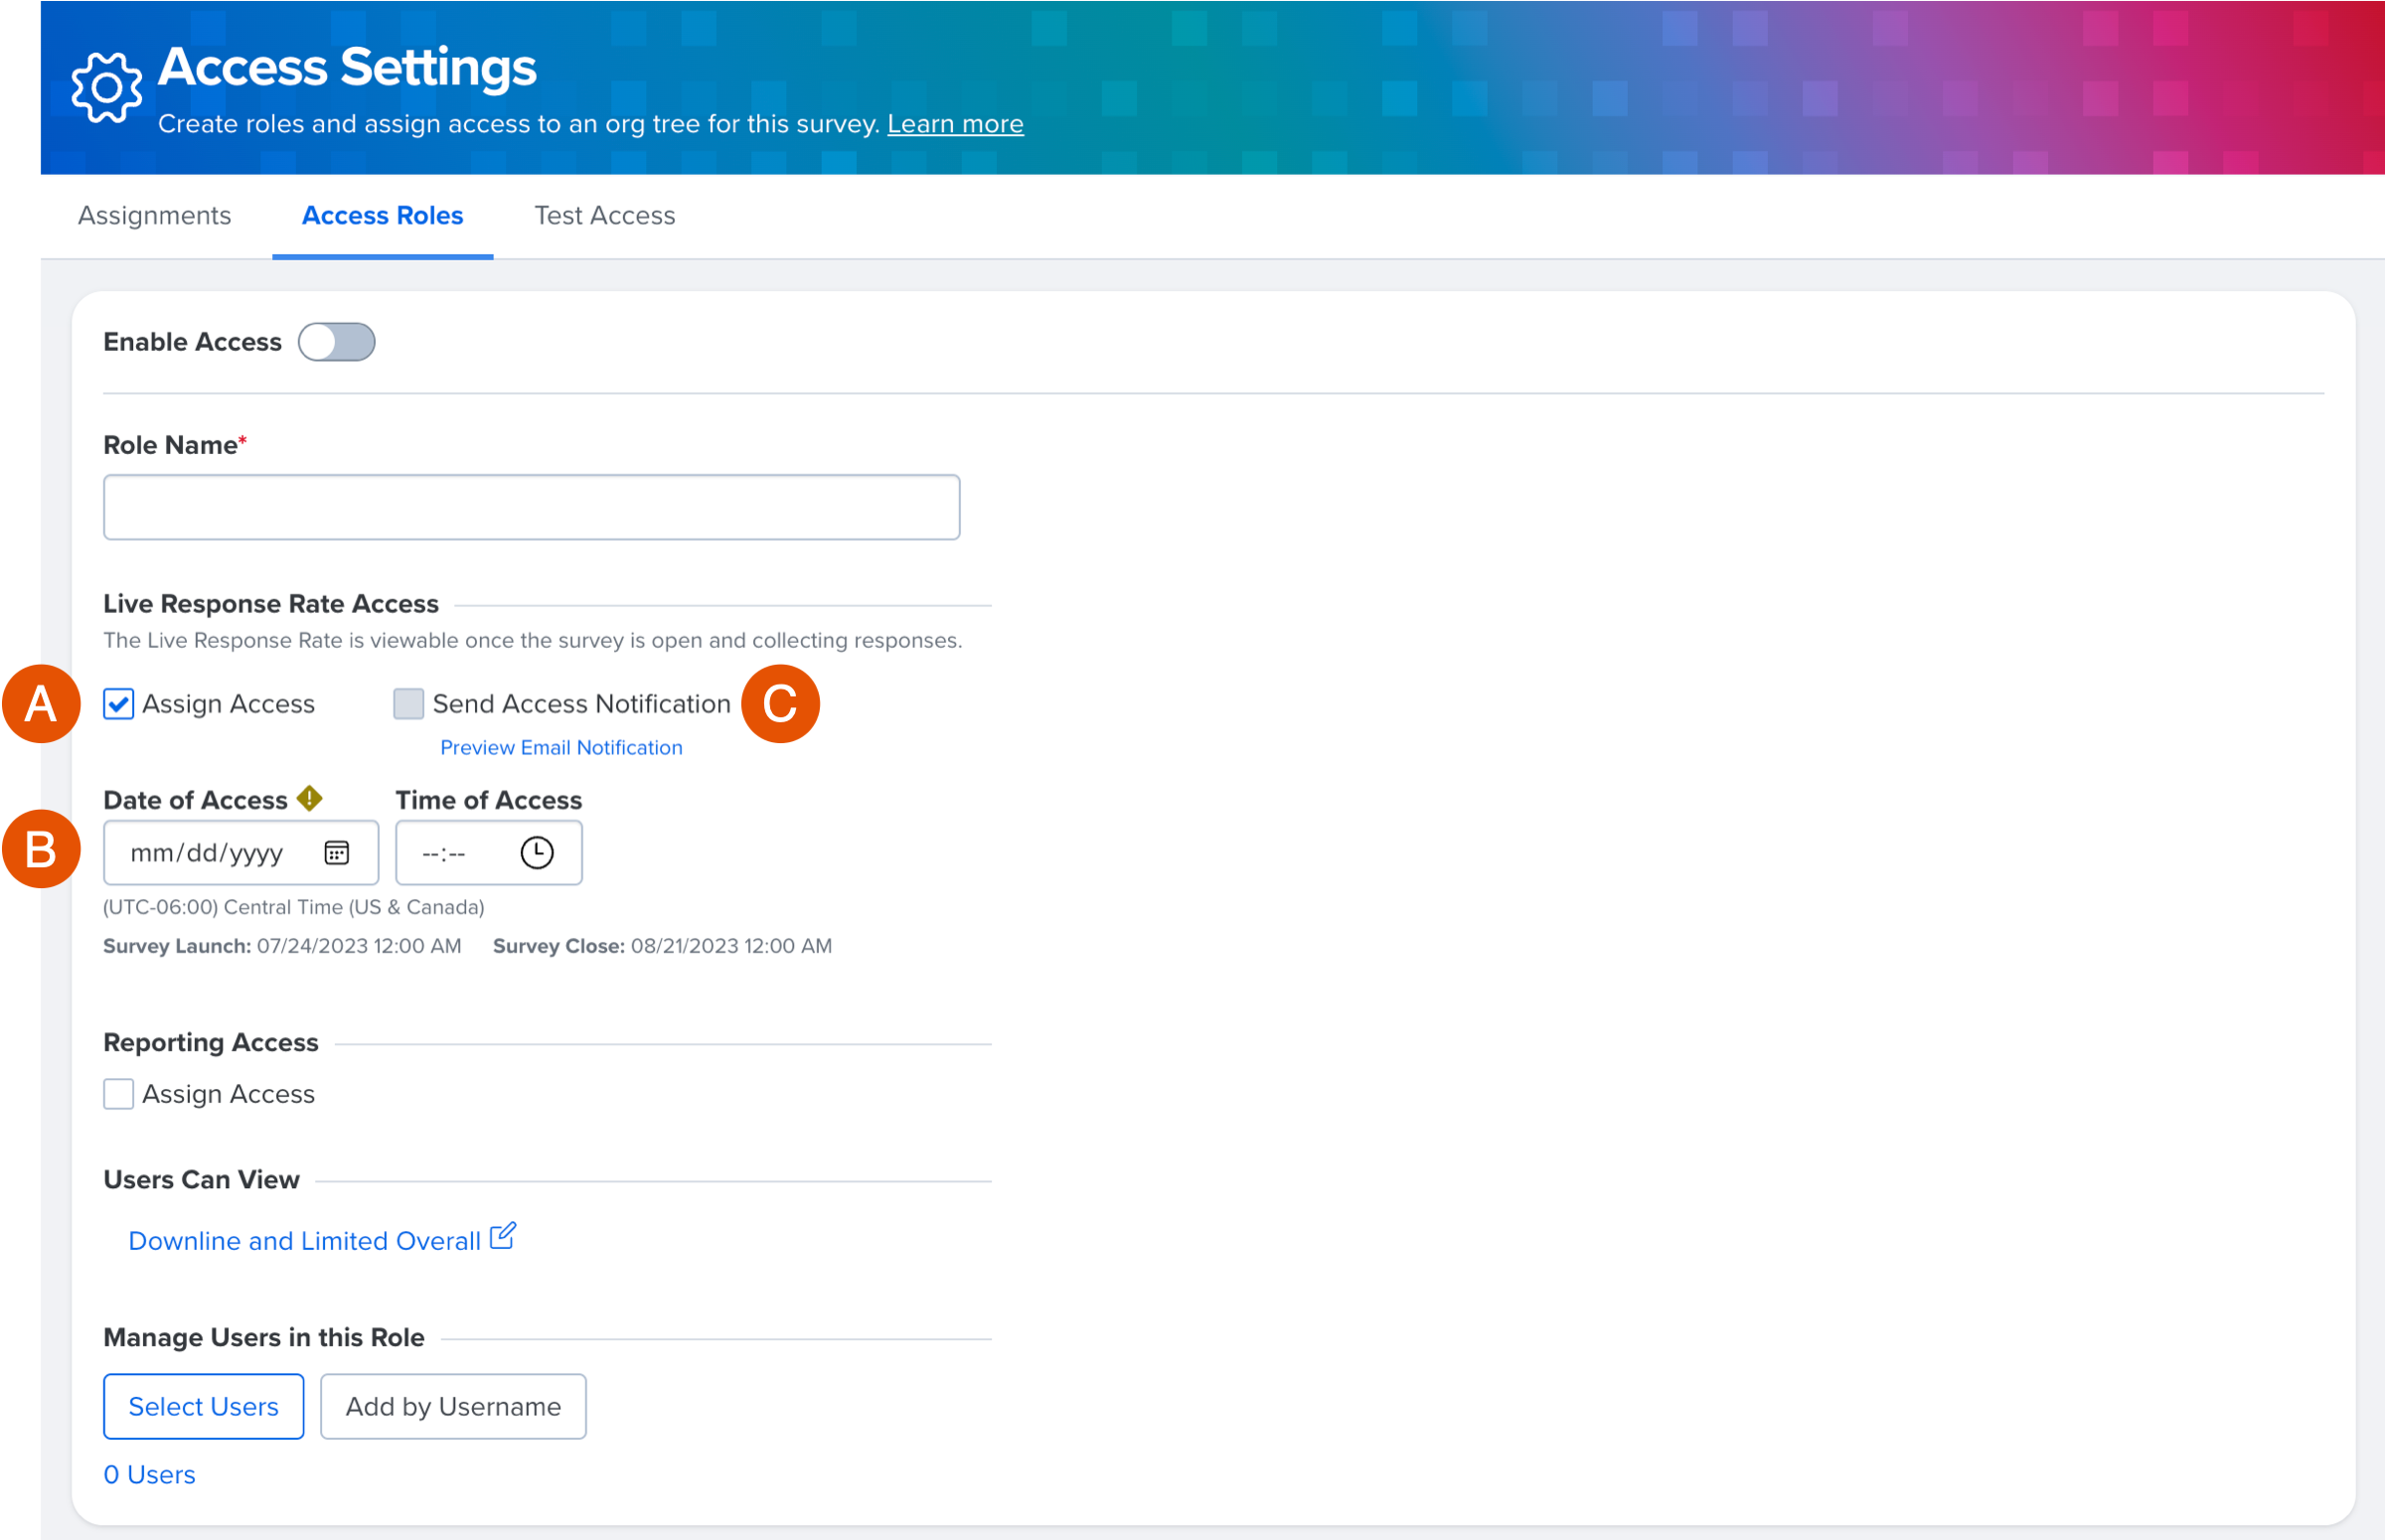
- Enable the Assign Access option (Figure A) to give users in this role access to the survey's Live Response Rate
- Schedule the date and optionally, the time of day, when user access to the Live Response Rate is active (Figure B)
- Optionally, enable Send Access Notification (Figure C) if users should receive notifications when they receive access
Continue to configure the role's settings. Click Save to save the role's settings.
Reporting Access
Enable access to reporting to give users customized visibility into survey results.
Learn more about survey analytics.
To enable Reporting access:

- Enable the Assign Access option (Figure A) to give users in this role access to the survey's analytics
- Schedule the date and optionally, the time of day, when user access to survey analytics is active (Figure B)
- Specify the options enabled for this role's access in the survey's analytics:
- C. View Comments: Specify if users can view the Comments report and which of the sub-features the role has access to, learn more
- D. View Comment Summaries: Specify if users can view and/or use the Smart Summary feature, learn more
- E. Heat Map: Specify if users can view the Heat Map report, learn more
- This requires the ability to slice by demographic
- F. Engagement Level Report: View engagement trends at the organizational level, learn more
- G. View Invited Participants: Specify if users can view a list of survey participants
- View Invited Participant Demographics: Specify if users can view the demographic attributes for each respondent, only attributes that can be sliced or filtered by the role are visible
-
- H. Action Planning: Specify if you can take advantage of Action Planning from the beginning of the survey to effectively increase employee engagement, learn more
- I. Benchmarks: Specify if benchmarks are available to compare with your analytics
- J. Demographic Filters & Slices: Determines which demographic attributes this role can use to filter and slice results
Continue to configure the role's settings. Click Save to save the role's settings.
User View Options
Configure who the user has visibility into relative to their node in the org tree.
To configure the user view options:
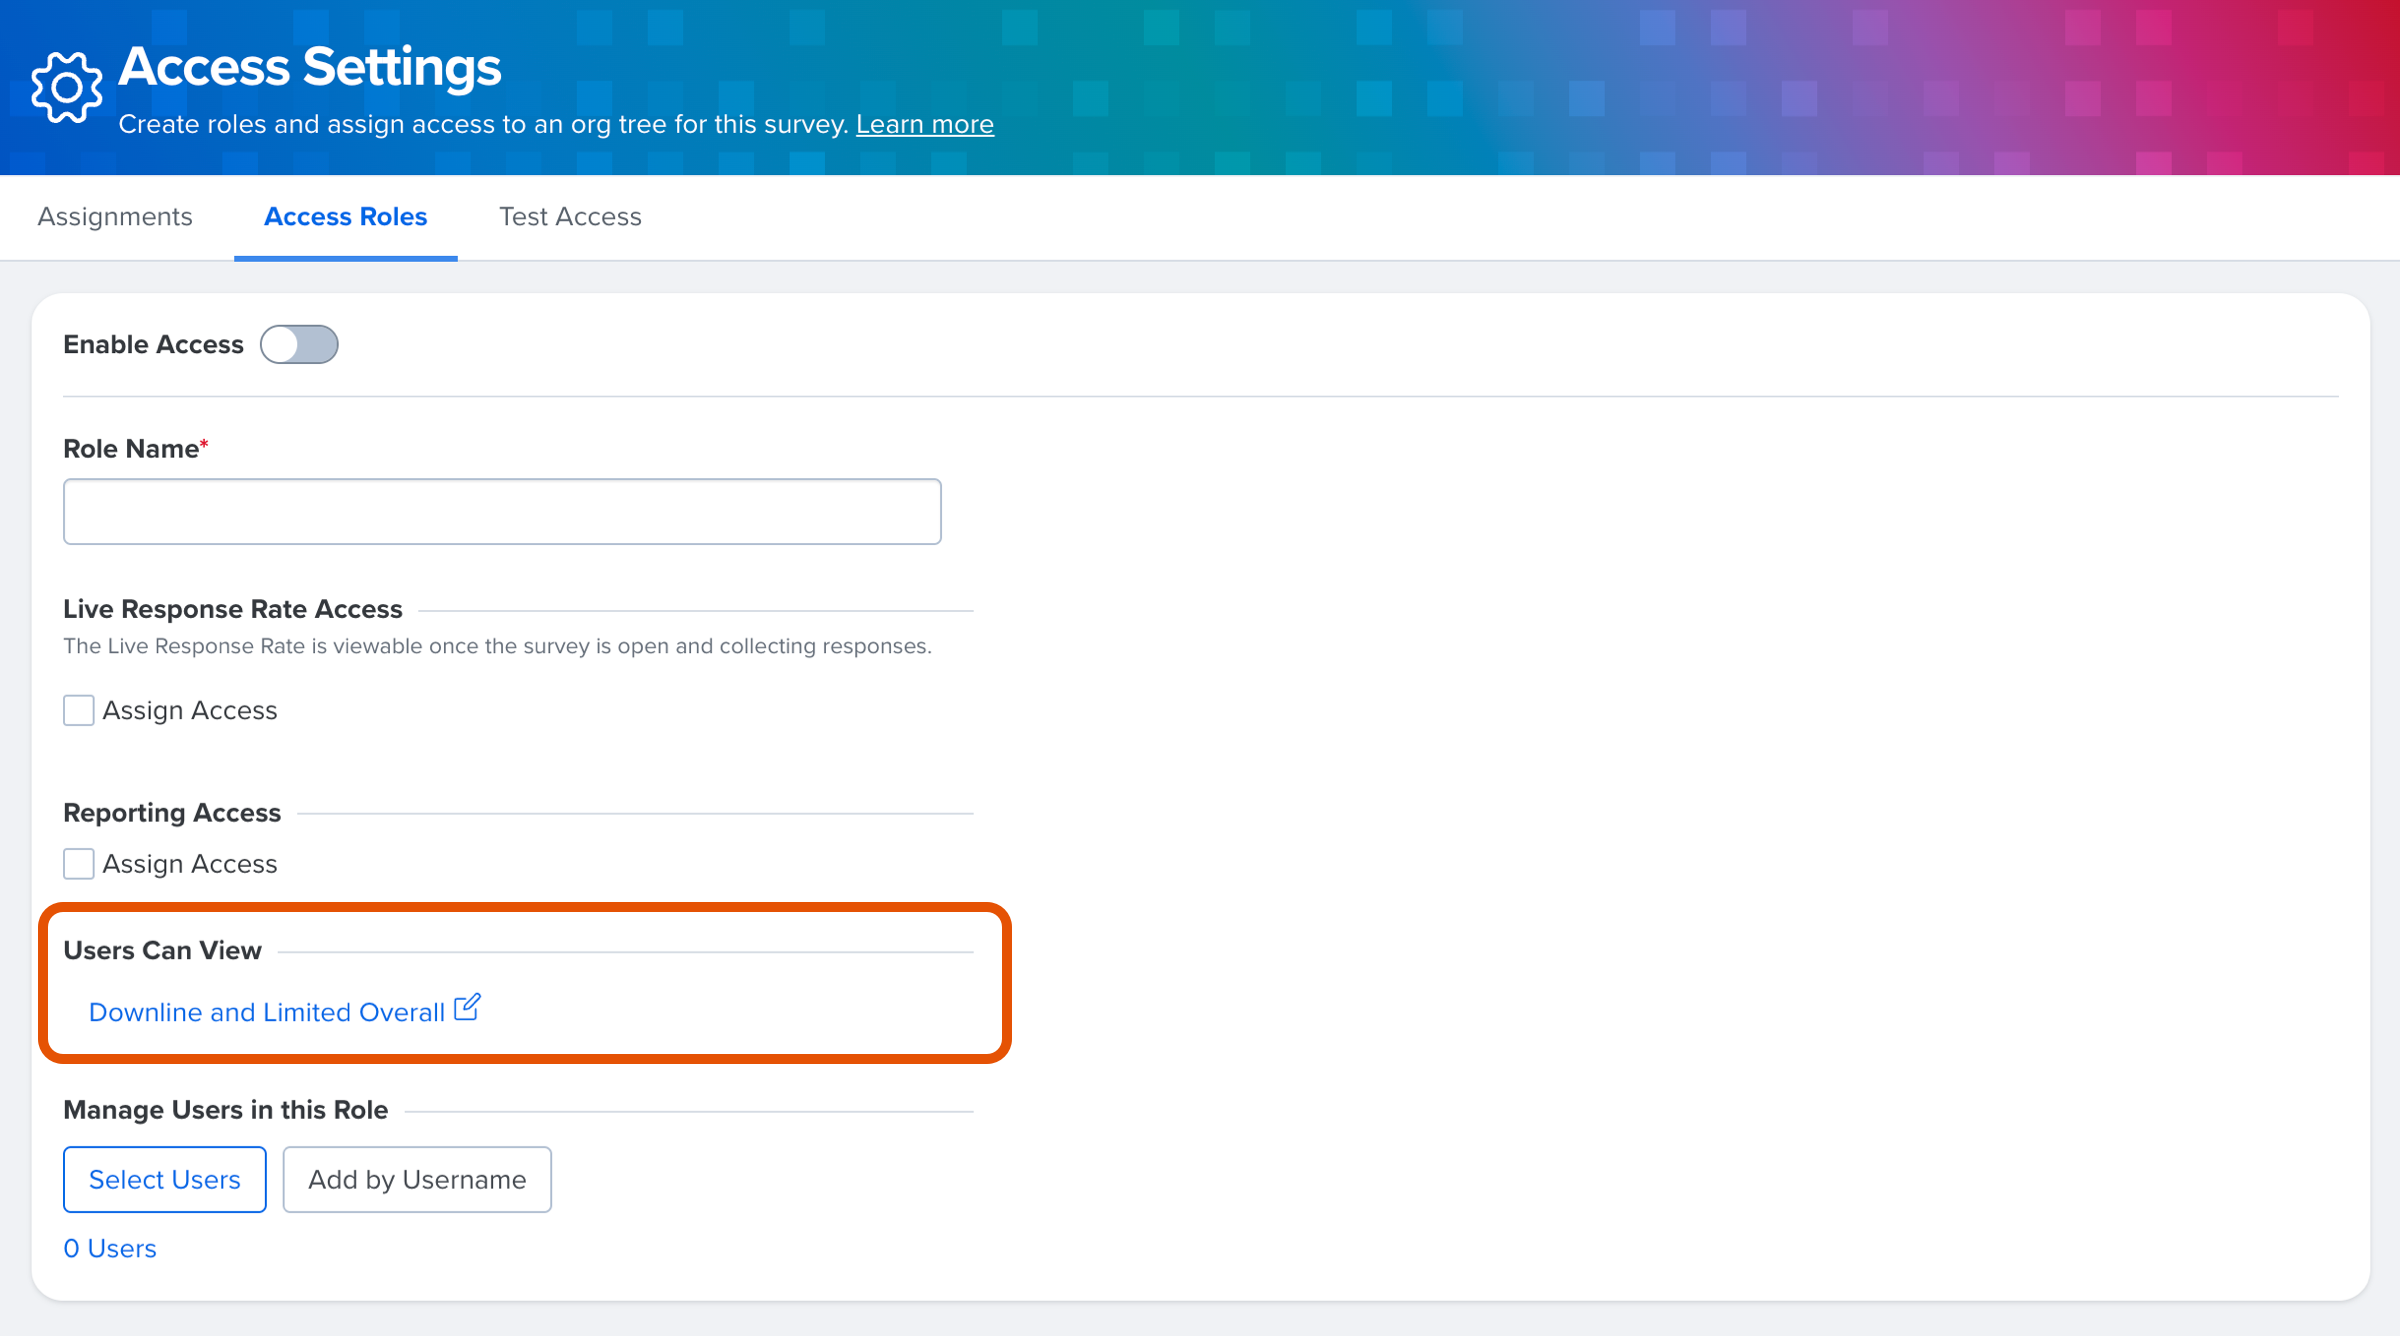
- Click the current user view selection to open a selection modal
- Select a user view option:
- Downline Only: Gives users visibility into their downline's results
- Downline & Limited Overall: Gives users visibility into the results of their downline and the organization overall, but slices & filters can not be applied to the organization's overall results
- Downline, Limited Upline, and Overall: Gives users visibility into the results of their downline. It also gives visibility to upline teams and the organization overall, but slices & filters can not be applied to the org's overall results
Managers who don't meet the confidentiality minimum threshold are prompted to navigate to an upline manager who has met the minimum threshold: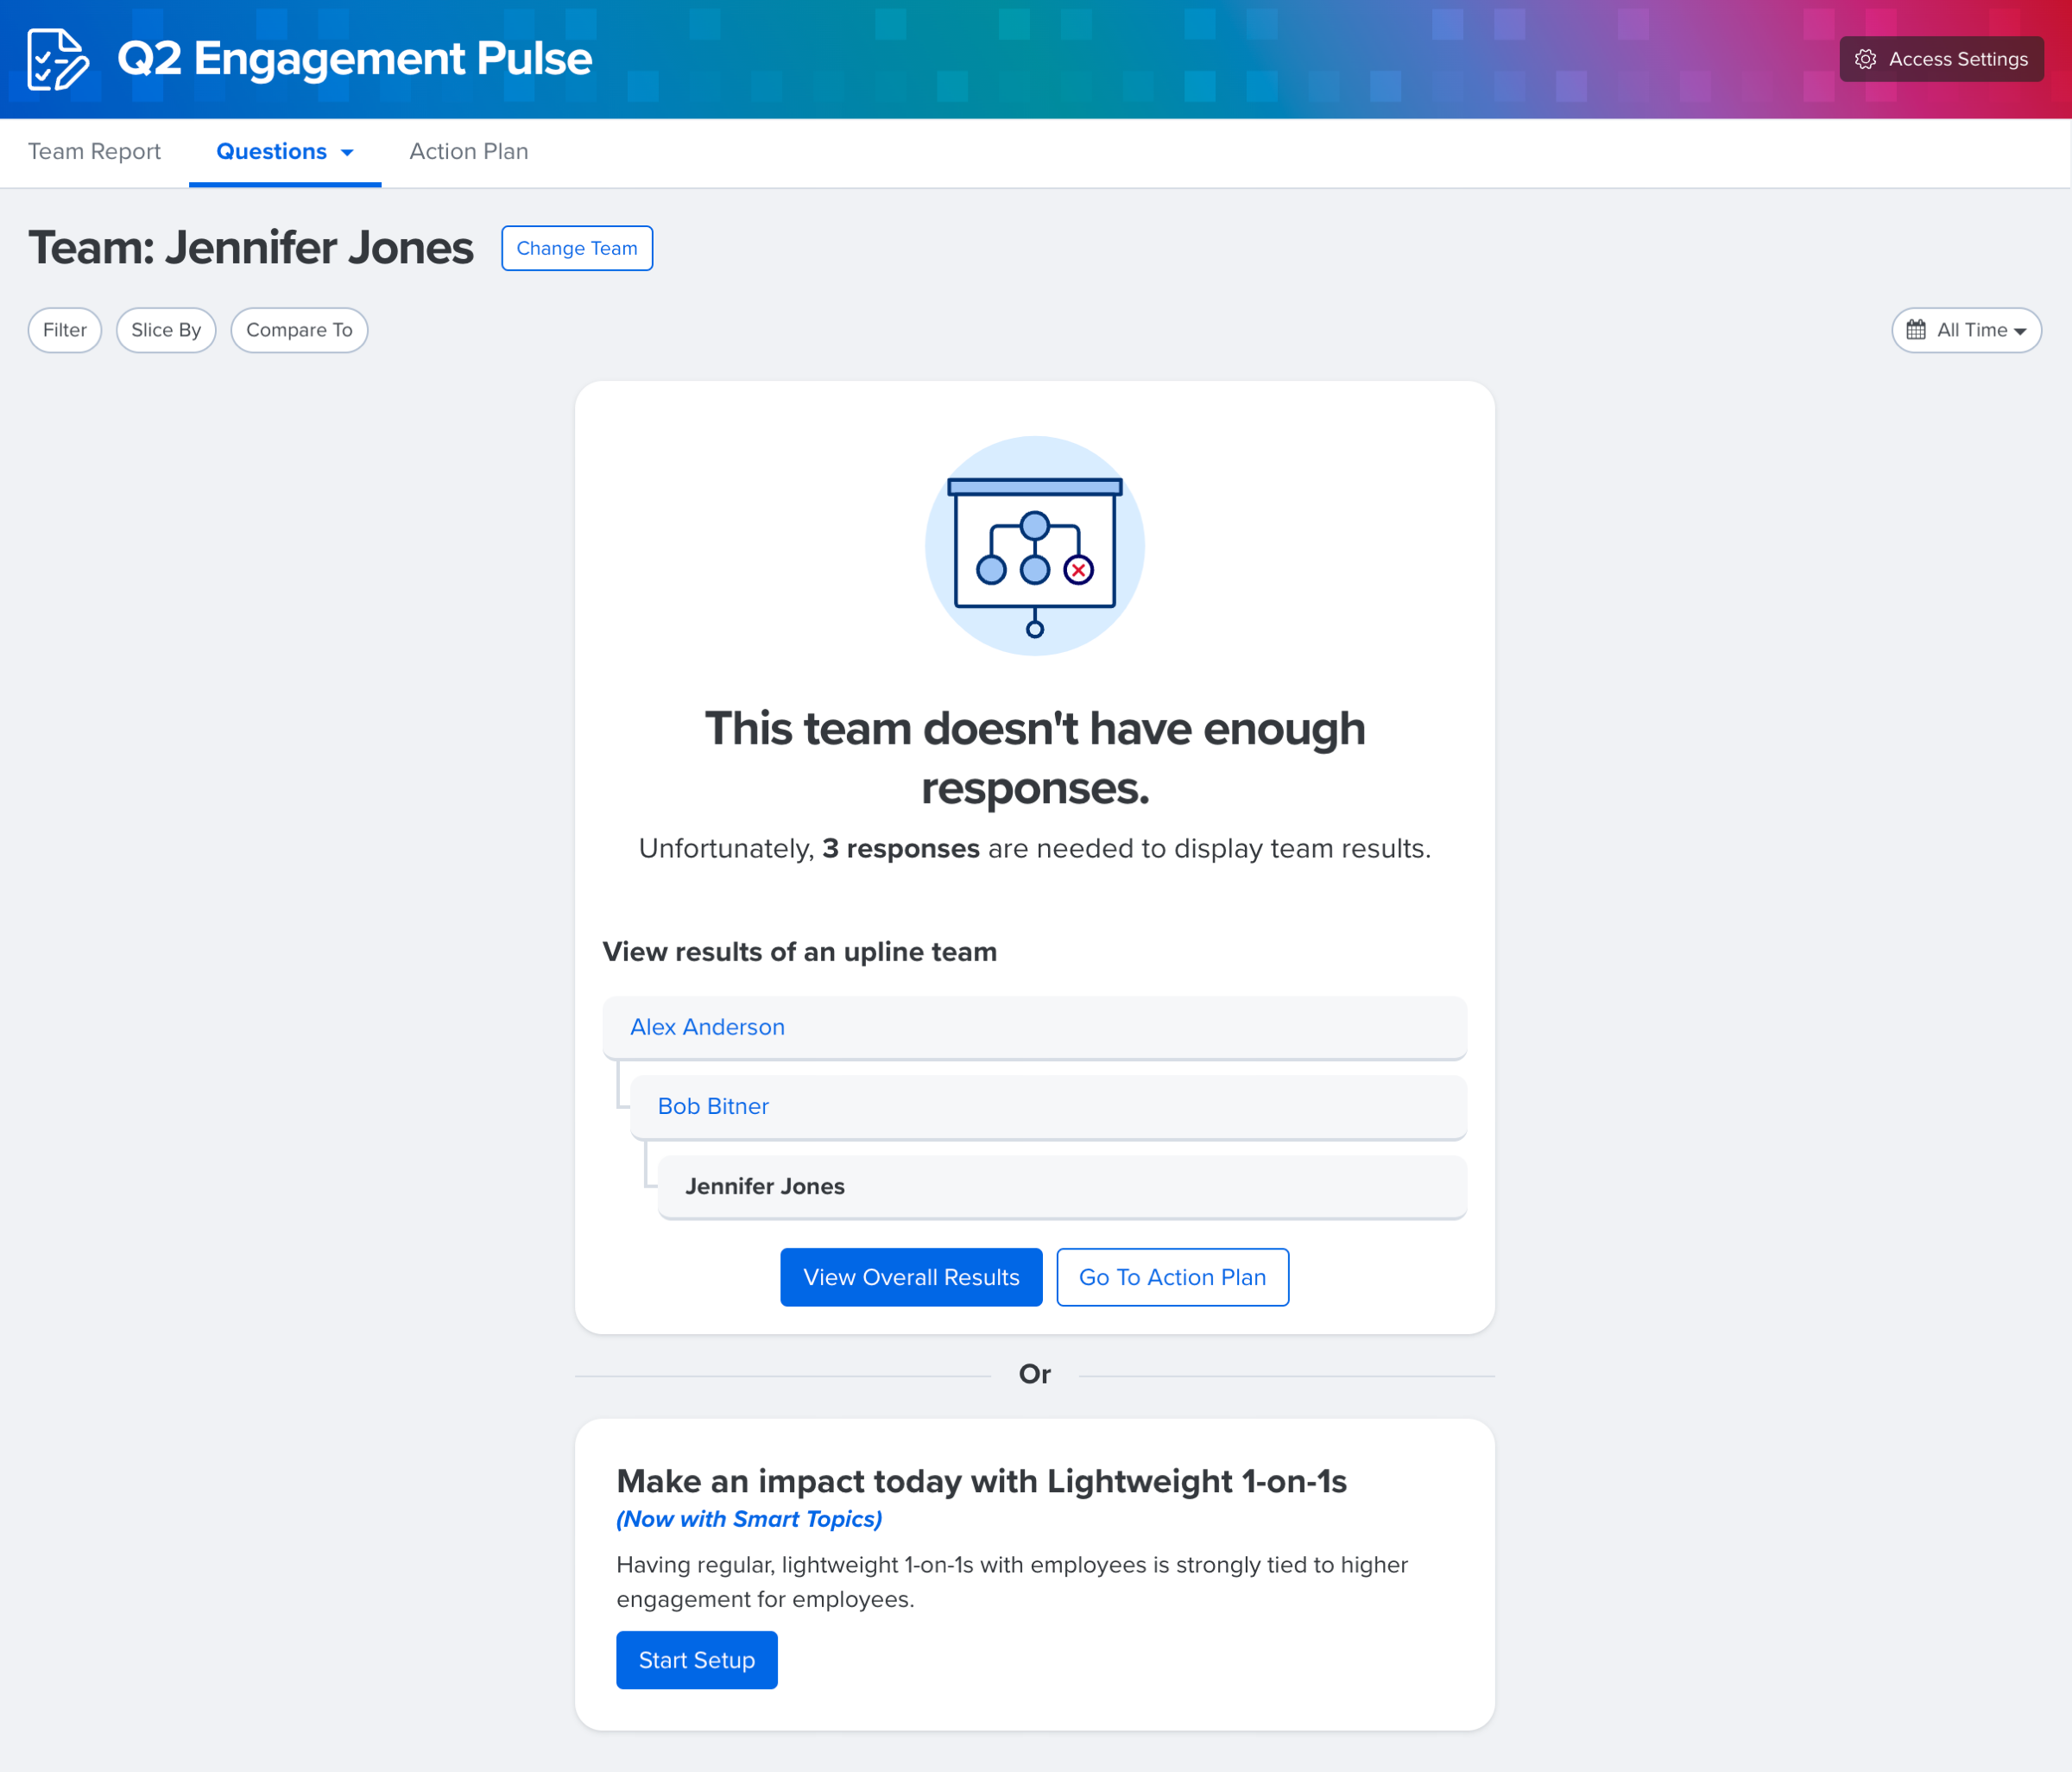
- Click Save
Continue to configure the role's settings. Click Save to save the role's settings.
Users in the Role
Manage the user(s) assigned to this role.
To manage the users in the role:
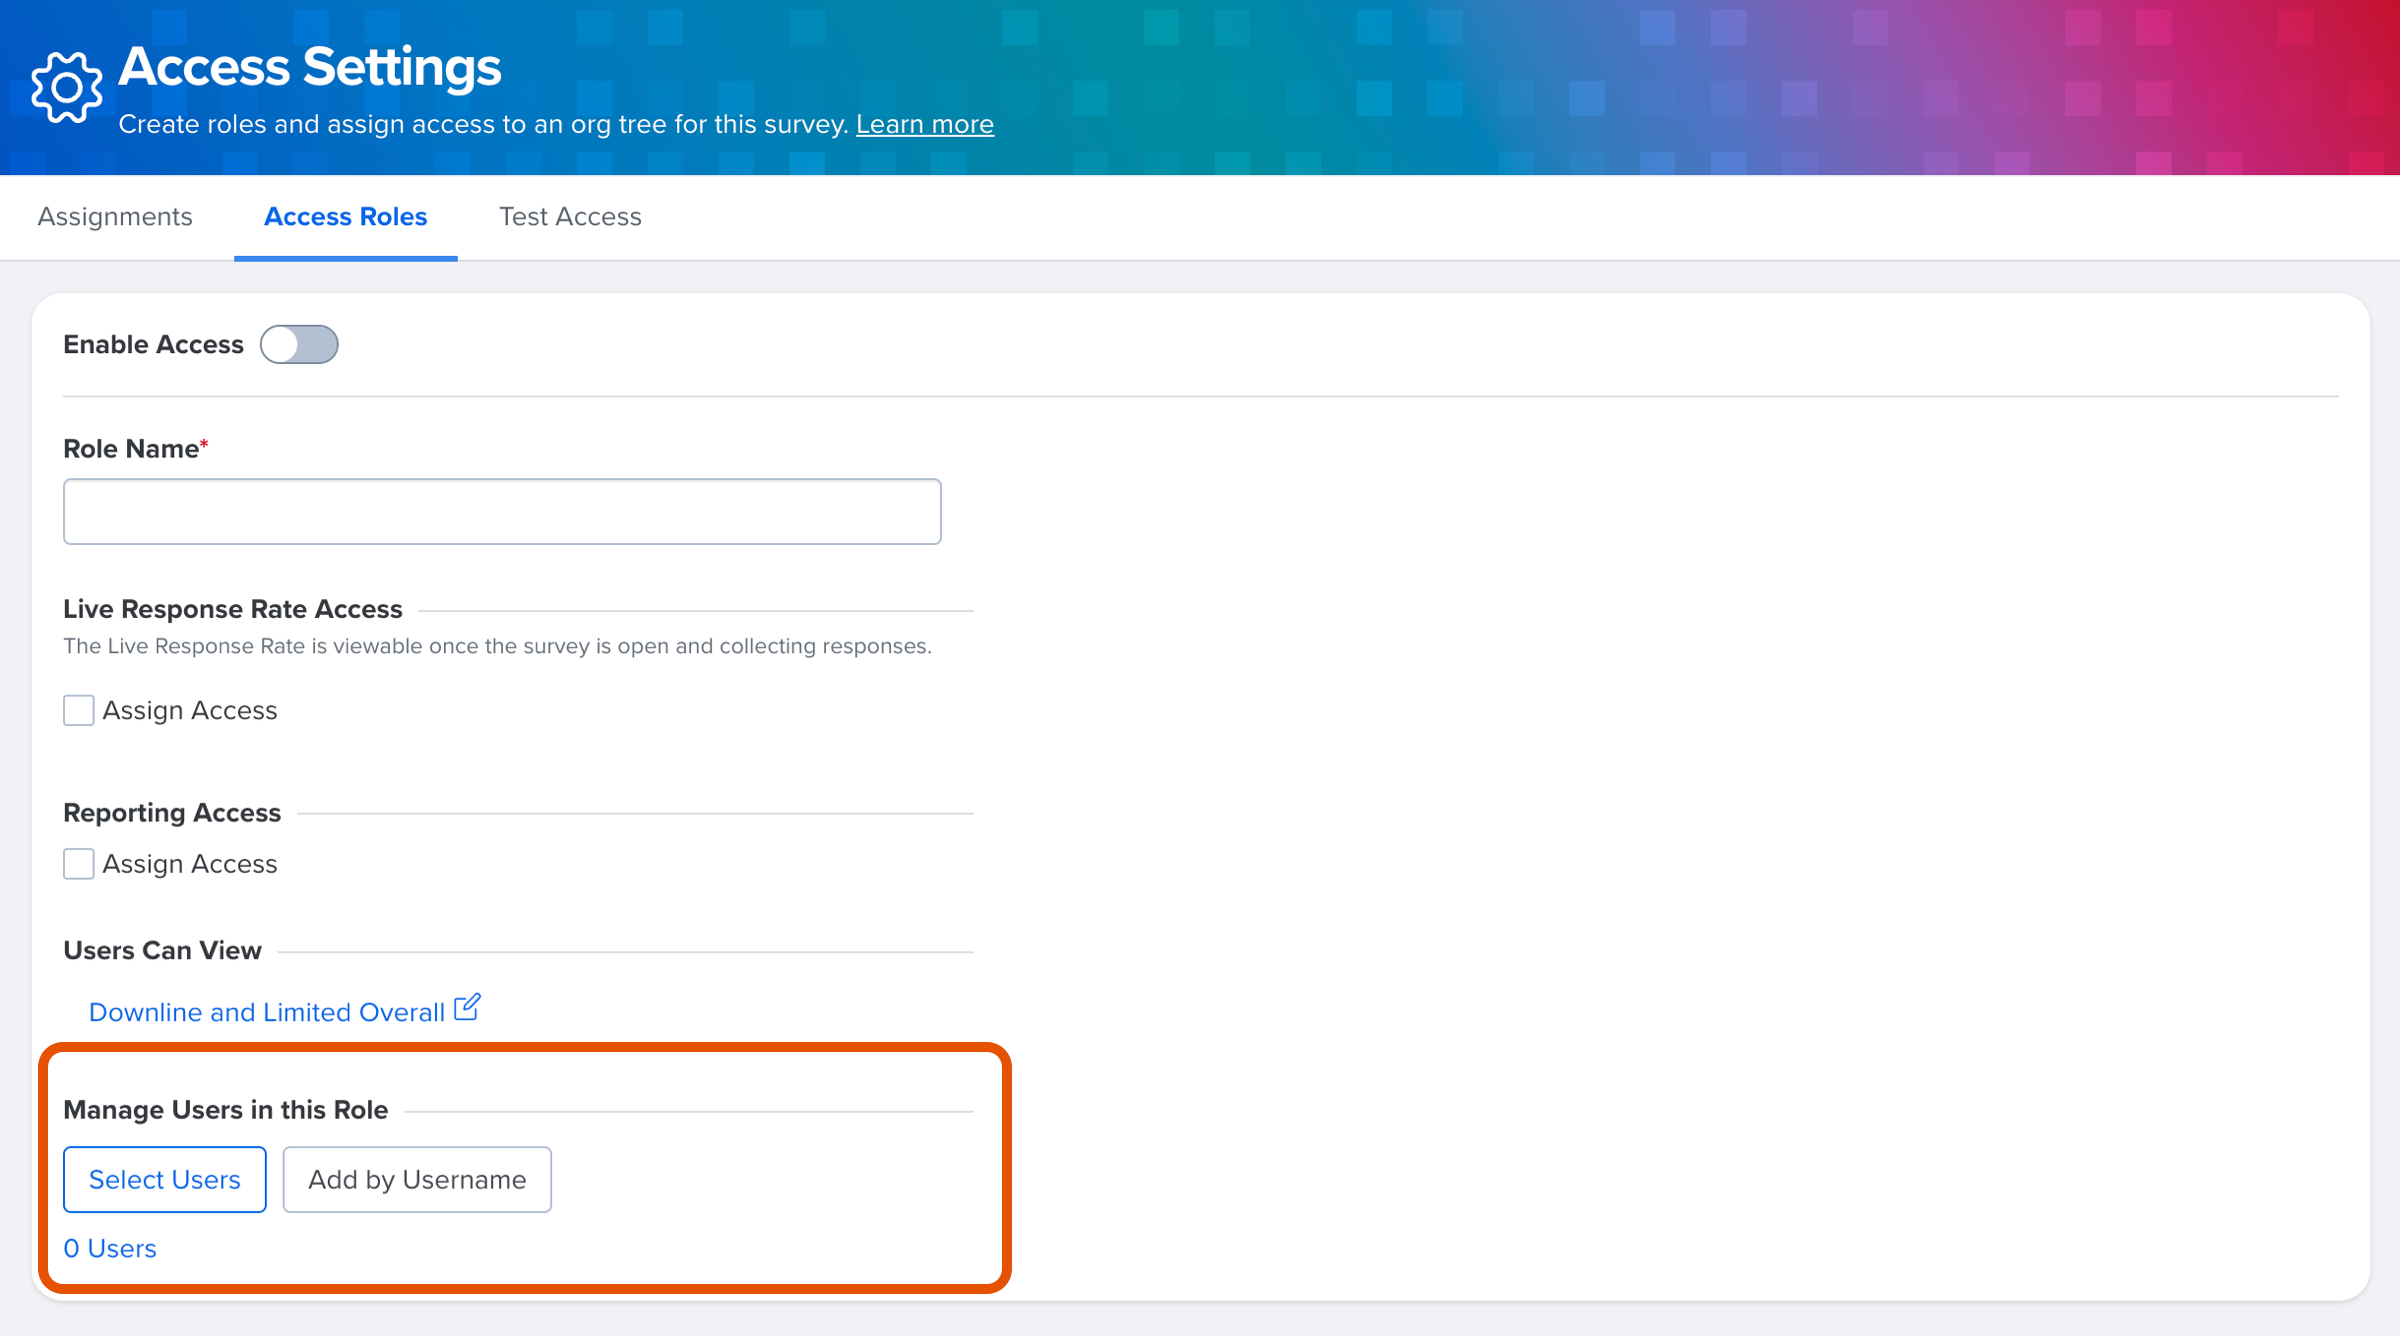
- Click Select Users
- In the Add Users field, enter the user(s) to add them to the role
- A user must be assigned to an org tree to view survey results- the Tree Access Assigned field notifies you of their status
- Optionally, if the role is active, click Send Notification to notify the user(s) of their role
- Click Save
Alternatively, click Add by Username to either upload a CSV file or manually enter the usernames of the users. Click Import to finalize the users.
Continue to configure the role's settings. Click Save to save the role's settings.
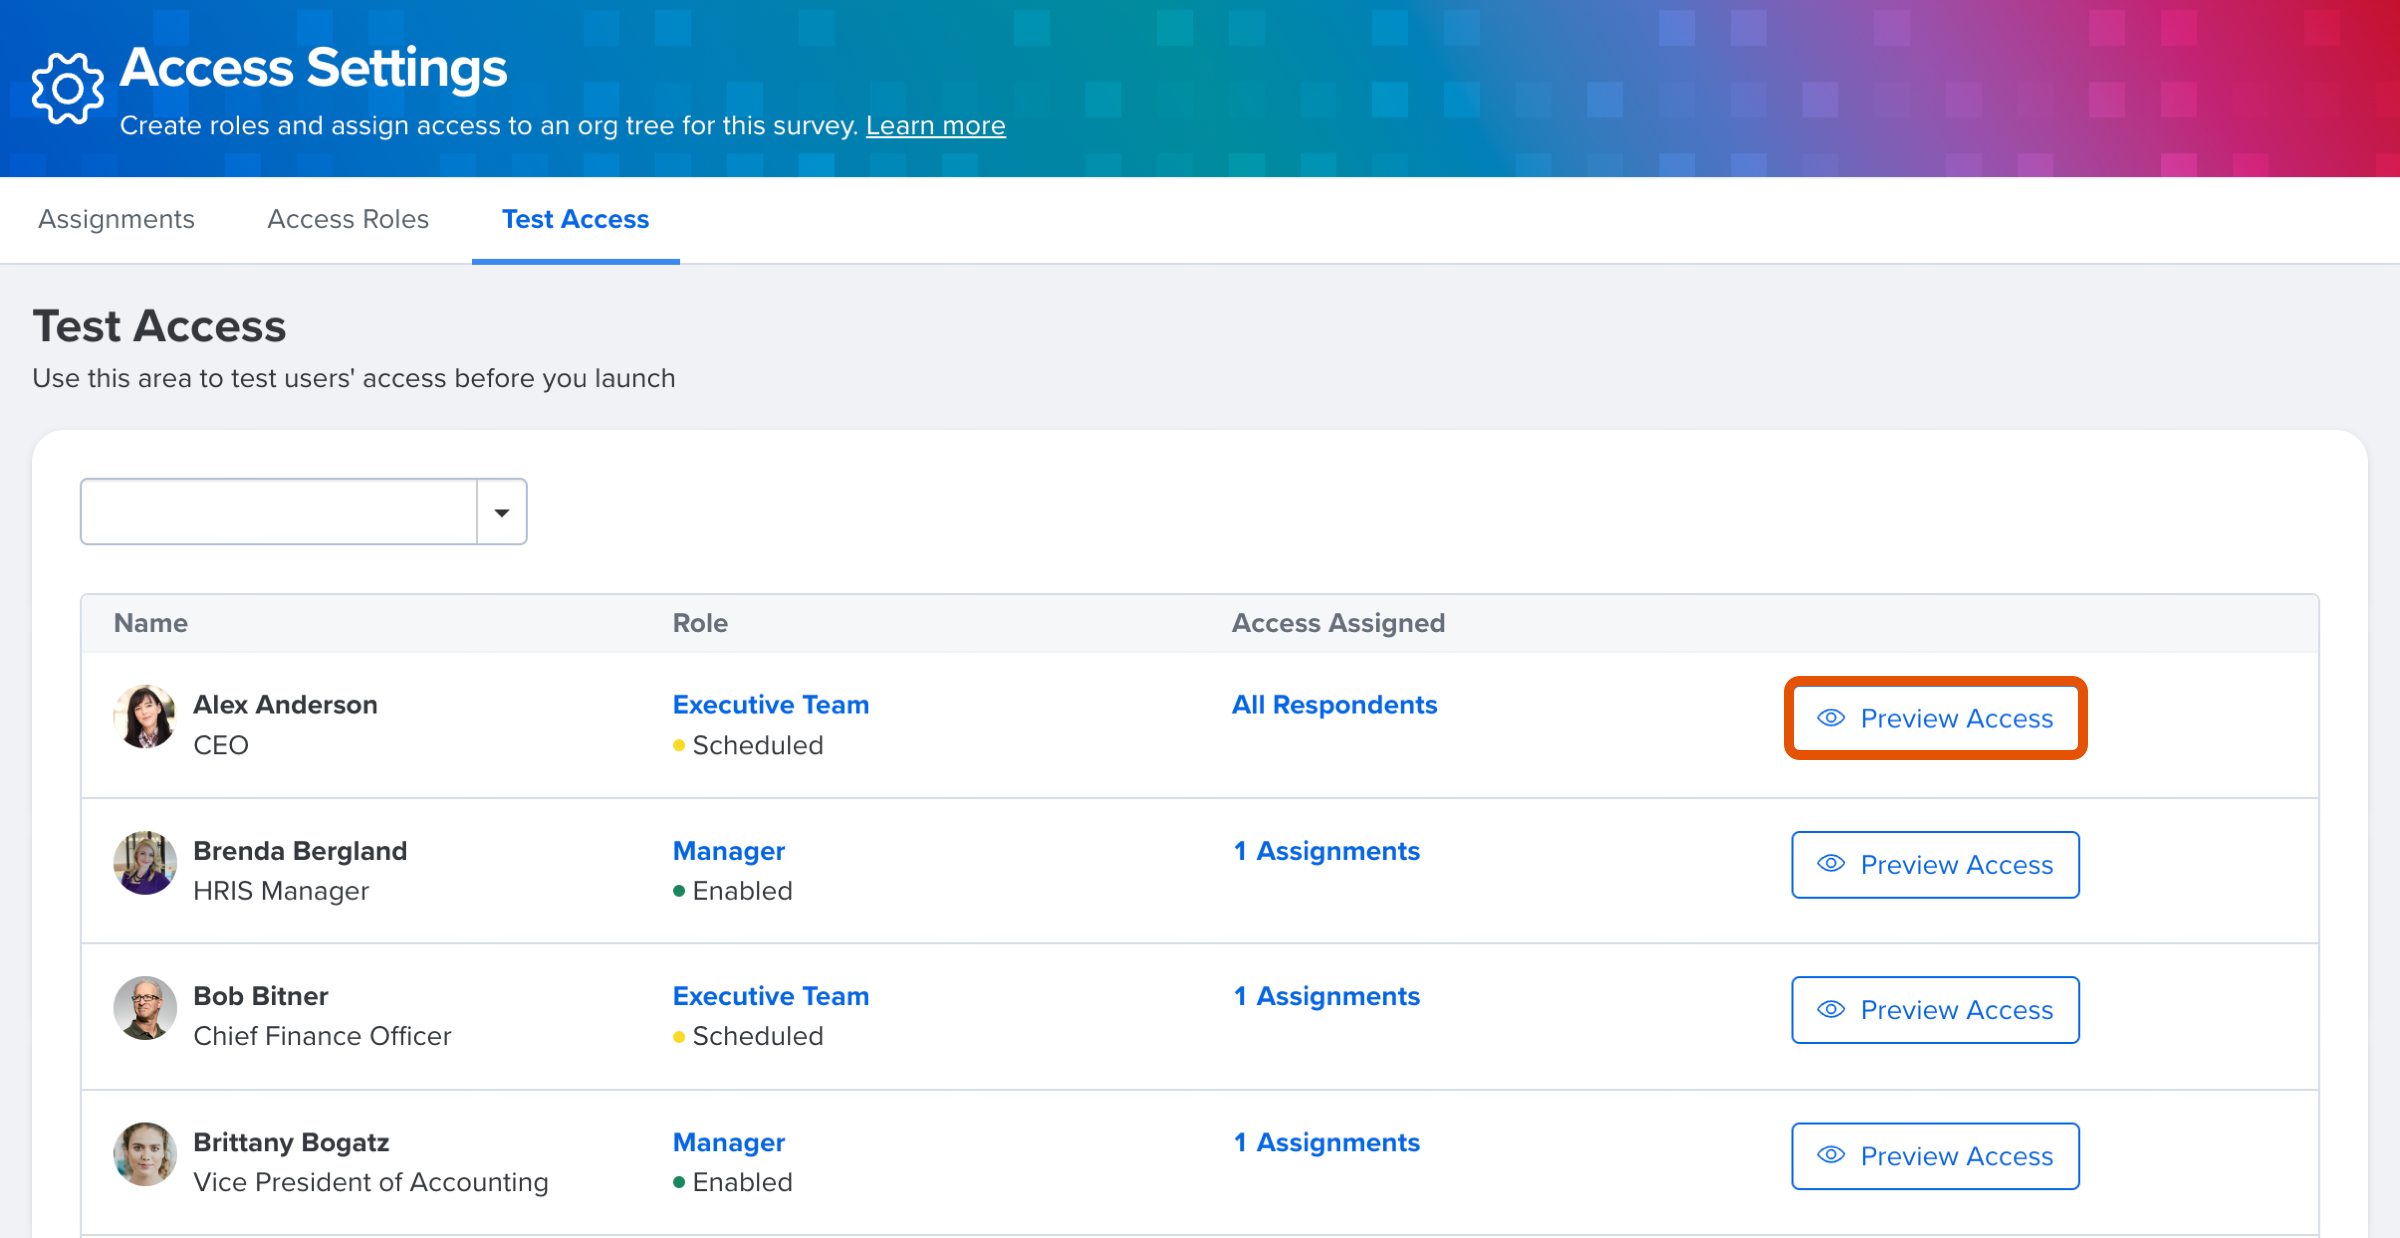
Test Access
As an admin, test and preview a user's visibility into a survey's analytics to ensure users have the correct level of visibility into survey analytics.
Requirements
To preview survey access, both of the following conditions must be satisfied:
- Click Assign Access for Live Response Rate Access or Reporting Access
- A user must be assigned to a branch of the manager org tree/custom org tree or assigned to All Respondents
A user without an Assignment is listed with, No Access Assigned, in their Access Assigned column.
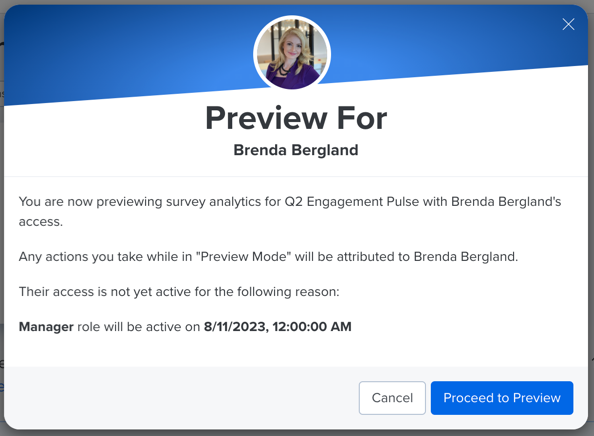
The Enable Access toggle does not affect the ability to preview as long as both conditions, mentioned above, are met.
Preview Survey Access
The Test Access tab displays all users with a role or assignment.
Each row represents the user, their Role and their status, as well as whether the user is assigned to All Respondents or an Assignment of a manager/custom org tree.
To preview a user's access to a survey's analytics:
- Click and expand Surveys in the left-hand navigation menu
- Click Analytics
- Select a specific survey
- Click Admin Controls, then Access Settings in the top-right
- Select the Test Access tab
- Every user with any level of access, i.e. an Assignment or Role, is listed in this tab
- Click Preview Access to preview the survey analytics
- In the modal, confirm the details and click Proceed to Preview
- To end the preview and return to the Test Access tab, click Close Preview in the preview banner
Preview Limitations
As you preview survey analytics as a user, there are a number of limitations in place to be aware of:
- While previewing as a user, any actions taken by the previewer are attributed to the previewed user
- While previewing as a user, you can export, filter/slice the results based on the permissions of the user being previewed
- Features available only to admins, i.e. Access Settings, etc. are not visible while previewing a non-admin user
One HR platform for connected talent insights. See how Quantum Workplace brings your data together across 1-on-1s, talent reviews, performance reviews, and more—so you can spot trends, act fast, and make more informed people decisions. Explore the interactive product tour or request a personalized demo with your Customer Success Manager.