General Settings in Administration
As an admin, use the General Settings menu to customize Quantum Workplace for your organization.
In this article:
- Overview
- Requirements
- Access General Settings
- Organization
- Home Logo
- Demographics
- Easy Impersonation
- Moderate Posts
Overview
As an admin, use the General Settings menu to customize Quantum Workplace for your organization.
Learn more about user management.
Requirements
- Available to admin users
Access General Settings
As an admin, to access General Settings:
- Click and expand Global Settings in the left-hand navigation menu
- Click General Settings
Organization
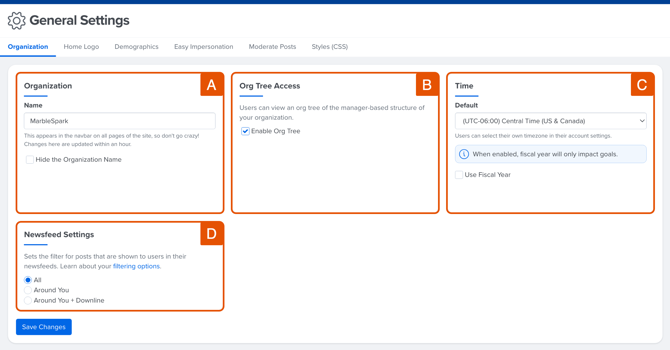
Specify the organization-wide settings for your organization:

- A. Organization Name: Configure the name of the organization used throughout the platform
- B. Org Tree Access: Enable/disable the ability for users to access the org tree, learn more
- C. Time: Configure the default timezone, typically for the headquarter's office
- Users can select their own timezone in their individual settings
- Click and enable Use Fiscal Year to specify the fiscal year's first month, learn more
- D. Newsfeed Settings: Configure the filter for posts in the newsfeed, learn more
Click Save Changes to finalize any changes.
As an Admin, you set the stage for employee success. Explore advanced tools that help you drive engagement, growth, and retention.
Home Logo
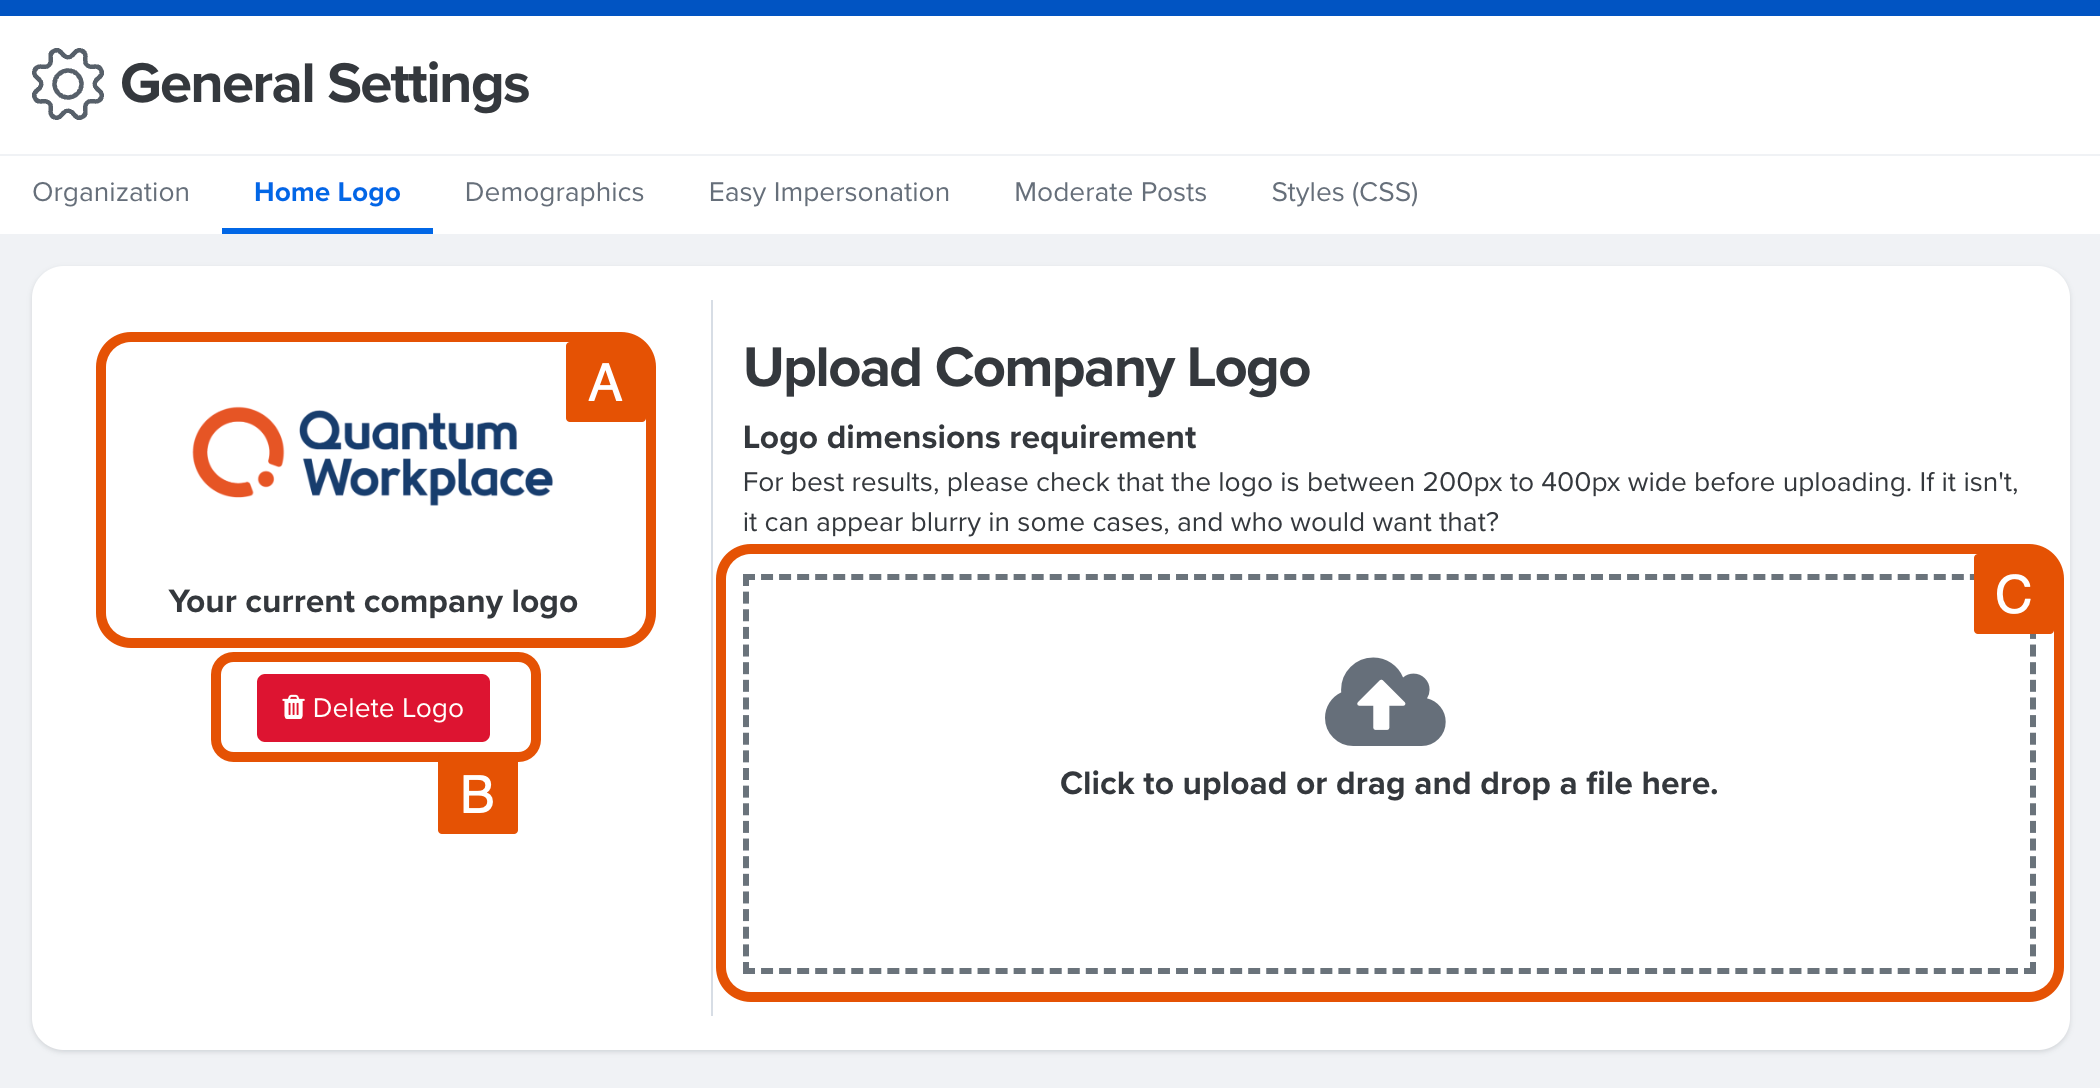
Use the Home Logo tab to manage your company's logo displayed on the home page and in surveys launched in Quantum Workplace.

- A. Current Logo: If a logo is in use, the logo will be displayed here
- B. Delete Logo: If a logo is in use, click Delete Logo to remove the logo
- C. Upload Logo: Click the box or drag and drop the logo file into the box to upload the logo
- For best results, ensure the width of the logo file is between 200px and 400px
Add or Update Logo: Quantum Workplace's Home Page & Surveys
The logos added here affect the company logo displayed on the home page and on surveys.
To add or update a logo:
.gif?quality=high&width=670&height=399&name=2023-03-23_16-39-43%20(1).gif)
- Click the box or drag and drop the logo file into the box to upload the logo
- Adjust the size and orientation of the logo to properly fit into the border
- If the logo orientation needs adjustment, use the rotate buttons in the bottom-right to rotate the logo clockwise or counter-clockwise
- If the logo size needs adjustment, use the scroll function of your mouse/trackpad or click-and-drag the zoom bar
- Click-and-drag the logo and center the logo within the border
- Click Save
Add or Update Logo: Email Notifications for Survey Invites and Reminders
The logos added here affect the company logo displayed on emails for survey invites and reminders.
To add or update a logo, contact your CIM/CSM with an image file of your company's logo.
-
- For clear resolution, ensure the maximum width of the logo file is 320px
Demographics
From the Demographics tab, you can do the following:

- Click + New Demographic to add a new demographic to your organization
- Rename demographic titles by the demographic's corresponding Edit icon
- Decide which demographics should be displayed on employees' profile cards
- Decide which demographics your users should be able to search by within the site
- Decide which demographics should be available for filtering and slicing within analytics and who can do so, i.e. admins, managers, everybody, or nobody
- Decide which demographics should be able to be added to Team Goals
The following demographics do not need to be added to General Settings first:
- First Name
- Last Name
- Email Address
- Username
- Position/Title
- Date of Birth
- Hire Date
- Term Date
- Employee ID
- Manager Employee ID
- Manager Username
- Profile Image URL
- Active Status
- Secondary Email Address
- User Default Language
Easy Impersonation
Configure the Easy Impersonation settings for your organization:

- A. Default Setting: Specify if Easy Impersonation is enabled/disabled; if enabled, specify if the baseline is to allow all users or no users to be impersonated
- B. Exceptions: If Easy Impersonation is enabled, enter the users who should be exceptions to the baseline
- If All Users is selected as the default setting, enter the users who should be excluded from being impersonated
- If No Users is selected as the default setting, enter the users who should be included and able to be impersonated
Learn more about Easy Impersonation.
Moderate Posts
Approve any Recognition or Goal posts that have been flagged.
From the Moderate Posts tab, look over flagged posts and decide to archive, make appropriate edits, or immediately approve the post.

