In this article:
Overview
Establishing an HRIS integration with Paychex allows your employee demographic information to automatically communicate with Quantum Workplace every 24 hours.
This ensures your employee data in Quantum Workplace is up to date and that automated services, such as Exit or New Hire Surveys are launched at the most opportune time.
To set up an HRIS integration with Paychex, you will need login access to Quantum Workplace as an administrator, and access to your organization's Paychex account.
How to Establish an HRIS Integration with Paychex
The following steps will be categorized into different sections for easier navigation and legibility but should be completed in chronological order.
Access Integrations
To access the Integrations page and establish the HRIS integration:
- Click and expand Global Settings in the left-hand navigation menu
- Click Integrations from the expanded menu
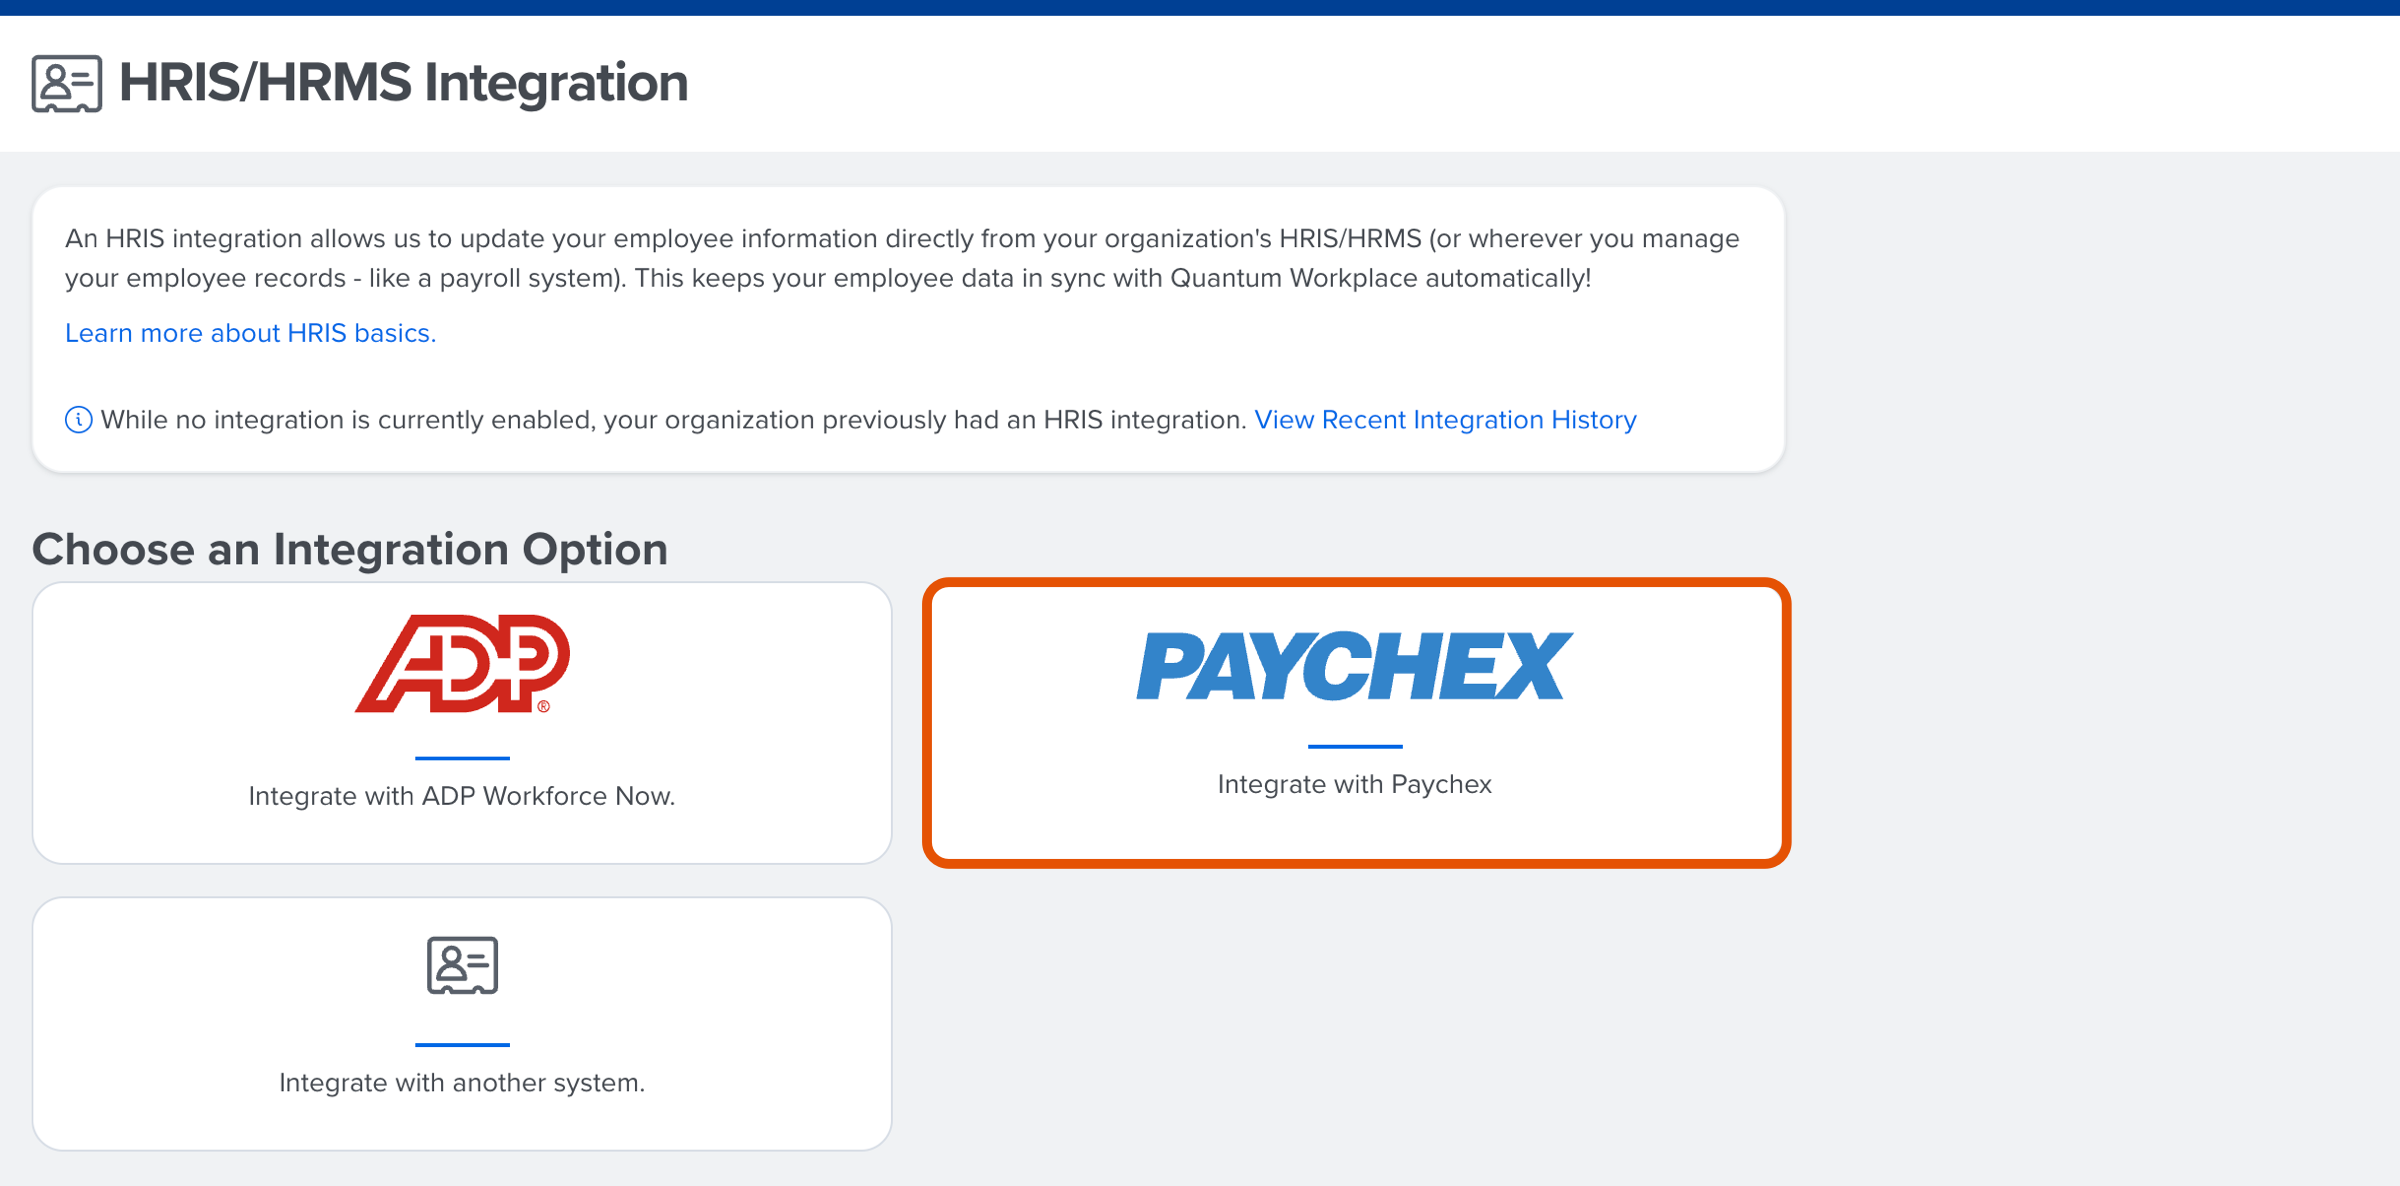
- Click the HRIS/HRMS card
- Click the Paychex card
Identify Your Paychex Company ID
This section will help you access and identify your organization's 8-digit Paychex company ID. This ID is required to securely connect your Paychex account to Quantum Workplace.
To identify your organization's Paychex company ID:
- Login and access your organization's Paychex account in a separate browser window or tab
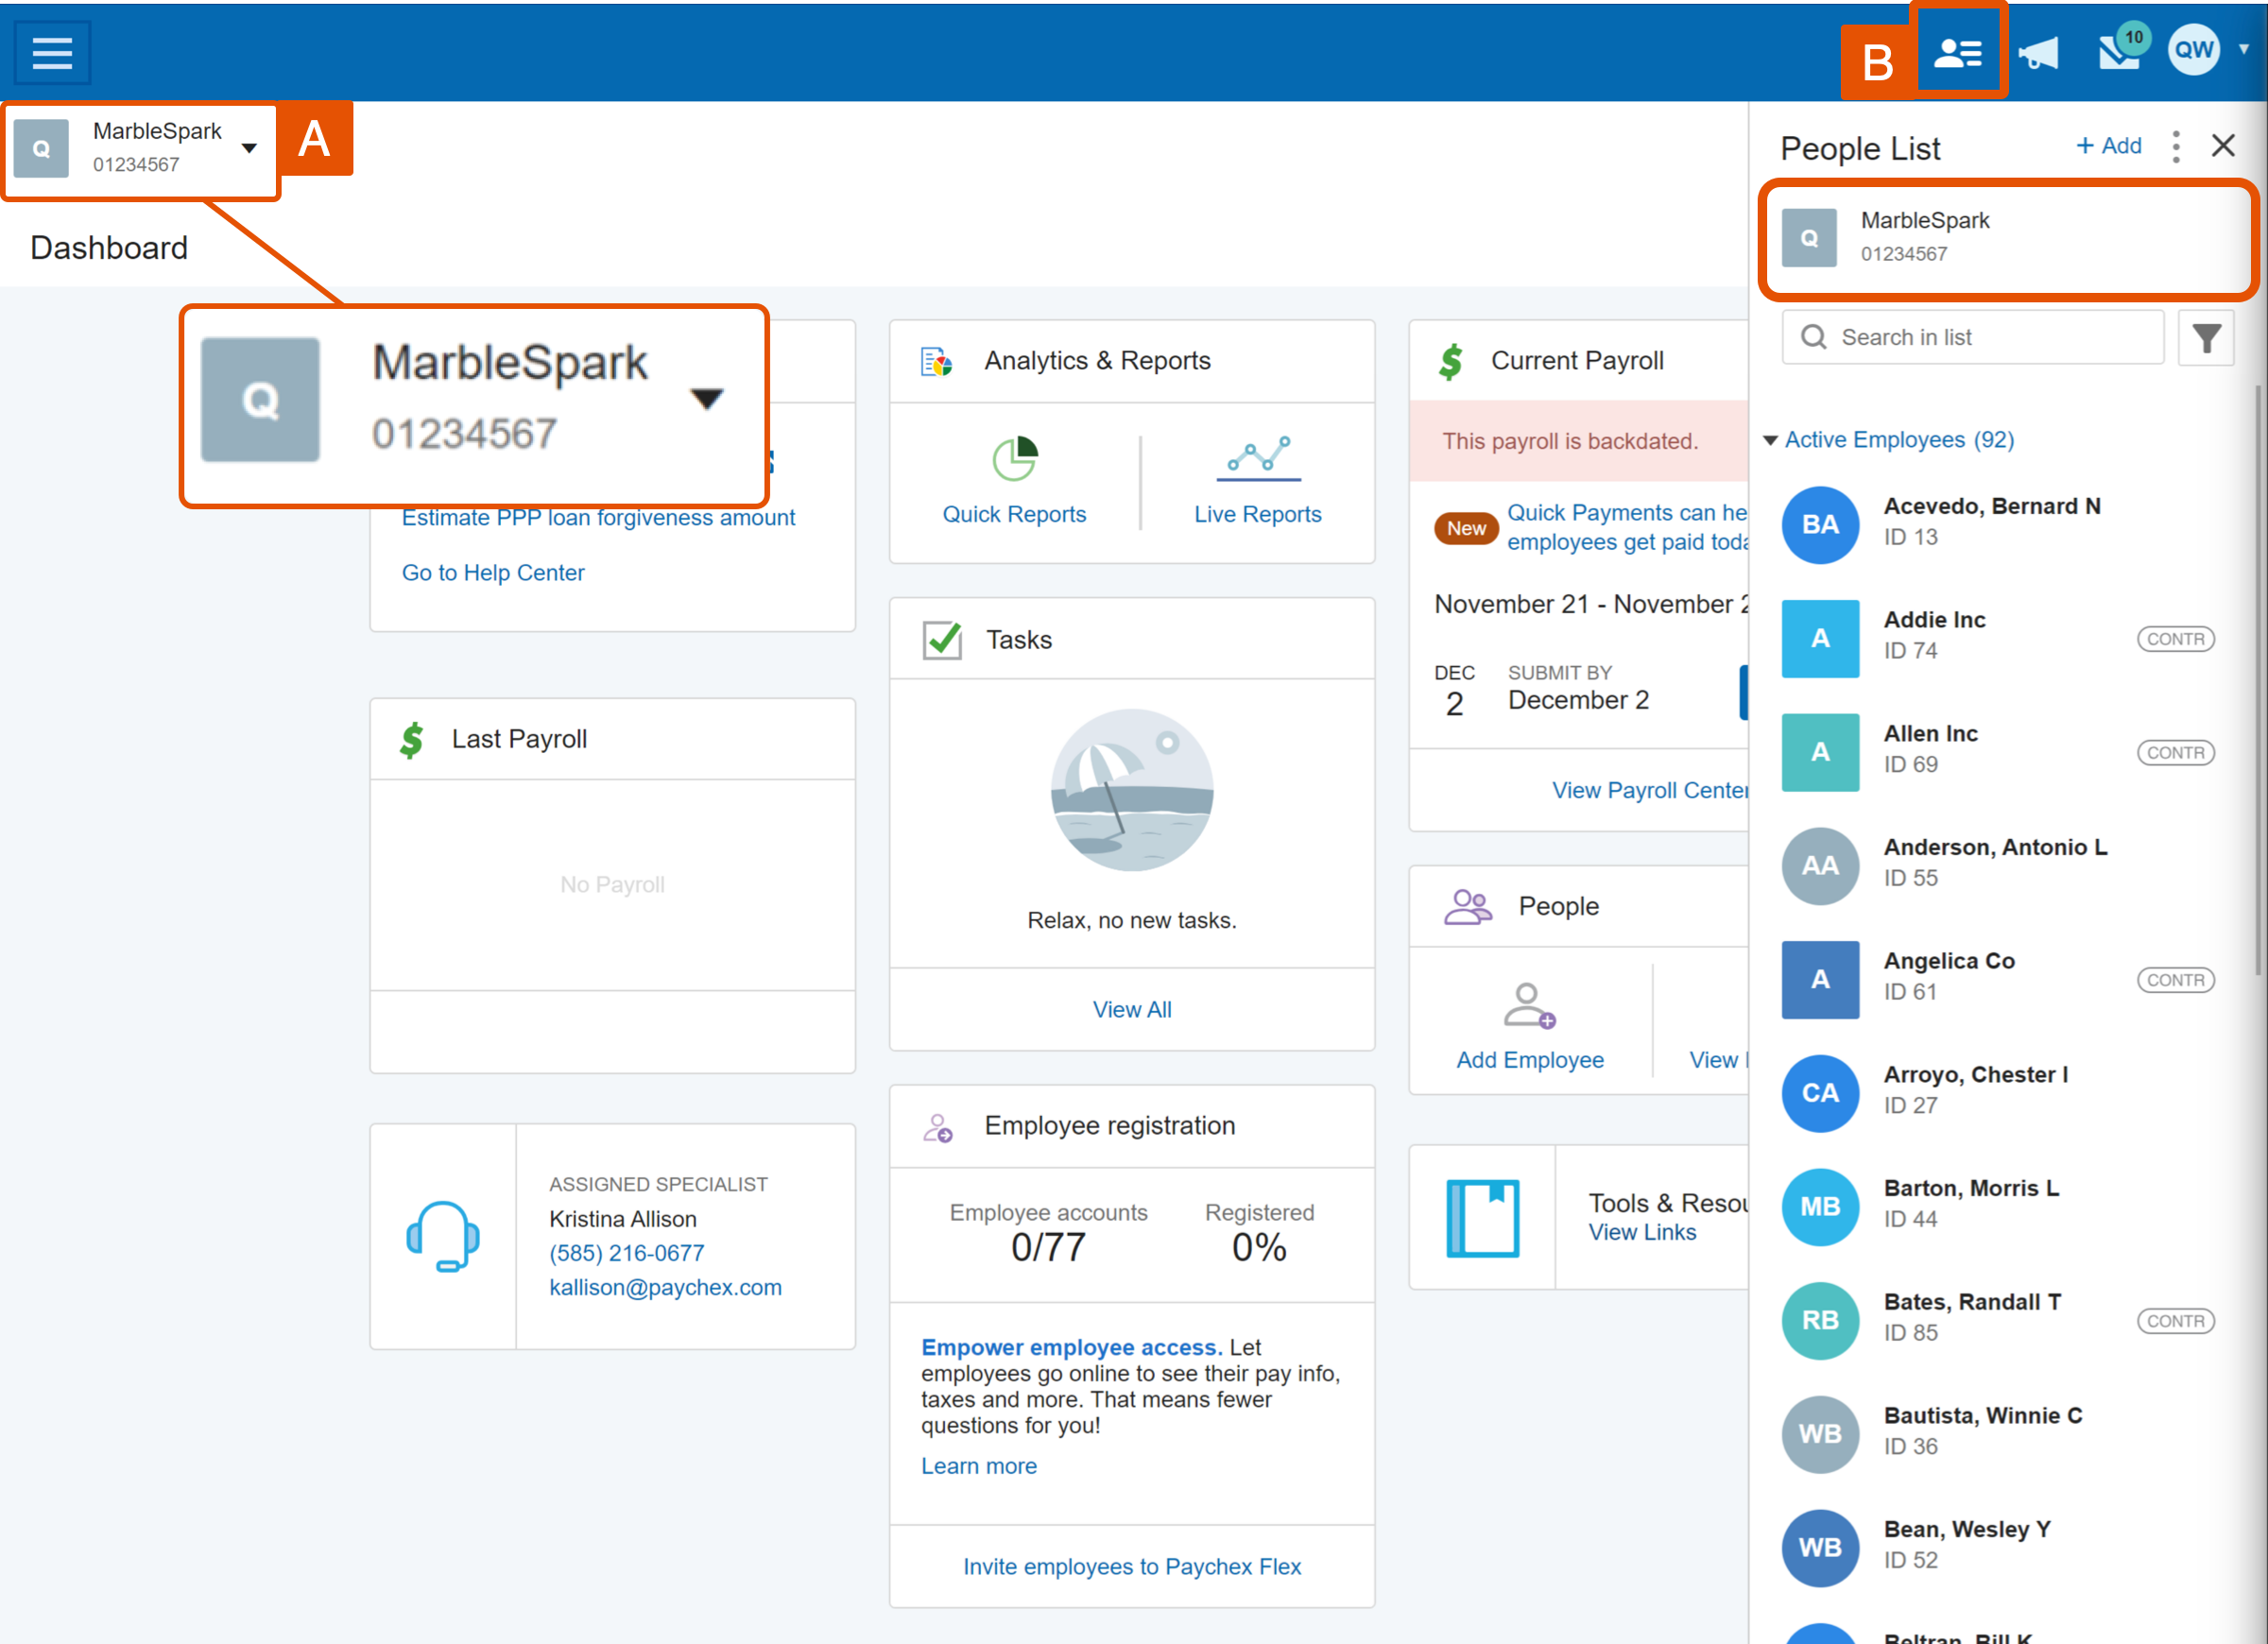
- From your Paychex dashboard, identify your company ID in one of two areas:
- Figure A: The 8-digit code can be found underneath your organization's name
- Figure B: Alternatively, Click the People List icon to expand a window with your organization's name and the 8-digit code
- Copy the 8-digit company ID
- Return to the Paychex Integration page in Quantum Workplace
Establish an HRIS Integration with Paychex
To connect your Paychex account and establish an HRIS integration with Quantum Workplace:
- Once you have identified your organization's 8-digit company ID, enter the code in the Paychex Company ID field
- Include leading zeros when entering the code for a total of 8 digits
- Click Start Setup
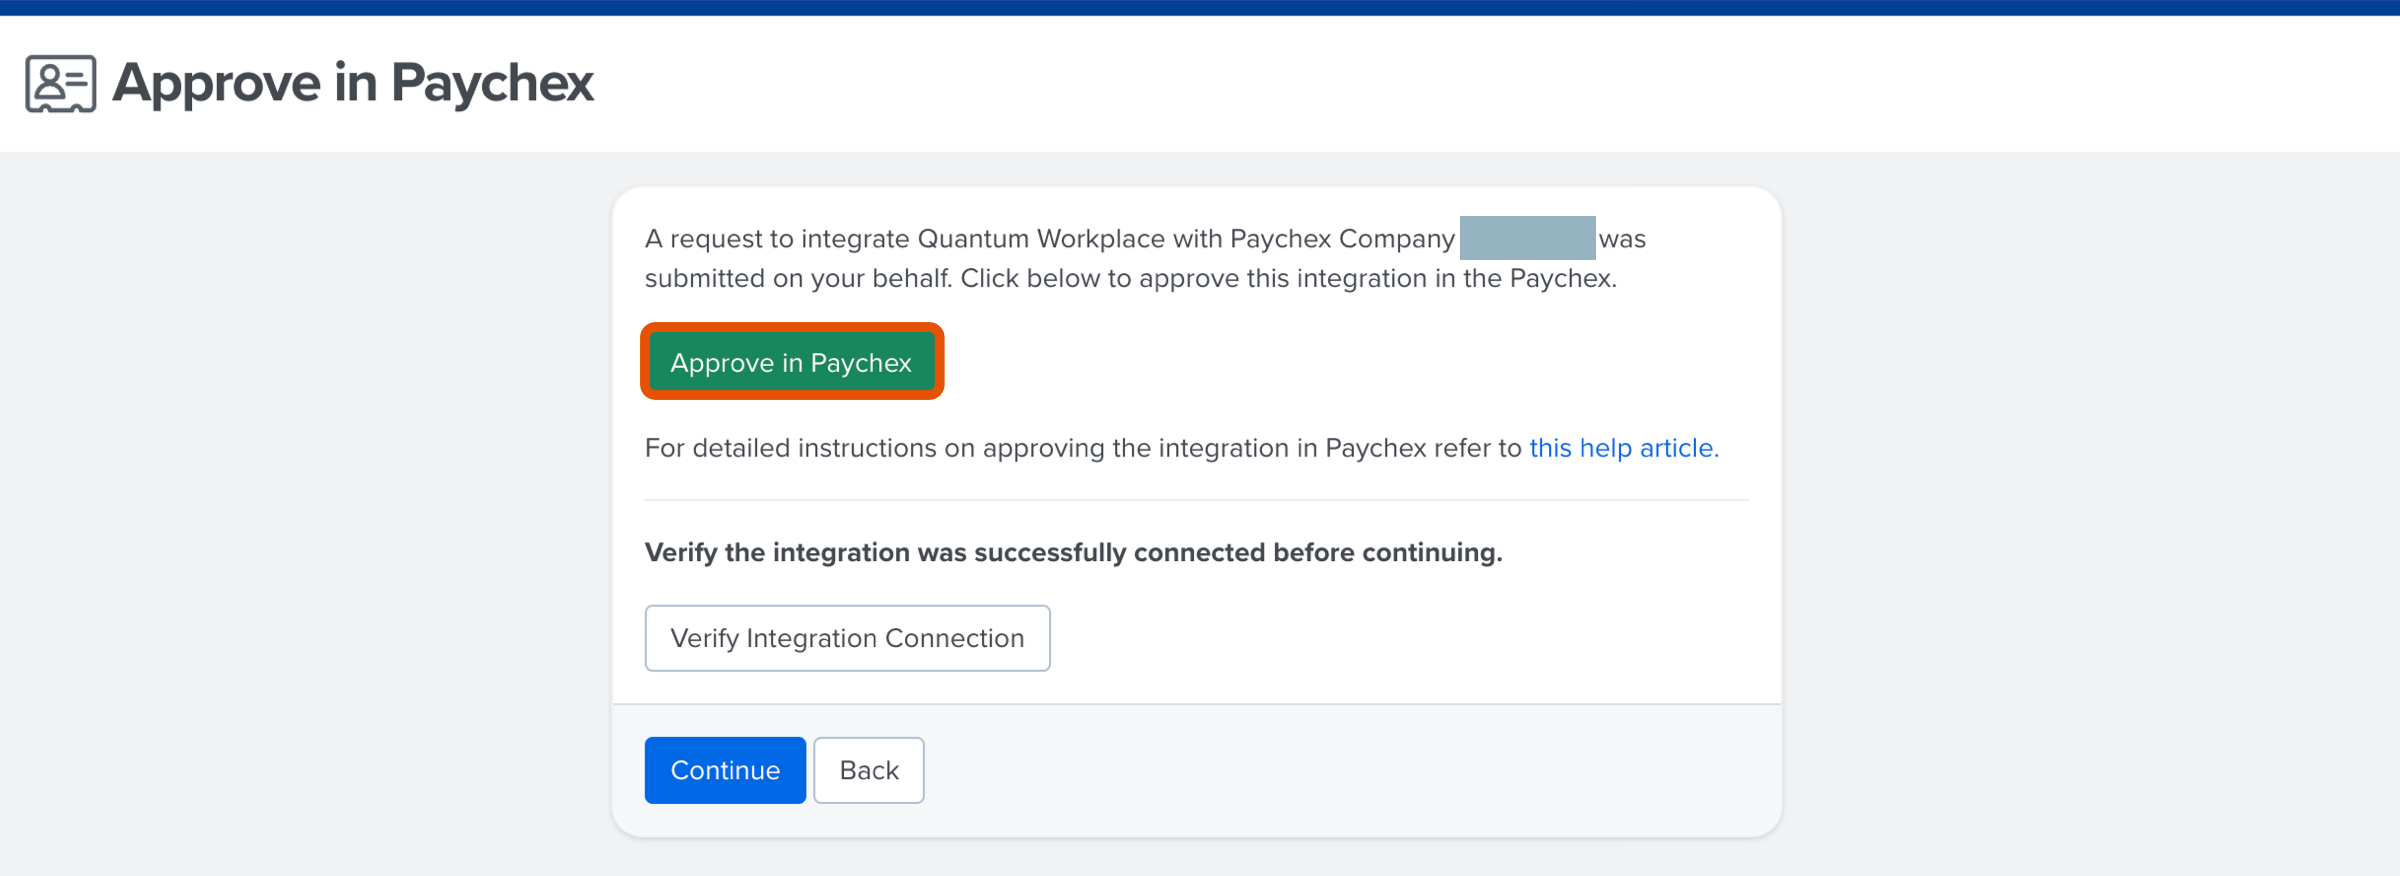
- Confirm the request is from your organization and that the company ID is correct, before clicking Approve in Paychex to navigate to Paychex in a new tab
- Agree to Paychex's Third-Party Terms of Use (Step 1) and click Approve (Step 2)
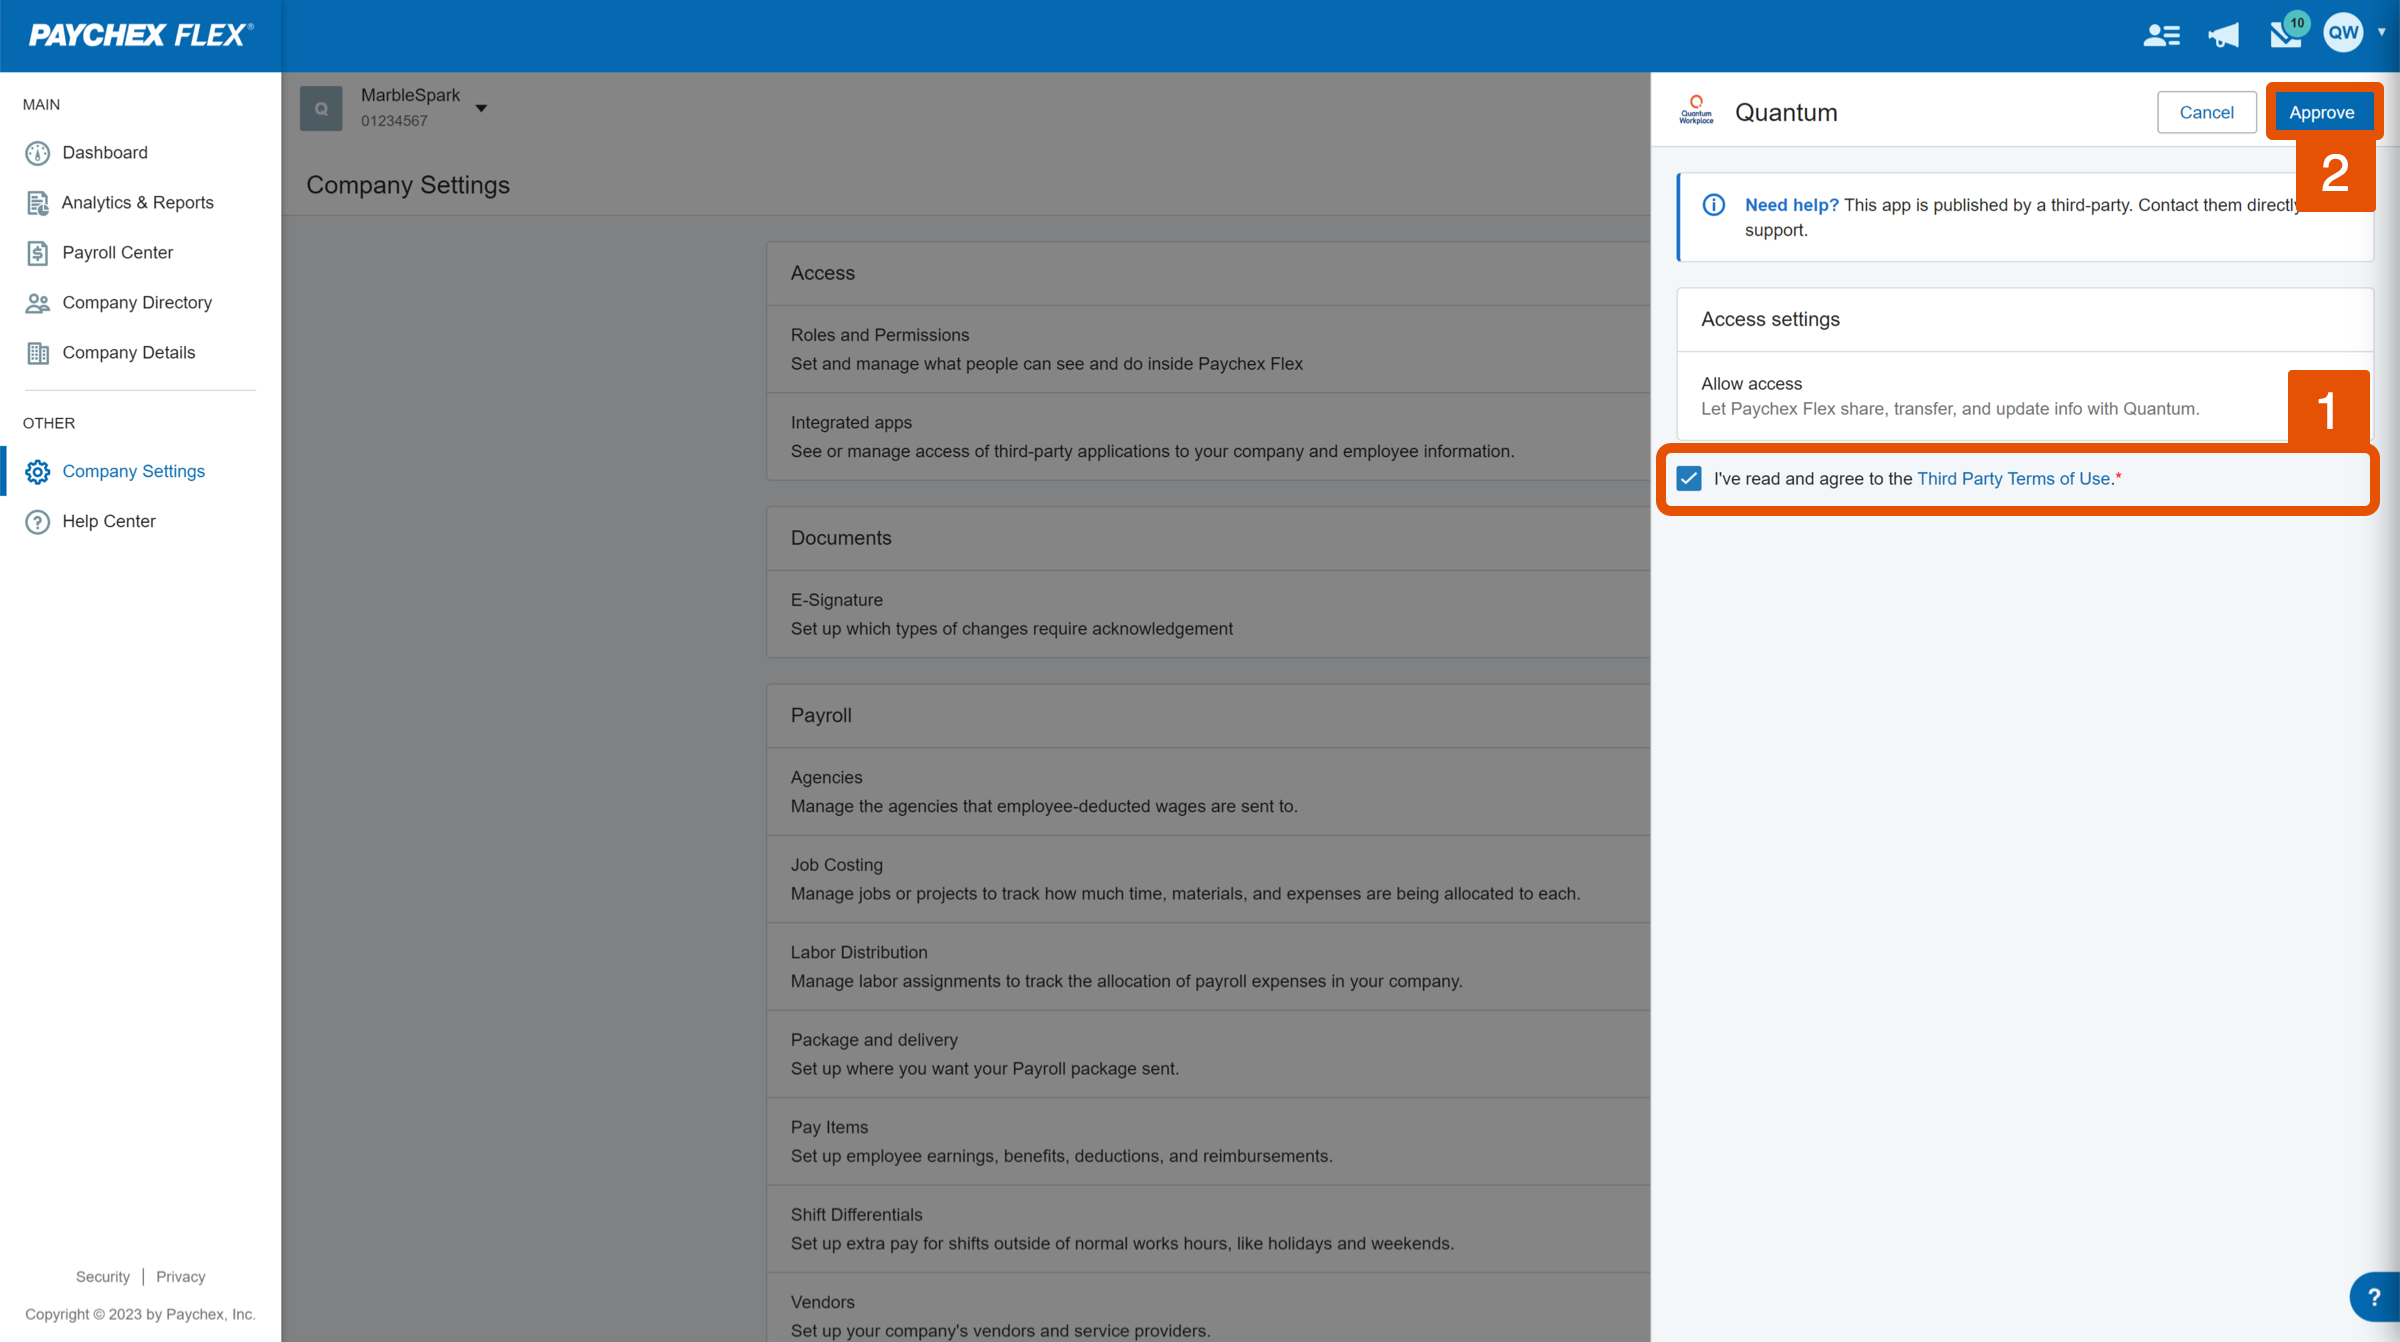
- If you are not automatically redirected to this view:
- From Paychex's dashboard, click Company Settings in the left-hand navigation menu > Integrated Apps under Access > [Your Org] under Available Apps
- If you are not automatically redirected to this view:
- Return to the Quantum Workplace tab and click Continue
- Verify that the fields for Paychex Company ID and Company Name are correct before clicking Complete Integration Setup
- Configure how demographics are mapped, learn more
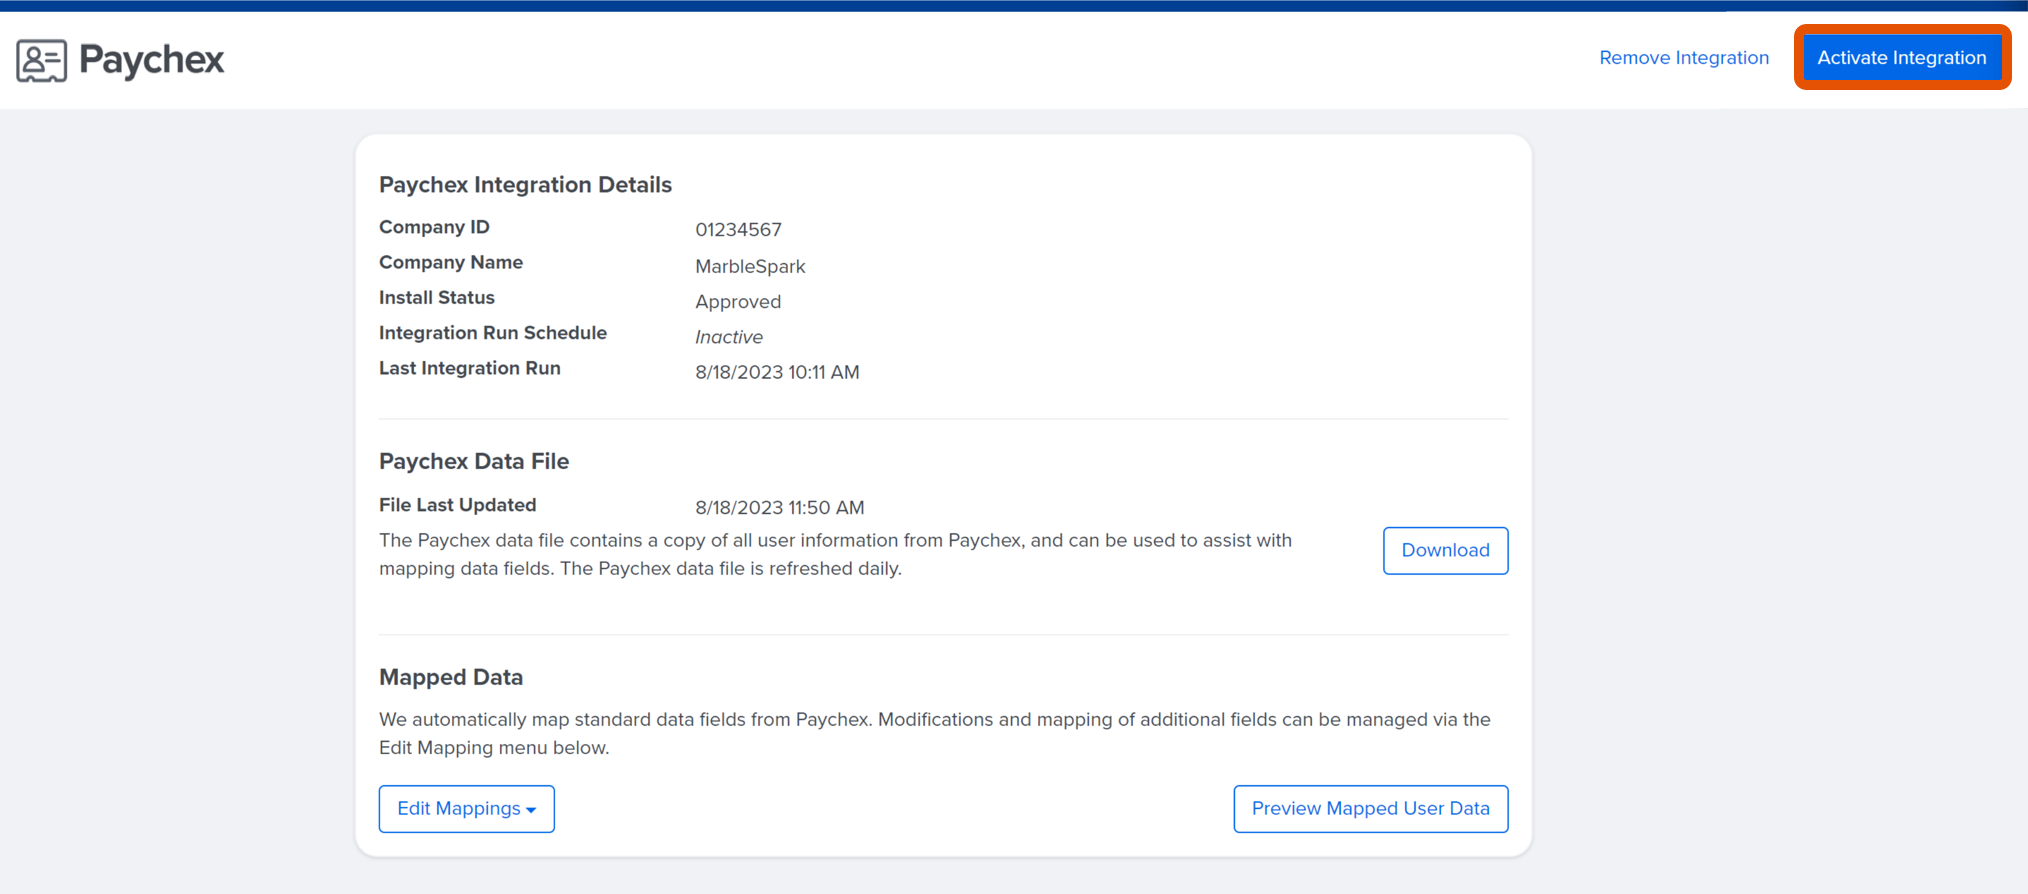
- Click Activate Integration
Manage Integration Mapping
The following steps will be categorized into different sections for easier navigation and legibility but should be completed in chronological order.
- Access the Paychex Integration
- Configure Mapping
- About Standard Mapping
- About Demographic Mapping
- About SMS Mapping
Once you have an active HRIS Integration with Paychex, you can manage the integration and configure the demographics being mapped.
From the Paychex Integration details page, you can:
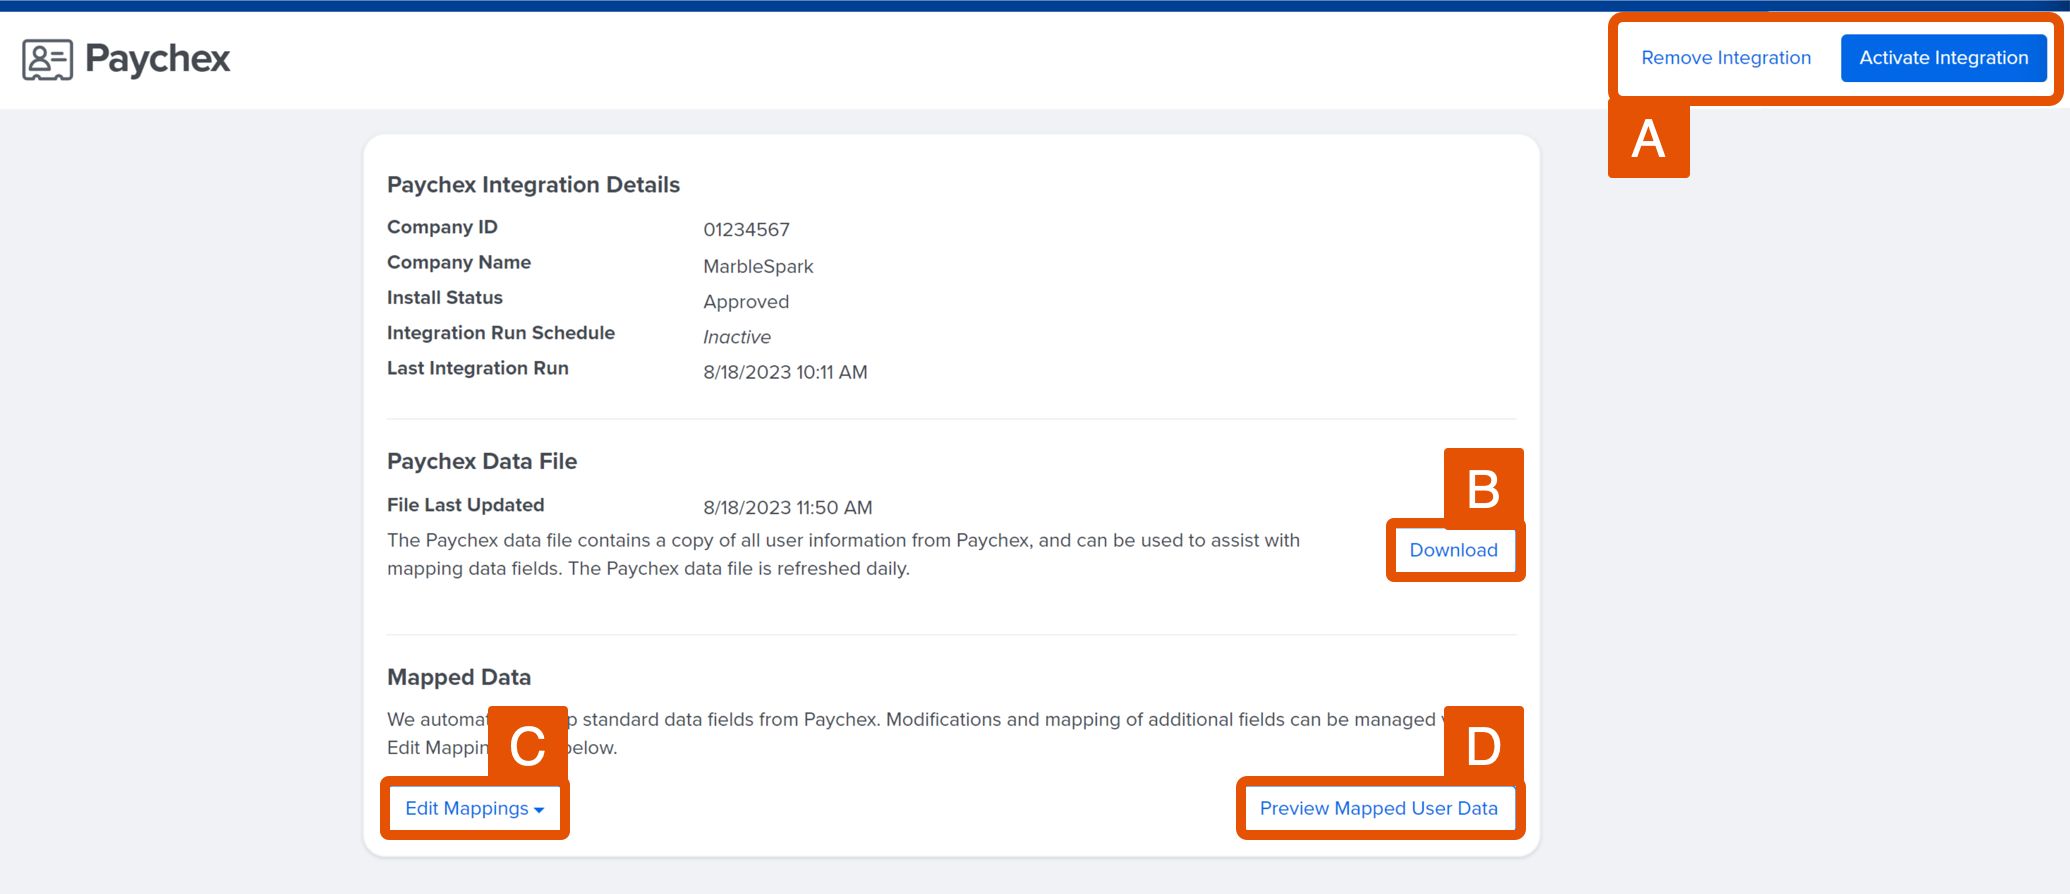
- A. Pause/Remove Integration: Pause or completely remove the Paychex integration
- B. Download Data File: Download a CSV file of the latest HRIS data file, this file is refreshed daily
- Contact your CIM/CSM if you need to refresh and access a data file
- C. Edit Mapping: Click and expand this field to configure the demographic fields being mapped
- D. Preview Mapped Data: Click to preview the mapped fields as they are configured
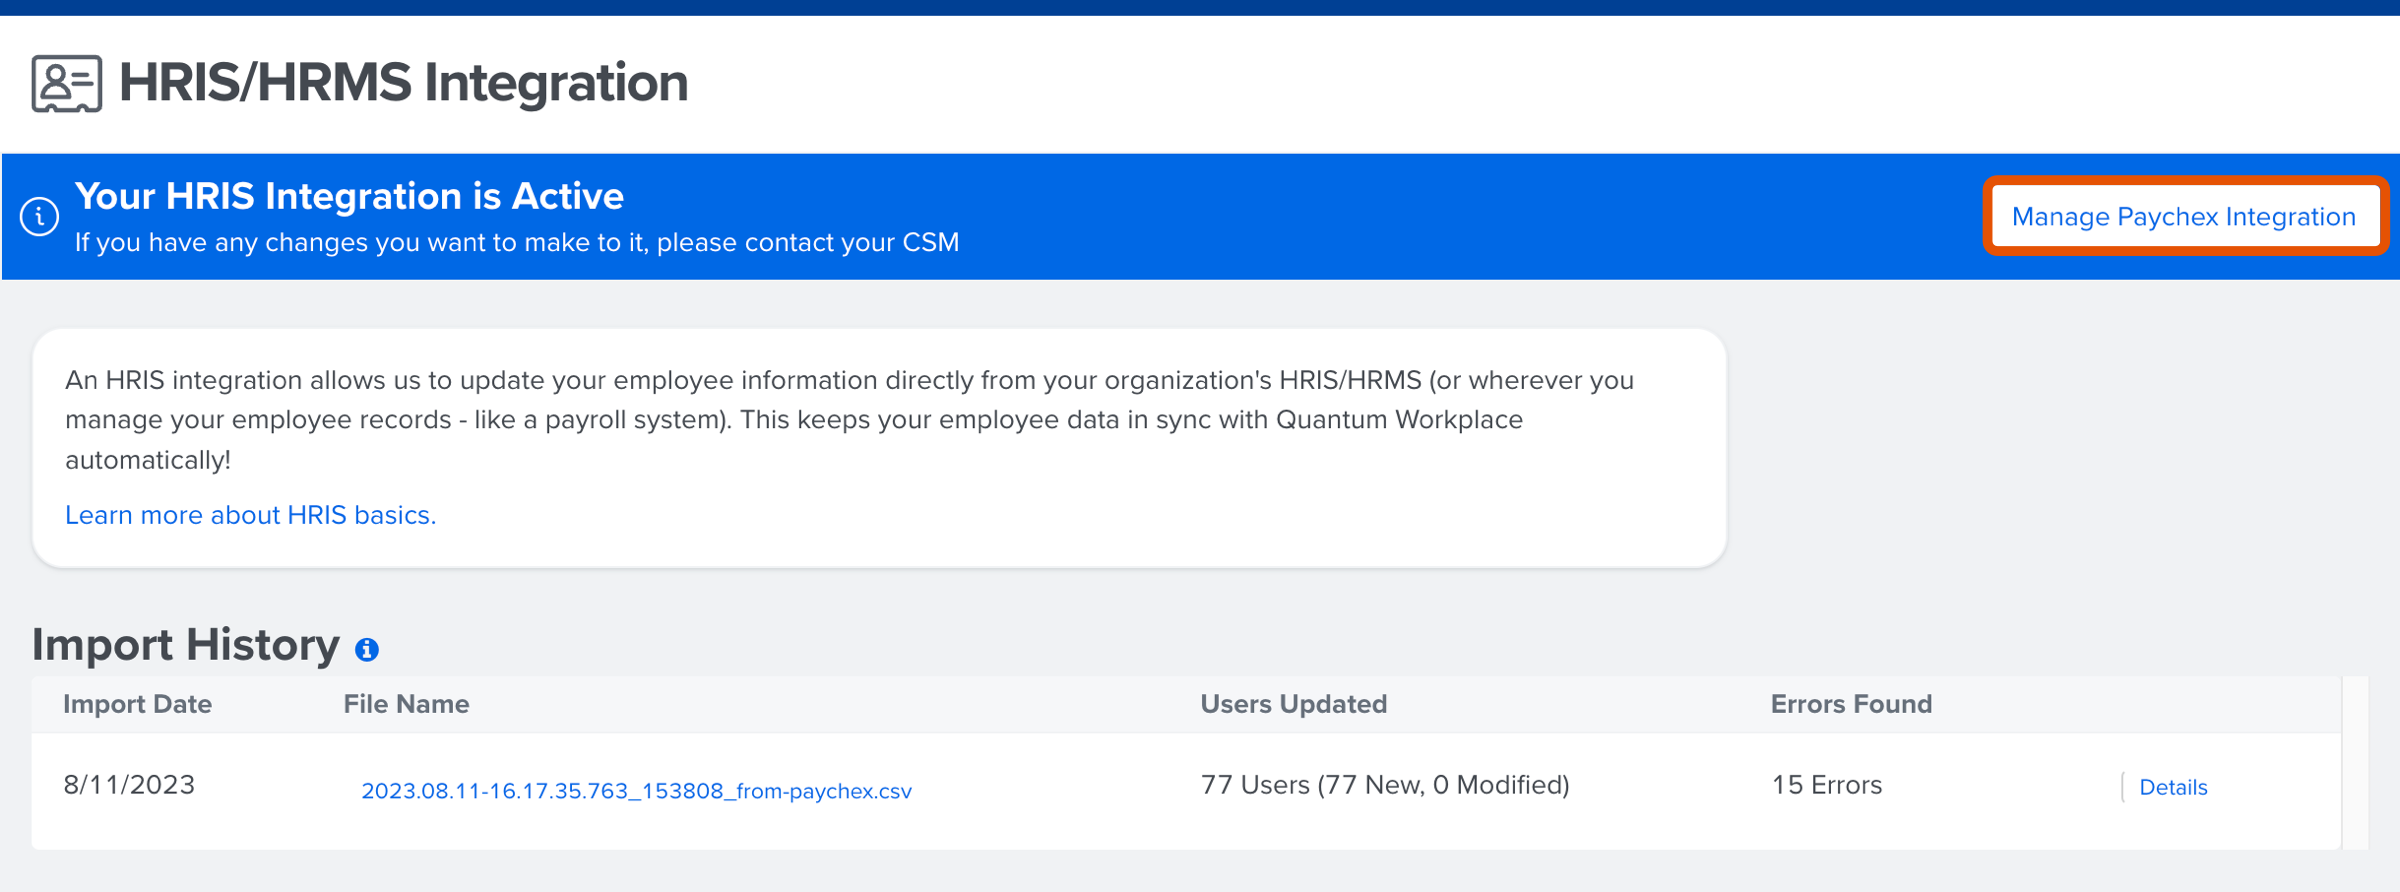
Access the Paychex Integration
To access and view the Paychex Integration details:
- Click and expand Global Settings in the left-hand navigation menu
- Click Integrations
- Click the HRIS/HRMS card
- Click Manage Paychex Integration
Configure Mapping
From the Paychex Integration details page within Quantum Workplace, configure the demographic mapping.
To configure Paychex's integration:
- From the Paychex Integration page, click and expand Edit Mappings
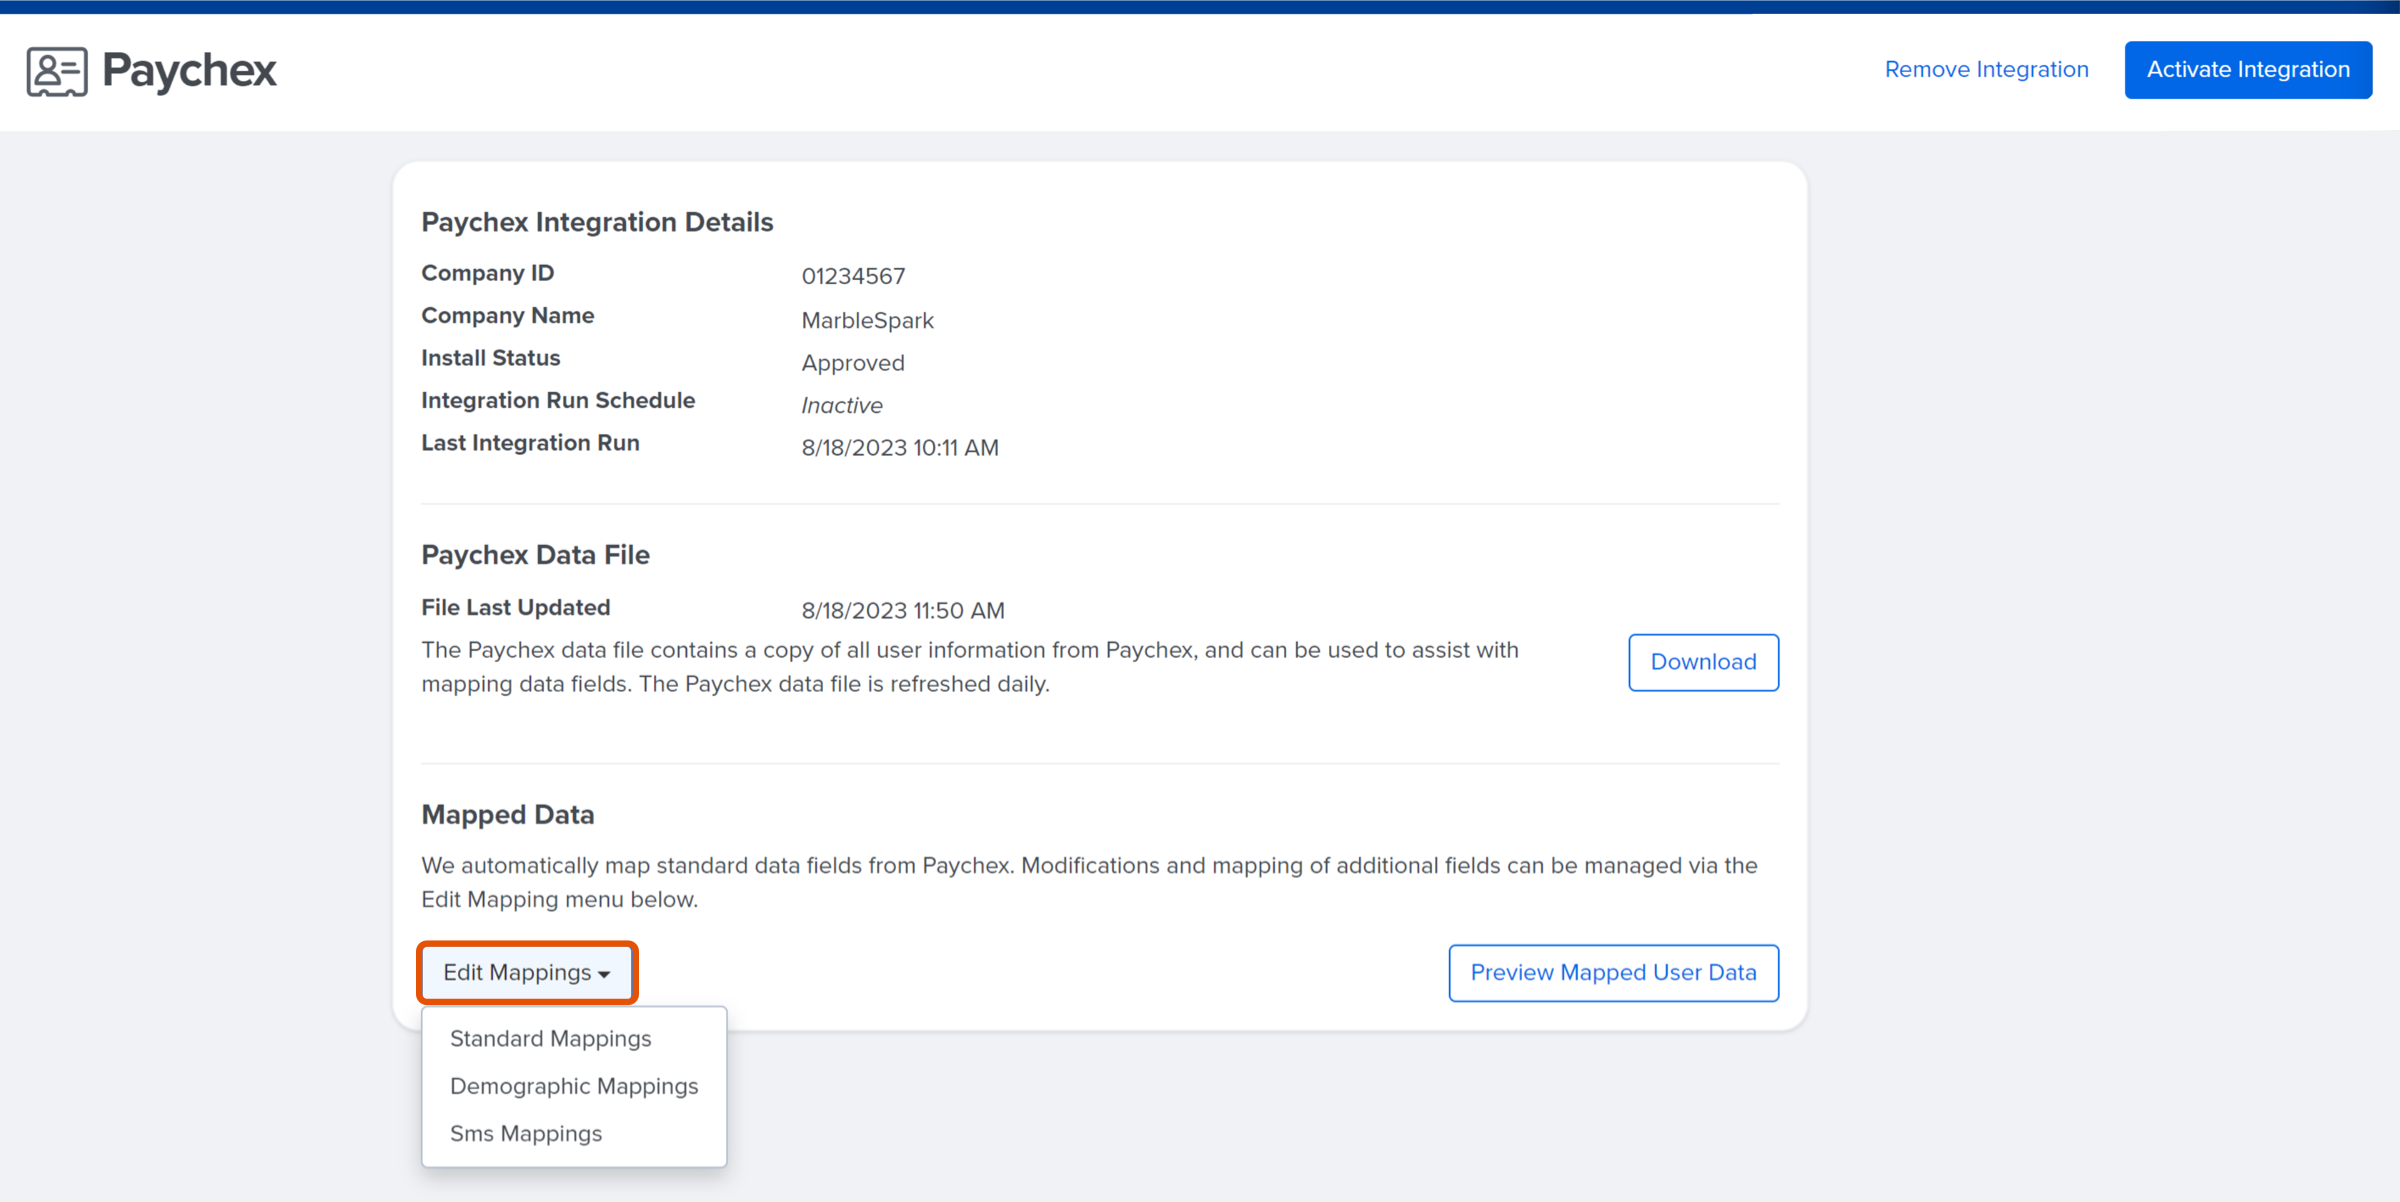
- Click the option to configure various demographics
- Standard Mappings: Configure automatically mapped standard demographics
- Demographic Mappings: Configure demographics created in Quantum Workplace and their Paychex demographic counterpart
- SMS Mappings: Configure demographics around SMS consent
- Click Preview Mapped User Data to view the demographic data as they are currently configured
About Standard Mapping
Standard demographics are required and the most common demographics.
When the integration is created, standard demographics are automatically created and mapped.
Learn more about Quantum Workplace's required demographics.
To update the mapped demographic:
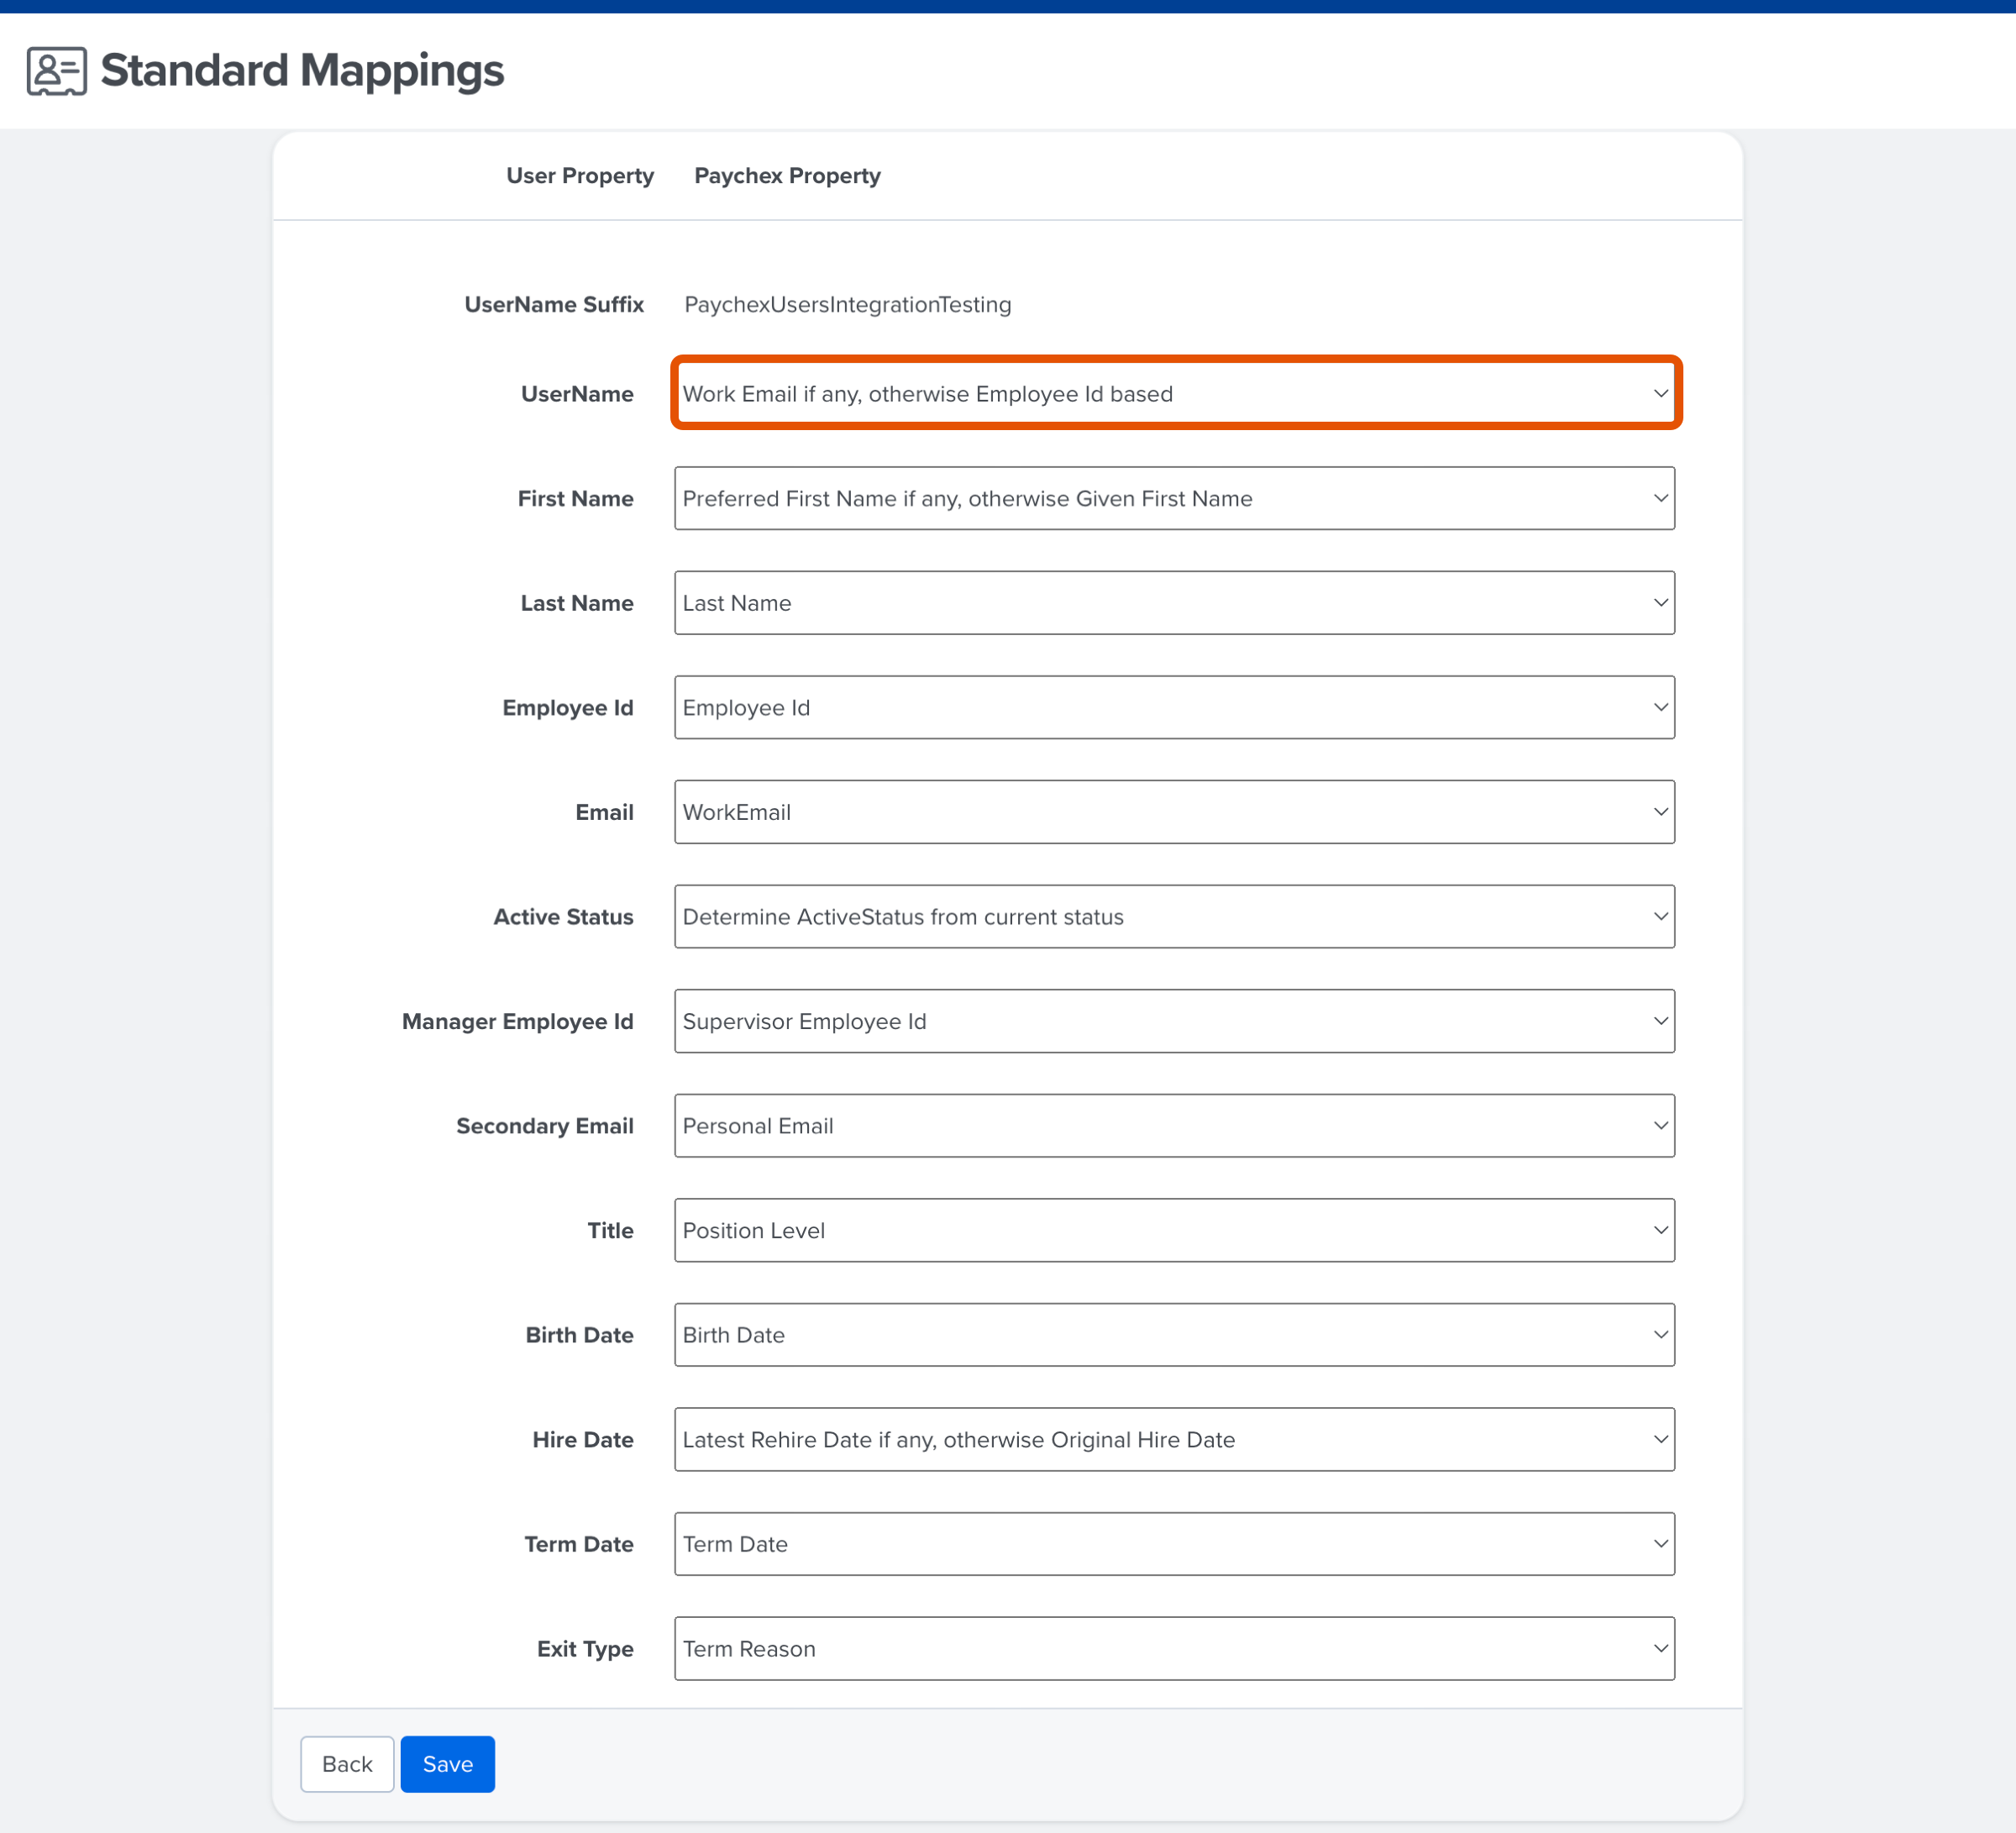
- Click and expand the standard demographic's corresponding field
- Click and update the mapped option
- Click Save
About Demographic Mapping
Demographics created within Quantum Workplace are listed and configurable from the Demographic Mapping page.
Learn more about demographics and relevant admin abilities.
To map demographics created in Quantum Workplace:
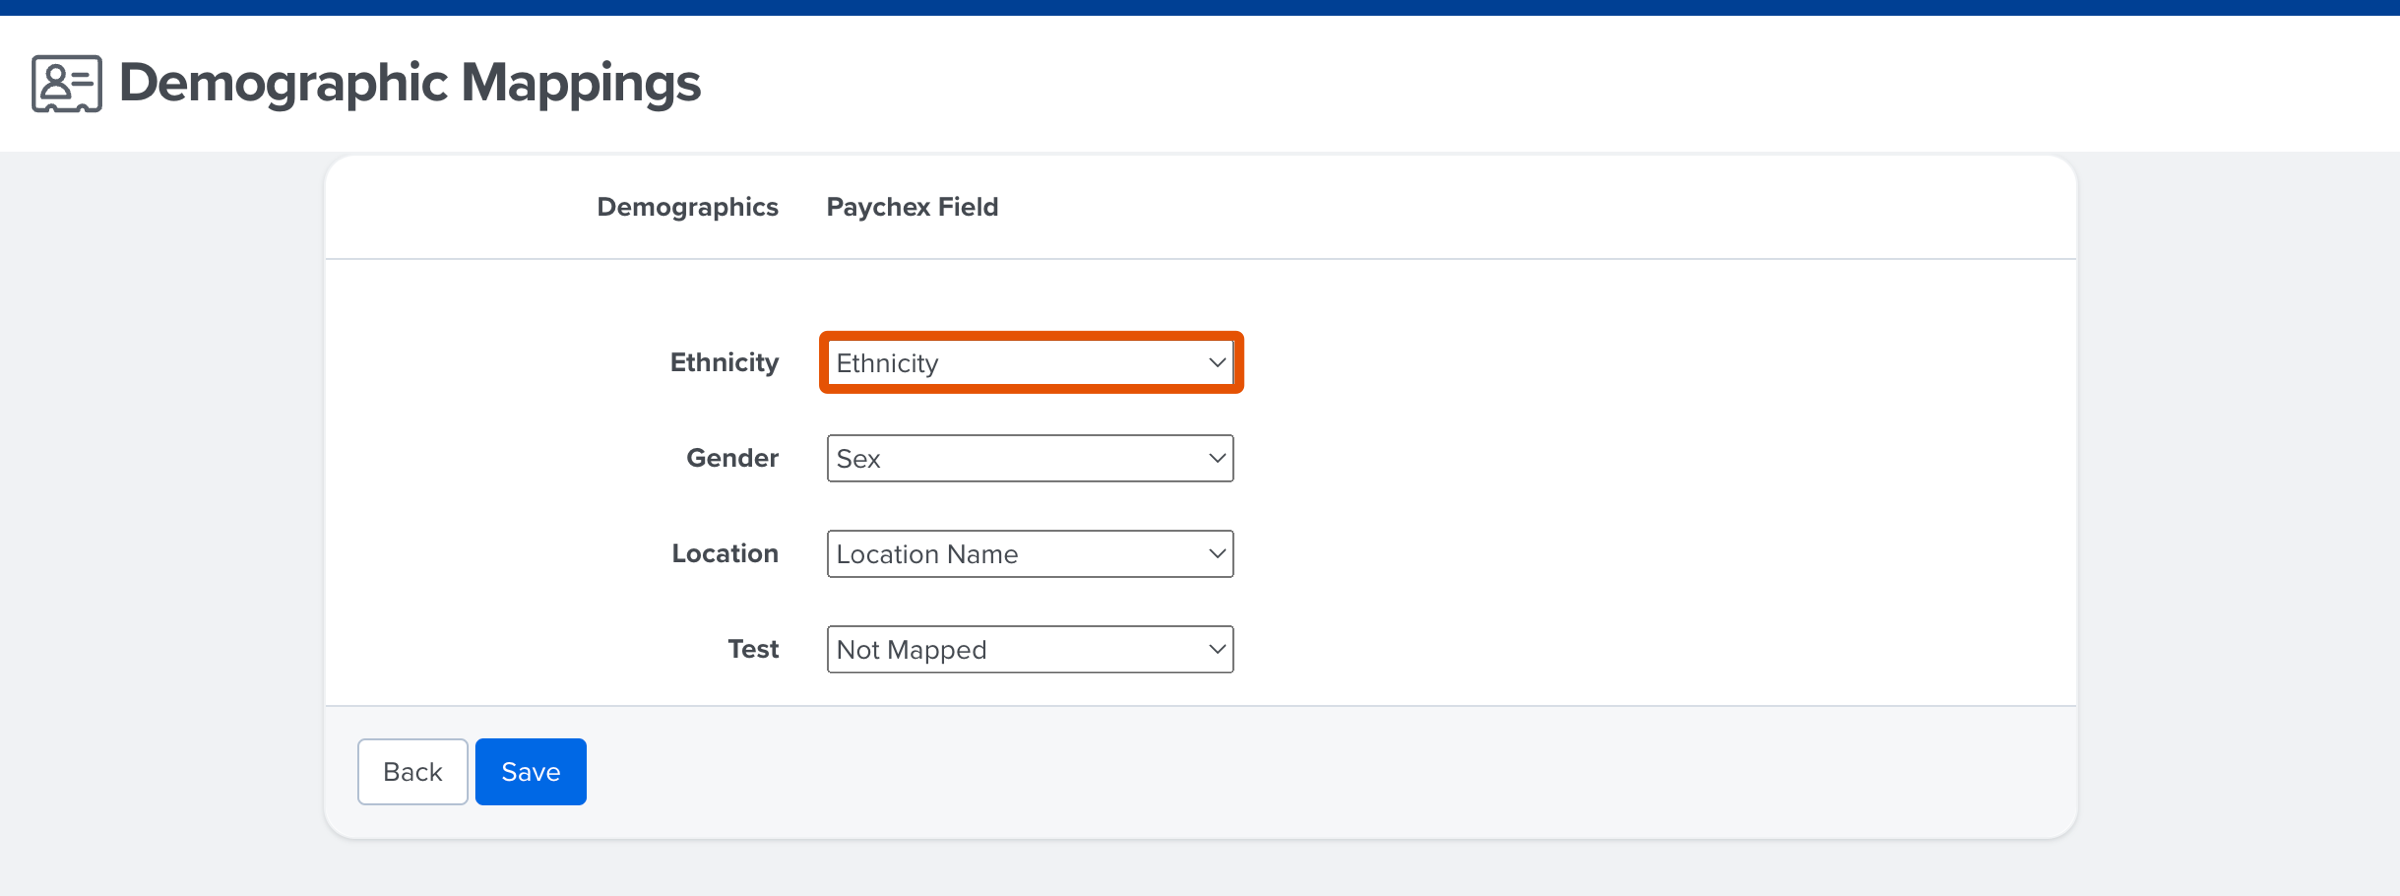
- Click and expand the demographic's corresponding field
- Click and update the mapped option
- Click Save
About SMS Mapping
Demographics are used by organizations to determine whether an employee grants or denies consent to receive SMS messages from their organization.
Learn more about SMS Messaging.
To configure SMS-related demographics:
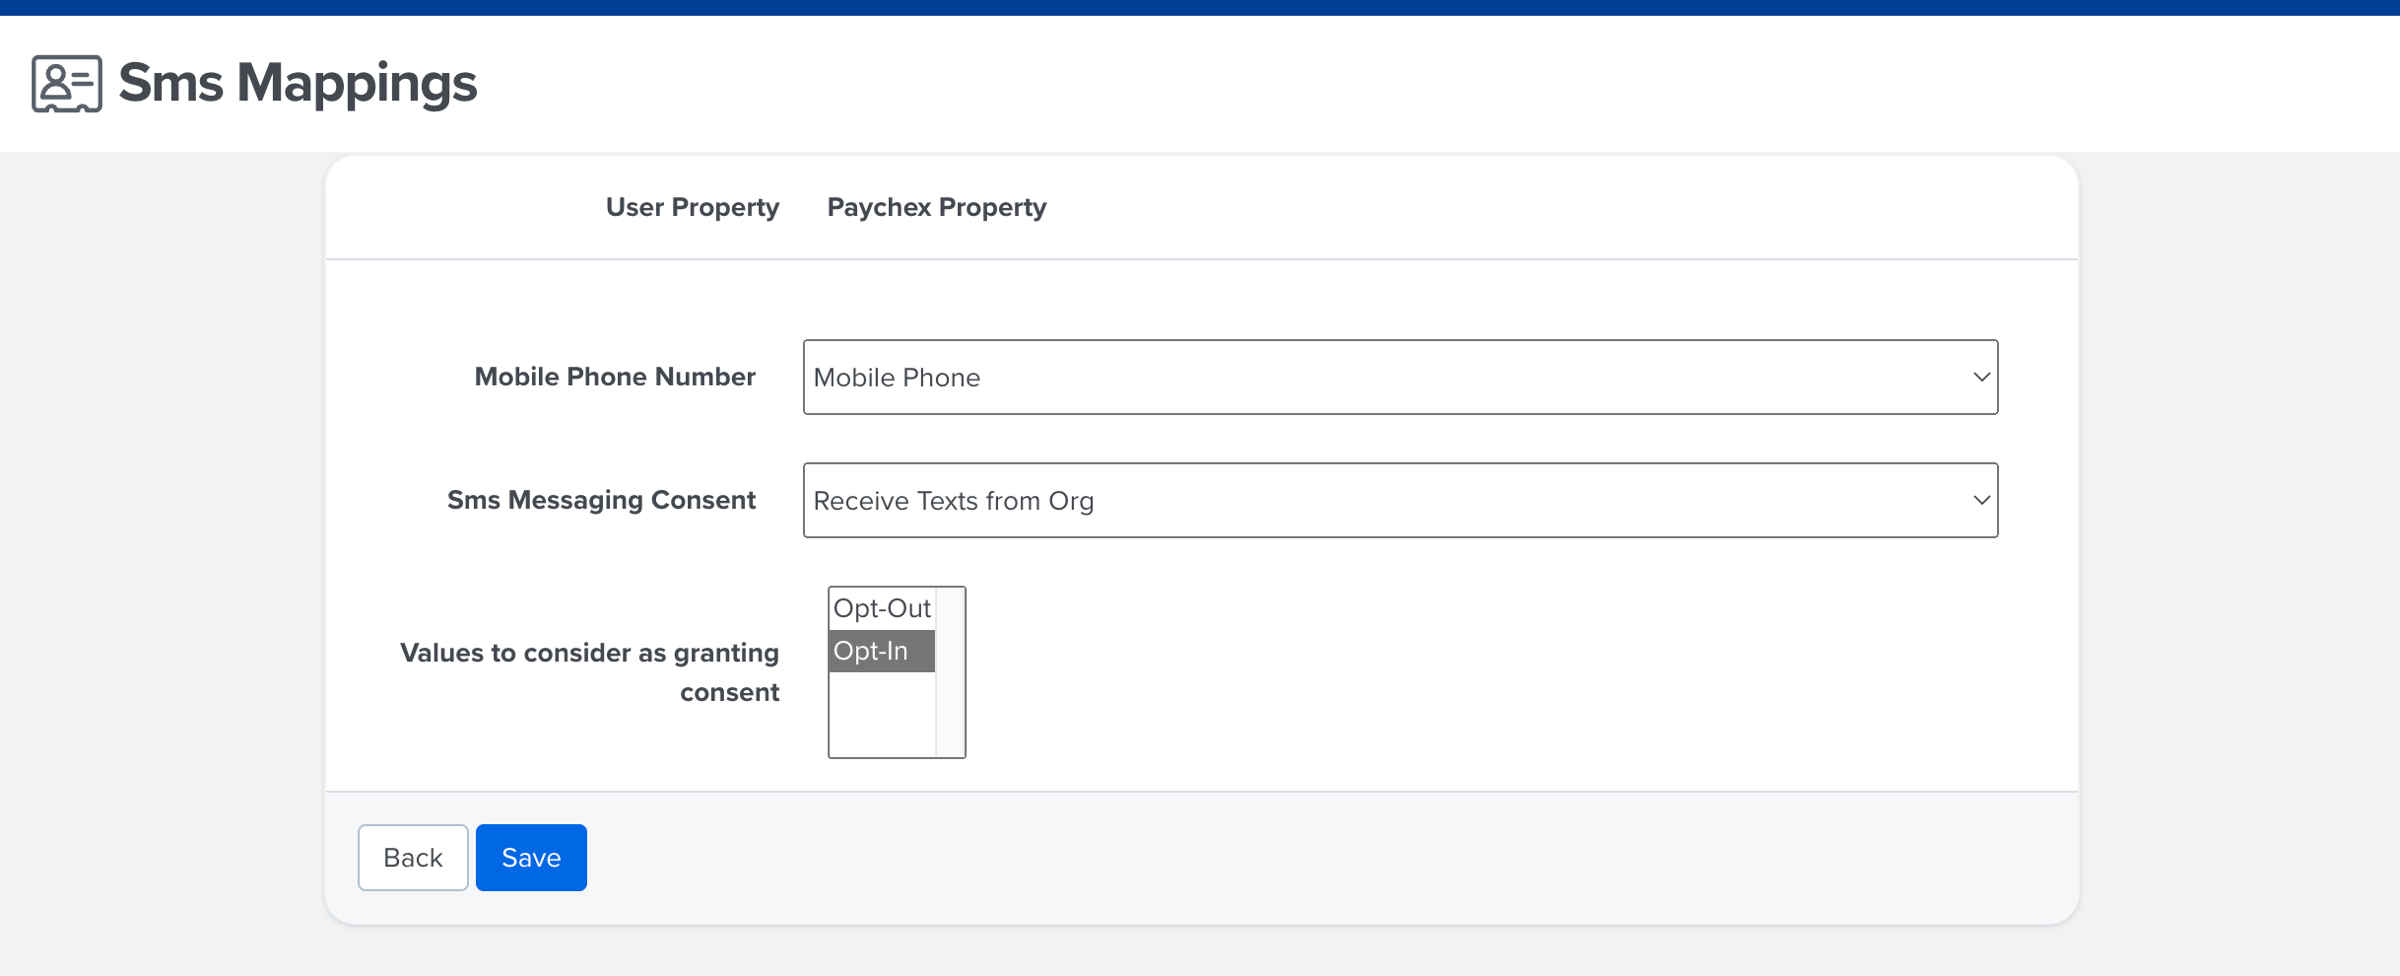
- Confirm that the Mobile Phone Number's corresponding field is mapped correctly
- For the SMS Messaging Consent field, select either
- Receive Texts from Org
- Receive Texts from Org (Alt)
- For the Values to Consider as Granting Consent field, if you selected:
- Receive Texts from Org: select Opt-In as the option considered consent
- Receive Texts from Org (Alt): no action is needed, this field is a True/False field
- Click Save