
In this article
About the Custom Survey Package
The Custom Survey package lets you tailor your Best Places to Work survey to fit your organization. It includes:
- Custom survey questions: add up to 10 of your own questions.
- Custom demographics: use your own department names, position titles, and locations.
- Spanish version (optional): offer your survey in English and Spanish.
- Pre-loaded employee demographics: add demographic details for your survey takers ahead of time.
- Employees outside the contest area: include up to 250 at no additional cost.
- Online reporting: view your results in our full reporting suite.
After you purchase the package, you will get an email from BPTWSales@QuantumWorkplace.com. The subject line is "Thank you for your Custom Survey purchase!" The email has a form where you tell us how you would like to customize your survey.
Note: Submit your form at least 2-3 business days before your preferred survey launch date. This gives our team time to build your survey.
How the Process Works
Customizing your survey takes six steps. Steps 1 through 5 are done by you. In step 6, our team takes over.
- Choose your survey language. Tell us if you need a Spanish version.
- Add custom survey questions. Add up to 10 of your own questions.
- Add custom demographics. Set up your department/function, position level, and location demographics.
- Review your survey. Check how your changes look.
- Review your registration and submit. Finalize your choices.
- Approve your test survey. We send you a test survey to review. After you approve it, we will email you instructions for sending the survey to your employees.
Step 1: Choose Your Survey Language
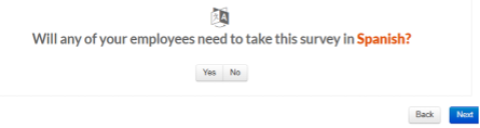
The first question asks: Do you need your survey to be available in Spanish?
- Select Yes if you want a Spanish version. Translation fields will appear as you customize your survey. You will need to enter the Spanish translations in those fields.
- Select No if you only need English. No translation fields will appear.
Step 2: Add Custom Survey Questions
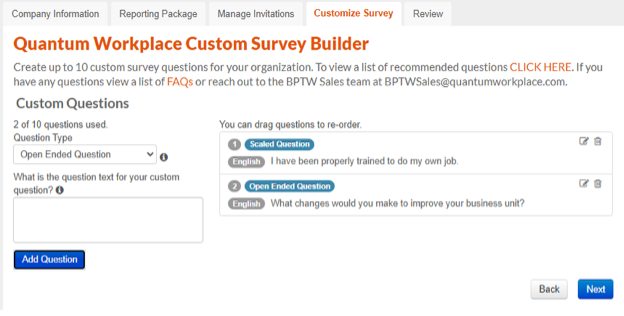
You can add up to 10 custom questions to your survey. These questions do not count toward your contest score. They can still give you useful insights when your reports are ready.
You have two options:
- Write your own question. Use either a six-point scale or an open-ended text box.
- Choose from our bank of recommended custom survey questions. Sample Custom Questions
To add a question:
- Choose the Type of question you are adding.
- Type your question in the text box.
- Click Add Question.
Your custom questions appear on the right side of the screen. To edit a question, click the paper & pencil icon. To remove it, click the trash can icon.
When you have added all your questions (up to 10), click Next.
Step 3: Add Custom Demographics
Demographics let you see how survey results differ between groups of employees, such as departments or job levels. Adding them is optional. You will see average results for every department or function with 5 or more people who completed the survey.
Your Custom Survey package lets you change these demographics:
|
Demographic |
What you can customize |
|
Department/Function |
Replace the standard options, such as Administration/Support or Customer Service/Customer Care, with your own department names. |
|
Position Level |
Use your own titles instead of the standard categories: manager, director, supervisor, or individual contributor/non-management. |
|
Location |
Add your locations. Label employees as In-Office, Hybrid, Remote, or Out-of-Contest so you can hear from each group. |
Important: Your custom demographics must match the demographics on your Invite Upload exactly. If a demographic is changed or shortened, the data will not import correctly into our reporting tool.
Send us your demographics
- Add the demographics you want to the Invite Upload
- Email the completed template to BPTWSales@QuantumWorkplace.com.
- Use the same names on your Invite Upload. On it, you choose which departments/functions and position levels to track. After your survey is built, we can pre-load this information for your survey takers.
Add demographics in the survey builder
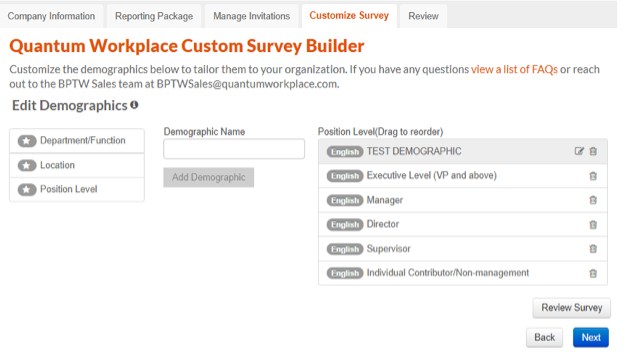
- Choose the demographic you want to customize. In our example, we selected Position Level.
- Type the name in the Demographic Name box. Make sure it matches your Invite Upload exactly.
- Click Add Demographic.
- To remove a demographic, click the trash can icon next to it on the right side of the screen.
- Repeat these steps for Department/Function and Location.
- When you are done, click Review Survey.
Step 4: Review Your Survey
After you click Review Survey, you will see a test version of your survey. Check these two things:
- Custom questions. They appear after Question 40.
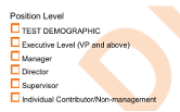
- Custom demographics. They appear within the demographic questions.
If you need to change anything, make your edits before moving on. When you are happy with your survey, click Next.
- Custom Questions Review Survey Example:

- Demographic Example From Review Survey:
Step 5: Review Registration and Submit
- Take a moment to review your registration. Make any changes you need.
- Click Finalize and Submit.
- Click Yes on the pop-up that appears.
Our Best Places to Work team is notified when your registration is complete.
What Happens Next?
- You will get a follow-up email from BPTWSales@QuantumWorkplace.com.
- Our team builds your custom survey and sends you a test survey to review.
- Once you approve the test survey, we email you instructions for sending the survey to your employees.
Need Help?
Email BPTWSales@QuantumWorkplace.com. Include your company name so we can help you faster.