In this article:
- Overview
- Requirements
- Access an Org Tree Export
- Manage Org Tree Assignments in Bulk
- Import an Org Tree File
Overview
As an admin or survey-admin, use the org tree export/import function in a survey's access settings to make bulk edits to org tree assignments.
Additional Resources:
- Survey Access Settings
- Organizational Tree
- Custom Org Trees
- Assign Users to an Action Plan
- Recording: Create a Custom Org Tree
Requirements
- Available to full admin and survey-admin users
Access an Org Tree Export
To update an org tree's assignments, access the org tree's current org tree assignments file.
To access the Org Tree export file:
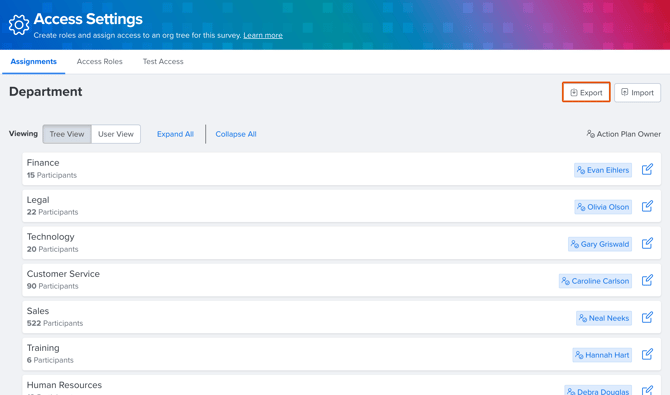
- Click and expand Surveys in the left-hand navigation menu
- Click Analytics
- Click on the survey to navigate to its analytics
- Click and expand Admin Controls in the top-right; click Access Settings
- From the Assignments tab, click View for the corresponding Manager or Custom Org Tree
- Click Export in the top-right to export the file to your device
- Open the exported file
Manage Org Trees Assignments In Bulk
When making bulk changes to an org tree file, the Branch ID, Username, Role, and Action Planning columns are the only required columns. The rest of the columns, Branch Name, email, etc. are referential only and do not impact any org tree changes.
Edits to the org tree file only add or remove users from branches; the org tree structure is unaffected.
Org tree branches, represented by the Branch ID column, must remain in the file, even if the corresponding Username and Role columns are empty.
Example org tree export:

Add a User to a Branch
To add a user to an org tree branch:
- Open the org tree export file
- Identify the row that contains the branch to add a user to
- If the user will be the only user assigned to the branch, continue to step 3
- If the user is one of multiple users assigned to the branch, duplicate the row to keep the Branch ID fields identical
- Update the duplicated row's Username, Role, and Action Planning column with the new user's information
- Admins are not assigned to Roles; leave the Role column empty when adding an admin to avoid an import error
- Each user must have their own row
- Save the file
- Import the updated file to finalize the org tree assignment changes
Remove a User from a Branch
To remove a user from an org tree branch:
- Open the org tree export file
- Identify the row that contains the user to be removed
- If the user is the only user assigned to the branch, delete the Username, Role, and Action Planning fields for the user; leave the Branch ID intact
- If the user is one of multiple users assigned to the branch, delete the entire row for the user
- Save the file
- Import the updated file to finalize the org tree assignment changes
Import an Org Tree File
Once an org tree file has been updated, import the updated file to finalize the org tree assignment edits.
To import an org tree file:

- Click and expand Surveys in the left-hand navigation menu
- Click Analytics
- Click on the survey to navigate to its analytics
- Click and expand Admin Controls in the top-right; click Access Settings
- From the Assignments tab, click View for the corresponding Manager or Custom Org Tree
- Click Import in the top-right to export the file to your device
- Click the upload window or drag-and-drop the org tree file into the window
- Click Import
- Once the upload is complete, confirm the updated information and click Save Changes